William Stanek - Windows Server 2012 R2 Storage, Security, & Networking Pocket Consultant
Здесь есть возможность читать онлайн «William Stanek - Windows Server 2012 R2 Storage, Security, & Networking Pocket Consultant» весь текст электронной книги совершенно бесплатно (целиком полную версию без сокращений). В некоторых случаях можно слушать аудио, скачать через торрент в формате fb2 и присутствует краткое содержание. Жанр: ОС и Сети, на английском языке. Описание произведения, (предисловие) а так же отзывы посетителей доступны на портале библиотеки ЛибКат.
- Название:Windows Server 2012 R2 Storage, Security, & Networking Pocket Consultant
- Автор:
- Жанр:
- Год:неизвестен
- ISBN:нет данных
- Рейтинг книги:3 / 5. Голосов: 1
-
Избранное:Добавить в избранное
- Отзывы:
-
Ваша оценка:
Windows Server 2012 R2 Storage, Security, & Networking Pocket Consultant: краткое содержание, описание и аннотация
Предлагаем к чтению аннотацию, описание, краткое содержание или предисловие (зависит от того, что написал сам автор книги «Windows Server 2012 R2 Storage, Security, & Networking Pocket Consultant»). Если вы не нашли необходимую информацию о книге — напишите в комментариях, мы постараемся отыскать её.
Windows Server 2012 R2 Storage, Security, & Networking Pocket Consultant — читать онлайн бесплатно полную книгу (весь текст) целиком
Ниже представлен текст книги, разбитый по страницам. Система сохранения места последней прочитанной страницы, позволяет с удобством читать онлайн бесплатно книгу «Windows Server 2012 R2 Storage, Security, & Networking Pocket Consultant», без необходимости каждый раз заново искать на чём Вы остановились. Поставьте закладку, и сможете в любой момент перейти на страницу, на которой закончили чтение.
Интервал:
Закладка:
1.In the Security Templates snap-in, select the Registry node or the File System node, depending on which type of file path with which you want work. In the right pane, all currently secured paths are listed.
2.Double-tap or double-click a registry or file path to view its current settings, as shown in Figure 5–6.
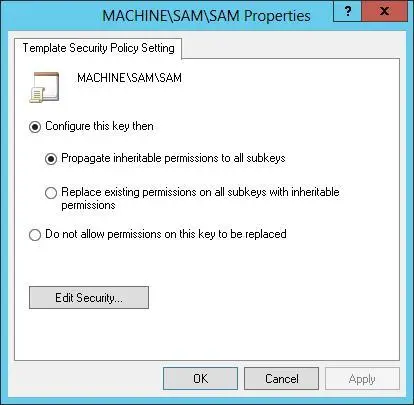
FIGURE 5–6Change template settings for paths and keys.
3.To ensure that permissions on the path or key are not replaced, select Do Not Allow Permissions On This Key To Be Replaced, and then tap or click OK. Skip the remaining steps in this procedure.
4.To configure the path or key and replace permissions, select Configure This Key Then, and then choose one of the following options:
■ Propagate Inheritable Permissions To All SubkeysChoose this option to apply all inheritable permissions to this registry or file path and to all registry and file paths below this path. Existing permissions are replaced only if they conflict with a security permission set for this path.
■ Replace Existing Permissions On All Subkeys With Inheritable PermissionsChoose this option to replace all existing permissions on this registry or file path and on all registry and file paths below this path. Any existing permissions are removed, and only the current permissions remain.
5.Tap or click Edit Security. In the Security For dialog box, configure security permissions for users and groups. You have the same options for permissions, auditing, and ownership as you do for files and folders used with NTFS. See Chapter 3, “Data sharing and redundancy” for details on permissions, auditing, and ownership.
6.Tap or click OK twice to save the settings.
You can define security settings for registry paths by following these steps:
1.In the Security Templates snap-in, select and then press and hold or right-click the Registry node, and then tap or click Add Key to display the Select Registry Key dialog box, shown in Figure 5–7.
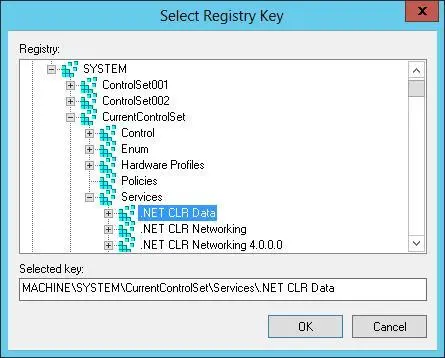
FIGURE 5–7Select the registry path or value to secure.
2.In the Select Registry Key dialog box, select the registry path or value with which you want to work, and then tap or click OK. Entries under CLASSES_ ROOT are for HKEY_CLASSES_ROOT. Entries under MACHINE are for HKEY_ LOCAL_MACHINE. Entries under USERS are for HKEY_USERS.
3.In the Security For dialog box, configure security permissions for users and groups. You have the same options for permissions, auditing, and ownership as you do for files and folders used with NTFS. See Chapter 3 for details on permissions, auditing, and ownership.
4.Tap or click OK. The Add Object dialog box is displayed. To ensure that permissions on the path or key are not replaced, select Do Not Allow Permissions On This Key To Be Replaced, and then tap or click OK. Skip the remaining steps in this procedure.
5.To configure the path or key and replace permissions, select Configure This Key Then, and then do one of the following:
■Choose Propagate Inheritable Permissions To All Subkeys to apply all inheritable permissions to this registry path and all registry paths below this path. Existing permissions are replaced only if they conflict with a security permission set for this path.
■Choose Replace Existing Permissions On All Subkeys With Inheritable Permissions to replace all existing permissions on this registry path and on all registry paths below this path. Any existing permissions are removed, and only the current permissions remain.
6.Tap or click OK.
You can define security settings for file paths by following these steps:
1.In the Security Templates snap-in, select and then press and hold or right-click the File System node, and then tap or click Add File to display the Add A File Or Folder dialog box, shown in Figure 5–8.
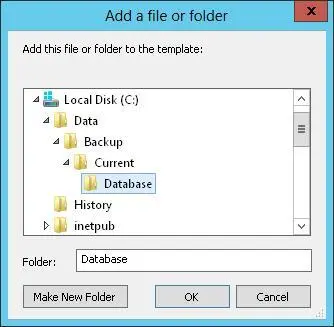
FIGURE 5–8Select the file or folder path to secure.
2.In the Add A File Or Folder dialog box, select the file or folder path or value with which you want to work, and then tap or click OK.
3.In the Database Security For dialog box, configure security permissions for users and groups. You have the same options for permissions, auditing, and ownership as you do for files and folders used with NTFS. See Chapter 12 for details on permissions, auditing, and ownership.
4.Tap or click OK. The Add Object dialog box is displayed. To ensure that permissions on the path are not replaced, select Do Not Allow Permissions On This File Or Folder To Be Replaced, and then tap or click OK. Skip the remaining steps in this procedure.
5.To configure the path and replace permissions, select Configure This Path Then, and then do one of the following:
■Choose Propagate Inheritable Permissions To All Subfolders to apply all inheritable permissions to this file path and all file paths below this path. Existing permissions are replaced only if they conflict with a security permission set for this path.
■Choose Replace Existing Permissions On All Subfolders With Inheritable Permissions to replace all existing permissions on this file path and on all file paths below this path. Any existing permissions are removed, and only the current permissions remain.
6.Tap or click OK.
Analyzing, reviewing, and applying security templates
As stated previously, you use the Security Configuration And Analysis snap-in to apply templates and to compare the settings in a template to the current settings on a computer. Applying a template ensures that a computer conforms to a specific security configuration. Comparing settings can help you identify any discrepancies between what is implemented currently and what is defined in a security template. This can also be useful to determine whether security settings have changed over time.
REAL WORLD The key drawback to using the Security Configuration And Analysis snap-in is that you cannot configure multiple computers at once. You can configure security only on the computer on which you are running the snap-in. If you want to use this tool to deploy security configurations, you must log on to and run the tool on each computer. Although this technique works for standalone computers, it is not the optimal approach in a domain. In a domain setting, you’ll want to import the security template settings into a Group Policy object (GPO), and then deploy the security configuration to multiple computers. For more information, see “Deploying security templates to multiple computers” later in this chapter.
The Security Configuration And Analysis snap-in uses a working database to store template security settings, and then applies the settings from this database. For analysis and comparisons, the template settings are listed as the effective database settings and the current computer settings are listed as the effective computer settings. Keep in mind that if you are actively editing a template in the Security Templates snap-in, you need to save the template so that the changes can be analyzed and used.
Читать дальшеИнтервал:
Закладка:
Похожие книги на «Windows Server 2012 R2 Storage, Security, & Networking Pocket Consultant»
Представляем Вашему вниманию похожие книги на «Windows Server 2012 R2 Storage, Security, & Networking Pocket Consultant» списком для выбора. Мы отобрали схожую по названию и смыслу литературу в надежде предоставить читателям больше вариантов отыскать новые, интересные, ещё непрочитанные произведения.


Обсуждение, отзывы о книге «Windows Server 2012 R2 Storage, Security, & Networking Pocket Consultant» и просто собственные мнения читателей. Оставьте ваши комментарии, напишите, что Вы думаете о произведении, его смысле или главных героях. Укажите что конкретно понравилось, а что нет, и почему Вы так считаете.