William Stanek - Windows Server 2012 R2 Storage, Security, & Networking Pocket Consultant
Здесь есть возможность читать онлайн «William Stanek - Windows Server 2012 R2 Storage, Security, & Networking Pocket Consultant» весь текст электронной книги совершенно бесплатно (целиком полную версию без сокращений). В некоторых случаях можно слушать аудио, скачать через торрент в формате fb2 и присутствует краткое содержание. Жанр: ОС и Сети, на английском языке. Описание произведения, (предисловие) а так же отзывы посетителей доступны на портале библиотеки ЛибКат.
- Название:Windows Server 2012 R2 Storage, Security, & Networking Pocket Consultant
- Автор:
- Жанр:
- Год:неизвестен
- ISBN:нет данных
- Рейтинг книги:3 / 5. Голосов: 1
-
Избранное:Добавить в избранное
- Отзывы:
-
Ваша оценка:
Windows Server 2012 R2 Storage, Security, & Networking Pocket Consultant: краткое содержание, описание и аннотация
Предлагаем к чтению аннотацию, описание, краткое содержание или предисловие (зависит от того, что написал сам автор книги «Windows Server 2012 R2 Storage, Security, & Networking Pocket Consultant»). Если вы не нашли необходимую информацию о книге — напишите в комментариях, мы постараемся отыскать её.
Windows Server 2012 R2 Storage, Security, & Networking Pocket Consultant — читать онлайн бесплатно полную книгу (весь текст) целиком
Ниже представлен текст книги, разбитый по страницам. Система сохранения места последней прочитанной страницы, позволяет с удобством читать онлайн бесплатно книгу «Windows Server 2012 R2 Storage, Security, & Networking Pocket Consultant», без необходимости каждый раз заново искать на чём Вы остановились. Поставьте закладку, и сможете в любой момент перейти на страницу, на которой закончили чтение.
Интервал:
Закладка:
After you define the necessary file groups and disk quota templates, you can create a disk quota by following these steps:
1.In File Server Resource Manager, expand the Quota Management node, and then select Quotas.
2.Tap or click Create Quota on the Action menu or in the Actions pane.
3.In the Create Quota dialog box, set the local computer path for the quota by tapping or clicking Browse and then by using the Browse For Folder dialog box to select the path, such as C: \Data. Tap or click OK.
4.In the Derive Properties From This Quota Template list, choose the disk quota template that defines the quota properties you want to use.
5.Tap or click Create.

CHAPTER 5: Enhancing computer security
■Using security templates
■Using the Security Configuration Wizard
Sound security practices and settings are essential to successful system administration. Two key methods to configure security settings are to use security templates and security policies. Both of these features manage system settings that you would otherwise manage through Group Policy.
Using security templates

Security templates provide a centralized way to manage security-related settings for workstations and servers. You use security templates to apply customized sets of Group Policy definitions to specific computers. These policy definitions generally affect the following policies:
■ Account policiesControl security for passwords, account lockout, and Kerberos security
■ Local policiesControl security for auditing, user rights assignment, and other security options
■ Event log policiesControl security for event logging
■ Restricted groups policiesControl security for local group membership administration
■ System services policiesControl security and startup mode for local services
■ File system policiesControl security for file and folder paths in the local file system
■ Registry policiesControl the permissions on security-related registry keys
NOTE Security templates are available in all Windows Server installations and can be imported into any Group Policy object (GPO). Security templates apply only to the Computer Configuration area of Group Policy. They do not apply to the User Configuration area. In Group Policy, you’ll find applicable settings under Computer Configuration\Windows Settings\Security Settings. Some security settings are not included, such as those that apply to wireless networks, public keys, software restrictions, and IP security.
Working with security templates is a multipart process that involves the following steps:
1.Use the Security Templates snap-in to create a new template, or select an existing template that you want to modify.
2.Use the Security Templates snap-in to make necessary changes to the template settings, and then save the changes.
3.Use the Security Configuration And Analysis snap-in to analyze the differences between the template with which you are working and the current computer security settings.
4.Revise the template as necessary after you review the differences between the template settings and the current computer settings.
5.Use the Security Configuration And Analysis snap-in to apply the template and overwrite existing security settings.
When you first start working with security templates, you should determine whether you can use an existing template as a starting point. Other administrators might have created templates, or your organization might have baseline templates that should be used. You can also create a new template to use as your starting point, as shown in Figure 5–1.
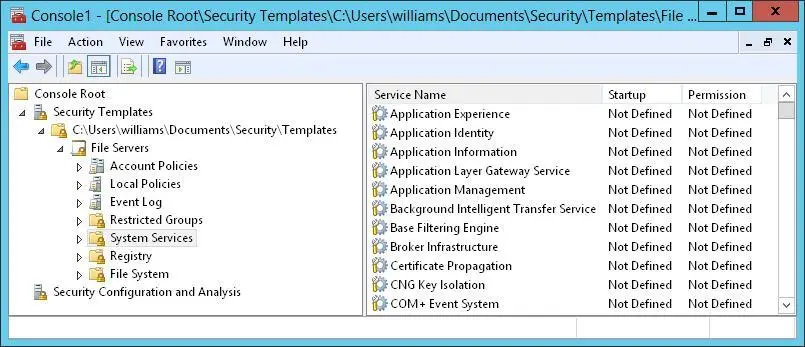
FIGURE 5–1View and create security templates with the Security Templates snap-in.
TIP If you select a template that you want to use as a starting point, you should go through each setting that the template applies and evaluate how the setting affects your environment. If a setting doesn’t make sense, you should modify it appropriately or delete it.
You should use the Security Configuration And Analysis snap-in to apply templates rather than the Security Templates snap-in. You can also use the Security Configuration And Analysis snap-in to compare the settings in a template to the current settings on a computer. The results of the analysis highlight areas in which the current settings don’t match those in the template. This is useful to determine whether security settings have changed over time.
Using the Security Templates and Security Configuration And Analysis snap-ins
You can open the security snap-ins by following these steps:
1.Start the Microsoft Management Console (MMC) by pressing the Windows key, entering mmc.exe, and then pressing Enter.
2.In the Microsoft Management Console, tap or click File, and then tap or click Add/Remove Snap-In.
3.In the Add Or Remove Snap-Ins dialog box, tap or click Security Templates, and then tap or click Add.
4.Tap or click Security Configuration And Analysis, and then tap or click Add, Tap or click OK.
By default, the Security Templates snap-in looks for security templates in the %SystemDrive%\Users\%UserName%\Documents\Security\Templates folder. You can add other search paths for templates by following these steps:
1.With the Security Templates snap-in selected in the MMC, choose New Template Search Path from the Action menu.
2.In the Browse For Folder dialog box, select the template location to add, such as %SystemRoot%\Security\Templates\Policies. Tap or click OK. Now that you’ve located the template search path with which you want to work, you can select a template and expand the related notes to review its settings.
You can create a template by following these steps:
1.In the Security Templates snap-in, either press and hold or right-click the search path where the template should be created, and then tap or click New Template.
2.Enter a name and description for the template in the text boxes provided.
3.Tap or click OK to create the template. The template will not have settings configured, so you need to modify the settings carefully before the template is ready for use.
4.After you modify the template, save the changes by pressing and holding or right-clicking the template in the Security Templates snap-in and selecting Save. Alternatively, you can select Save As to assign a different name to the modified template.
Reviewing and changing template settings
The sections that follow discuss how to work with template settings. As you’ll learn, you manage each type of template setting in a slightly different way.
Account policy settings control security for passwords, account lockout, and Kerberos security. Local policy settings control security for auditing, user rights assignment, and other security options. Event log policy settings control security for event logging. For detailed information on account policy, local policy settings, and configuring event logging, see Chapter 9, “Creating User and Group Accounts” and Chapter 3, “Monitoring Services, Processes, and Events” in Windows Server 2012 R2 Pocket Consultant: Essentials Configuration.
Читать дальшеИнтервал:
Закладка:
Похожие книги на «Windows Server 2012 R2 Storage, Security, & Networking Pocket Consultant»
Представляем Вашему вниманию похожие книги на «Windows Server 2012 R2 Storage, Security, & Networking Pocket Consultant» списком для выбора. Мы отобрали схожую по названию и смыслу литературу в надежде предоставить читателям больше вариантов отыскать новые, интересные, ещё непрочитанные произведения.


Обсуждение, отзывы о книге «Windows Server 2012 R2 Storage, Security, & Networking Pocket Consultant» и просто собственные мнения читателей. Оставьте ваши комментарии, напишите, что Вы думаете о произведении, его смысле или главных героях. Укажите что конкретно понравилось, а что нет, и почему Вы так считаете.