William Stanek - Windows Server 2012 R2 Storage, Security, & Networking Pocket Consultant
Здесь есть возможность читать онлайн «William Stanek - Windows Server 2012 R2 Storage, Security, & Networking Pocket Consultant» весь текст электронной книги совершенно бесплатно (целиком полную версию без сокращений). В некоторых случаях можно слушать аудио, скачать через торрент в формате fb2 и присутствует краткое содержание. Жанр: ОС и Сети, на английском языке. Описание произведения, (предисловие) а так же отзывы посетителей доступны на портале библиотеки ЛибКат.
- Название:Windows Server 2012 R2 Storage, Security, & Networking Pocket Consultant
- Автор:
- Жанр:
- Год:неизвестен
- ISBN:нет данных
- Рейтинг книги:3 / 5. Голосов: 1
-
Избранное:Добавить в избранное
- Отзывы:
-
Ваша оценка:
Windows Server 2012 R2 Storage, Security, & Networking Pocket Consultant: краткое содержание, описание и аннотация
Предлагаем к чтению аннотацию, описание, краткое содержание или предисловие (зависит от того, что написал сам автор книги «Windows Server 2012 R2 Storage, Security, & Networking Pocket Consultant»). Если вы не нашли необходимую информацию о книге — напишите в комментариях, мы постараемся отыскать её.
Windows Server 2012 R2 Storage, Security, & Networking Pocket Consultant — читать онлайн бесплатно полную книгу (весь текст) целиком
Ниже представлен текст книги, разбитый по страницам. Система сохранения места последней прочитанной страницы, позволяет с удобством читать онлайн бесплатно книгу «Windows Server 2012 R2 Storage, Security, & Networking Pocket Consultant», без необходимости каждый раз заново искать на чём Вы остановились. Поставьте закладку, и сможете в любой момент перейти на страницу, на которой закончили чтение.
Интервал:
Закладка:
BEST PRACTICES Whenever you work with the Quota tab, pay particular attention to the Status text and the associated traffic light icon. Both change based on the state of quota management. If quotas aren’t configured, the traffic light icon shows a red light and the status is inactive or not configured. If the operating system is working or updating the quotas, the traffic light icon shows a yellow light and the status shows the activity being performed. If quotas are configured, the traffic light icon shows a green light and the status text states that the quota system is active.
5.To set a default disk quota limit for all users, select Limit Disk Space To. In the text boxes provided, set a limit in kilobytes, megabytes, gigabytes, terabytes, petabytes, or exabytes. Then set the default warning limit in the Set Warning Level To text boxes. Again, you’ll usually want the disk quota warning limit to be 90–95 percent of the disk quota limit.
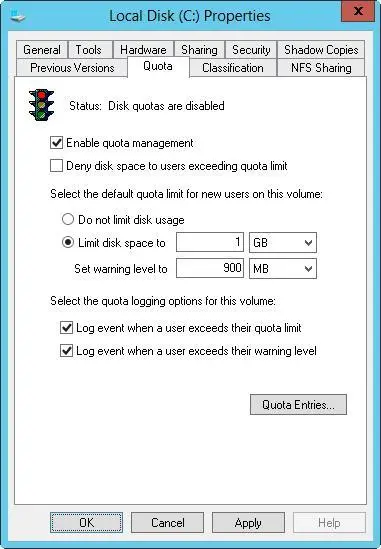
FIGURE 4–7After you enable quota management, you can configure a quota limit and quota warning for all users.
TIP Although the default quota limit and warning apply to all users, you can configure different levels for individual users. You do this in the Quota Entries dialog box. If you create many unique quota entries and don’t want to re-create them on a volume with similar characteristics and usage, you can export the quota entries and import them into a different volume.
6.To enforce the disk quota limit and prevent users from going over the limit, select the Deny Disk Space To Users Exceeding Quota Limit check box. Keep in mind that this creates an actual physical limitation for users (but not for administrators).
7.To configure logging when users exceed a warning limit or the quota limit, select the Log Event check boxes. Tap or click OK to save your changes.
8.If the quota system isn’t currently enabled, you’ll get a prompt asking you to enable the quota system. Tap or click OK so that Windows Server 2012 R2 can rescan the volume and update disk usage statistics. Actions might be taken against users who exceed the current limit or warning levels. These actions can include preventing additional writing to the volume, notifying them the next time they access the volume, and logging applicable events to the application log.
Viewing disk quota entries
Disk space usage is tracked on a per-user basis. When disk quotas are enabled, each user storing data on a volume has an entry in the disk quota file. This entry is updated periodically to show the current disk space used, the applicable quota limit, the applicable warning level, and the percentage of allowable space being used. As an administrator, you can modify disk quota entries to set different limits and warning levels for particular users. You can also create disk quota entries for users who haven’t yet saved data on a volume. The key reason for creating entries is to ensure that when a user does make use of a volume, the user has an appropriate limit and warning level.
To view the current disk quota entries for a volume, follow these steps:
1.Open Computer Management. If necessary, connect to a remote computer.
2.In the console tree, expand Storage, and then select Disk Management. The volumes configured on the selected computer are displayed in the details pane.
3.Using Volume List view or Graphical View, press and hold or right-click the volume with which you want to work, and then tap or click Properties.
4.On the Quota tab, tap or click Quota Entries to display the Quota Entries dialog box. Each quota entry is listed according to a status, which is meant to quickly depict whether a user has gone over a limit. A status of OK means the user is working within the quota boundaries. Any other status usually means the user has reached the warning level or the quota limit.
Creating disk quota entries
You can create disk quota entries for users who haven’t yet saved data on a volume. This enables you to set custom limits and warning levels for a particular user. You usually use this feature when a user frequently stores more information than other users and you want to allow the user to go over the normal limit or when you want to set a specific limit for administrators. As you might recall, administrators aren’t subject to disk quota limits, so if you want to enforce limits for individual administrators, you must create disk quota entries for each administrator you want to limit.
REAL WORLD You shouldn’t create individual disk quota entries haphazardly. You need to track individual entries carefully. Ideally, you should keep a log that details any individual entries so that other administrators understand the policies in place and how those policies are applied. When you modify the base rules for quotas on a volume, you should reexamine individual entries to see whether they’re still applicable or need to be updated as well. I’ve found that certain types of users are exceptions more often than not, and that it’s sometimes better to put different classes of users on different volumes and then apply disk quotas to each volume. In this way, each class or category of user has a quota limit that’s appropriate for its members’ typical usage, and you have fewer (perhaps no) exceptions. For example, you might use separate volumes for executives, managers, and standard users, or you might have separate volumes for management, graphic designers, engineers, and all other users.
To create a quota entry on a volume, follow these steps:
1.Open the Quota Entries dialog box as discussed in “Viewing disk quota entries” earlier in this chapter. Current quota entries for all users are listed. To refresh the listing, press F5 or choose Refresh from the View menu.
2.If the user doesn’t have an existing entry on the volume, you can create it by choosing New Quota Entry from the Quota menu. This opens the Select Users dialog box.
3.In the Select Users dialog box, enter the name of a user you want to use in the Enter The Object Names To Select text box, and then tap or click Check Names. If a match is found, select the account you want to use, and then tap or click OK. If no matches are found, update the name you entered and try searching again. Repeat this step as necessary, and then tap or click OK. You also can enter user names separated by semicolons to apply the same quota to multiple users at the same time.
4.After you select a user, the Add New Quota Entry dialog box is displayed, as shown in Figure 4–8. You have two options. You can remove all quota restrictions for this user by selecting Do Not Limit Disk Usage, or you can set a specific limit and warning level by selecting Limit Disk Space To and then entering the appropriate values. Tap or click OK.
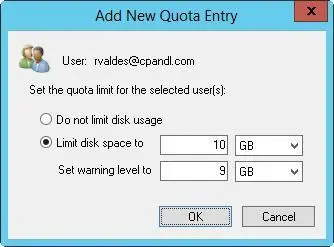
In the Add New Quota Entry dialog box, you can customize the user’s quota limit and warning level or remove quota restrictions altogether.
Deleting disk quota entries
When you’ve created disk quota entries on a volume and a user no longer needs to use the volume, you can delete the associated disk quota entry. When you delete a disk quota entry, all files owned by the user are collected and displayed in a dialog box so that you can permanently delete the files, take ownership of the files, or move the files to a folder on a different volume.
Читать дальшеИнтервал:
Закладка:
Похожие книги на «Windows Server 2012 R2 Storage, Security, & Networking Pocket Consultant»
Представляем Вашему вниманию похожие книги на «Windows Server 2012 R2 Storage, Security, & Networking Pocket Consultant» списком для выбора. Мы отобрали схожую по названию и смыслу литературу в надежде предоставить читателям больше вариантов отыскать новые, интересные, ещё непрочитанные произведения.


Обсуждение, отзывы о книге «Windows Server 2012 R2 Storage, Security, & Networking Pocket Consultant» и просто собственные мнения читателей. Оставьте ваши комментарии, напишите, что Вы думаете о произведении, его смысле или главных героях. Укажите что конкретно понравилось, а что нет, и почему Вы так считаете.