William Stanek - Windows Server 2012 R2 Storage, Security, & Networking Pocket Consultant
Здесь есть возможность читать онлайн «William Stanek - Windows Server 2012 R2 Storage, Security, & Networking Pocket Consultant» весь текст электронной книги совершенно бесплатно (целиком полную версию без сокращений). В некоторых случаях можно слушать аудио, скачать через торрент в формате fb2 и присутствует краткое содержание. Жанр: ОС и Сети, на английском языке. Описание произведения, (предисловие) а так же отзывы посетителей доступны на портале библиотеки ЛибКат.
- Название:Windows Server 2012 R2 Storage, Security, & Networking Pocket Consultant
- Автор:
- Жанр:
- Год:неизвестен
- ISBN:нет данных
- Рейтинг книги:3 / 5. Голосов: 1
-
Избранное:Добавить в избранное
- Отзывы:
-
Ваша оценка:
Windows Server 2012 R2 Storage, Security, & Networking Pocket Consultant: краткое содержание, описание и аннотация
Предлагаем к чтению аннотацию, описание, краткое содержание или предисловие (зависит от того, что написал сам автор книги «Windows Server 2012 R2 Storage, Security, & Networking Pocket Consultant»). Если вы не нашли необходимую информацию о книге — напишите в комментариях, мы постараемся отыскать её.
Windows Server 2012 R2 Storage, Security, & Networking Pocket Consultant — читать онлайн бесплатно полную книгу (весь текст) целиком
Ниже представлен текст книги, разбитый по страницам. Система сохранения места последней прочитанной страницы, позволяет с удобством читать онлайн бесплатно книгу «Windows Server 2012 R2 Storage, Security, & Networking Pocket Consultant», без необходимости каждый раз заново искать на чём Вы остановились. Поставьте закладку, и сможете в любой момент перейти на страницу, на которой закончили чтение.
Интервал:
Закладка:
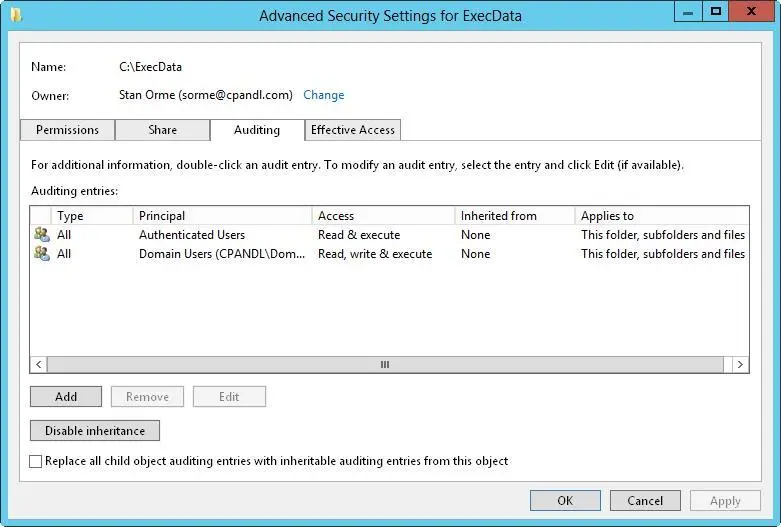
FIGURE 4–5After you audit object access, you can set auditing policies on individual files and folders on the Auditing tab.
4.The Auditing Entries list shows the users, groups, or computers whose actions you want to audit. To remove an account, select the account in the Auditing Entries list, and then tap or click Remove.
5.To configure auditing for additional users, computers, or groups, tap or click Add. This displays the Select Users, Computers, Service Accounts, Or Groups dialog box.
6.Enter the name of a user, computer, or group in the current domain, and then tap or click Check Names. If a single match is found, the dialog box is automatically updated and the entry is underlined; otherwise, you’ll get an additional dialog box. If no matches are found, you either entered the name incorrectly or you’re working with an incorrect location. Modify the name in the Name Not Found dialog box and try again, or tap or click Locations to select a new location. When multiple matches are found, in the Multiple Names Found dialog box, select the name you want to use, and then tap or click OK.
7.Tap or click OK. The user and group are added, and the Principal and the Auditing Entry dialog box are updated to show this. Only basic permissions are listed by default. If you want to work with advanced permissions, tap or click Show Advanced Permissions to display the special permissions.
8.As necessary, use the Applies To list to specify where objects are audited. If you are working with a folder and want to replace the auditing entries on all child objects of this folder (and not on the folder itself), select Only Apply These Settings To Objects And/Or Containers Within This Container. Keep in mind that the Applies To list lets you specify the locations where you want the auditing settings to apply. The Only Apply These Settings To Objects And/Or Containers Within This Container check box controls how auditing settings are applied. When this check box is selected, auditing settings on the parent object replace settings on child objects. When this check box is cleared, auditing settings on the parent are merged with existing settings on child objects.
9.Use the Type list to specify whether you are configuring auditing for success, failure, or both, and then specify which actions should be audited. Success logs successful events, such as successful file reads. Failure logs failed events, such as failed file deletions. The events you can audit are the same as the special permissions listed in Tables 4–3 and 4–4, except that you can’t audit the synchronizing of offline files and folders. For essential files and folders, you’ll typically want to track the following:
■Write Attributes — Successful
■Write Extended Attributes — Successful
■Delete Subfolders And Files — Successful
■Delete — Successful
■Change Permissions — Successful
TIP If you want to audit actions for all users, use the special group everyone; otherwise, select the specific user groups, users, or both that you want to audit.
10.If you’re using claims-based policies and want to limit the scope of the auditing entry, you can add claims-based conditions to the auditing entry. For example, if all corporate computers are members of the Domain Computers group, you might want to closely audit access by devices that aren’t members of this group.
11.When you have finished configuring auditing, tap or click OK. Repeat this process to audit other users, groups, or computers.
Auditing the registry
If you configure a GPO to enable the Audit Object Access option, you can set the level of auditing for keys within the registry. This enables you to track when key values are set, when subkeys are created, and when keys are deleted.
You can configure registry auditing by following these steps:
1.Open the Registry Editor. At a command prompt, enter regedit; or enter regeditin the Everywhere search box, and then press Enter.
2.Browse to a key you want to audit. On the Edit menu, select Permissions.
3.In the Permissions dialog box, tap or click Advanced. In the Advanced Security Settings dialog box, tap or click the Auditing tab.
4.Tap or click Add to display the Auditing Entry dialog box. Tap or click Select A Principal to display the Select User, Computer, Service Account, Or Group dialog box.
5.In the Select User, Computer, Service Account, Or Group dialog box, enter Everyone, tap or click Check Names, and then tap or click OK.
6.In the Auditing Entry dialog box, only basic permissions are listed by default. Tap or click Show Advanced Permissions to display the special permissions.
7.Use the Applies To list to specify how the auditing entry is to be applied.
8.Use the Type list to specify whether you are configuring auditing for success, failure, or both, and then specify which actions should be audited. Typically, you’ll want to track the following advanced permissions:
■Set Value — Successful and Failed
■Create Subkey — Successful and Failed
■Delete — Successful and Failed
9.Tap or click OK three times to close all open dialog boxes and apply the auditing settings.
Auditing Active Directory objects
If you configure a GPO to enable the Audit Directory Service Access option, you can set the level of auditing for Active Directory objects so that you can control precisely how object usage is tracked.
To configure object auditing, follow these steps:
1.In Active Directory Users And Computers, ensure that Advanced Features is selected on the View menu, and then access the container for the object.
2.Double-tap or double-click the object to be audited to open the related Properties dialog box.
3.Tap or click the Security tab, and then tap or click Advanced.
4.In the Advanced Settings dialog box, tap or click the Auditing tab. The Auditing Entries list shows the users, groups, or computers whose actions you are auditing currently (if any). To remove an account, select the account in the Auditing Entries list, and then tap or click Remove.
5.To add specific accounts, tap or click Add to display the Auditing Entry dialog box. Tap or click Select A Principal to display the Select User, Computer, Service Account, Or Group dialog box.
6.Enter the name of a user, computer, or group in the current domain, and then tap or click Check Names. If a single match is found, the dialog box is automatically updated and the entry is underlined; otherwise, you’ll get an additional dialog box. If no matches are found, you either entered the name incorrectly or you’re working with an incorrect location. Modify the name in the Name Not Found dialog box and try again, or tap or click Locations to select a new location. When multiple matches are found, in the Multiple Names Found dialog box, select the name you want to use, and then tap or click OK.
7.Tap or click OK to return to the Auditing Entry dialog box. Use the Applies To list to specify how the auditing entry is to be applied.
Читать дальшеИнтервал:
Закладка:
Похожие книги на «Windows Server 2012 R2 Storage, Security, & Networking Pocket Consultant»
Представляем Вашему вниманию похожие книги на «Windows Server 2012 R2 Storage, Security, & Networking Pocket Consultant» списком для выбора. Мы отобрали схожую по названию и смыслу литературу в надежде предоставить читателям больше вариантов отыскать новые, интересные, ещё непрочитанные произведения.


Обсуждение, отзывы о книге «Windows Server 2012 R2 Storage, Security, & Networking Pocket Consultant» и просто собственные мнения читателей. Оставьте ваши комментарии, напишите, что Вы думаете о произведении, его смысле или главных героях. Укажите что конкретно понравилось, а что нет, и почему Вы так считаете.