2.Tap or click Add to display the Permission Entry dialog box. Tap or click Select A Principal to display the Select User, Computer, Service Account, Or Group dialog box.
3.Enter the name of a user or a group account. Be sure to reference the user account name rather than the user’s full name. Only one name can be entered at a time.
4.Tap or click Check Names. If a single match is found for each entry, the dialog box is automatically updated and the entry is underlined. Otherwise, you’ll get an additional dialog box. If no matches are found, you either entered the name incorrectly or you’re working with an incorrect location. Modify the name in the Name Not Found dialog box and try again, or tap or click Locations to select a new location. When multiple matches are found, in the Multiple Names Found dialog box, select the name you want to use and then tap or click OK.
5.Tap or click OK. The user and group are added as the Principal. Tap or click Add A Condition.
6.Use the options provided to define the condition or conditions that must be met to grant access. With users and groups, set basic claims based on group membership, previously defined claim types, or both. With resource properties, define conditions for property values.
7.When you have finished configuring conditions, tap or click OK.
Because shared folders also have NTFS permissions, you might want to set claims-based permissions by using Server Manager. To do this, follow these steps:
1.In Server Manager, select File and Storage Services, select the server with which you want to work, and then Select Shares.
2.Press and hold or right-click the folder with which you want to work, and then tap or click Properties to display a Properties dialog box.
3.When you tap or click Permissions in the left pane, the current share permissions and NTFS permissions are shown in the main pane.
4.Tap or click Customize Permissions to open the Advanced Security Settings dialog box with the Permissions tab selected.
Users or groups that already have access to the file or folder are listed under Permission Entries. Use the options provided to view, edit, add, or remove permissions for users and groups. When you are editing or adding permissions in the Permission Entry dialog box, you can add conditions just as I discussed in steps 6–8 of the previous procedure.
Auditing system resources

Auditing is the best way to track what’s happening on your Windows Server 2012 R2 systems. You can use auditing to collect information related to resource usage such as file access, system logons, and system configuration changes. Any time an action occurs that you’ve configured for auditing, the action is written to the system’s security log, where it’s stored for your review. The security log is accessible from Event Viewer.
NOTE For most auditing changes, you need to be logged on using an account that’s a member of the Administrators group or you need to be granted the Manage Auditing And Security Log right in Group Policy.
Setting auditing policies
Auditing policies are essential to help ensure the security and integrity of your systems. Just about every computer system on the network should be configured with some type of security logging. You configure auditing policies for individual computers with local Group Policy and for all computers in domains with Active Directory-based Group Policy. Through Group Policy, you can set auditing policies for an entire site, a domain, or an organizational unit. You can also set policies for an individual workstation or server.
After you access the GPO with which you want to work, you can set auditing policies by following these steps:
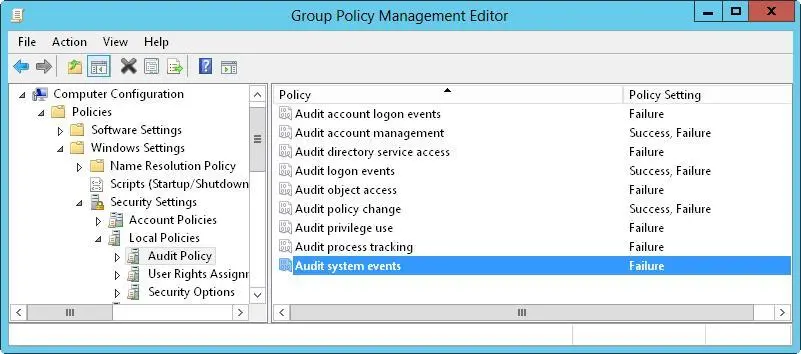
1.In the Group Policy Management Editor, shown in Figure 4–4, access the Audit Policy node by working your way down the console tree. Expand Computer Configuration, Policies, Windows Settings, Security Settings, and Local Policies, and then select Audit Policy.

FIGURE 4–4Set auditing policies by using the Audit Policy node in Group Policy.
2.The auditing options are as follows:
■ Audit Account Logon EventsTracks events related to user logon and logoff.
■ Audit Account ManagementTracks account management by means of Active Directory Users And Computers. Events are generated any time user, computer, or group accounts are created, modified, or deleted.
■ Audit Directory Service AccessTracks access to Active Directory. Events are generated any time users or computers access the directory.
■ Audit Logon EventsTracks events related to user logon, logoff, and remote connections to network systems.
■ Audit Object AccessTracks system resource usage for files, directories, shares, printers, and Active Directory objects.
■ Audit Policy ChangeTracks changes to user rights, auditing, and trust relationships.
■ Audit Privilege UseTracks the use of user rights and privileges, such as the right to back up files and directories.
NOTE The Audit Privilege Use policy doesn’t track system access-related events, such as the use of the right to log on interactively or the right to access the computer from the network. You track these events with logon and logoff auditing.
■ Audit Process TrackingTracks system processes and the resources they use.
■ Audit System EventsTracks system startup, shutdown, and restart, in addition to actions that affect system security or the security log.
3.To configure an auditing policy, double-tap or double-click its entry, or press and hold or right-click the entry, and then tap or click Properties.
4.In the dialog box that is displayed, select the Define These Policy Settings check box, and then select either the Success check box, the Failure check box, or both. Success logs successful events, such as successful logon attempts. Failure logs failed events, such as failed logon attempts.
5.Tap or click OK.
When auditing is enabled, the security event log will reflect the following:
■Event IDs of 560 and 562 detailing user audits
■Event IDs of 592 and 593 detailing process audits
Auditing files and folders
If you configure a GPO to enable the Audit Object Access option, you can set the level of auditing for individual folders and files. This enables you to control precisely how folder and file usage is tracked. Auditing of this type is available only on NTFS volumes.
You can configure file and folder auditing by following these steps:
1.In File Explorer, press and hold or right-click the file or folder to be audited, and then tap or click Properties.
2.Tap or click the Security tab, and then tap or click Advanced to display the Advanced Security Settings dialog box.
3.On the Auditing tab, tap or click Continue. You can now view and manage auditing settings by using the options shown in Figure 4–5.
Читать дальше


