William Stanek - Windows Server 2012 R2 Storage, Security, & Networking Pocket Consultant
Здесь есть возможность читать онлайн «William Stanek - Windows Server 2012 R2 Storage, Security, & Networking Pocket Consultant» весь текст электронной книги совершенно бесплатно (целиком полную версию без сокращений). В некоторых случаях можно слушать аудио, скачать через торрент в формате fb2 и присутствует краткое содержание. Жанр: ОС и Сети, на английском языке. Описание произведения, (предисловие) а так же отзывы посетителей доступны на портале библиотеки ЛибКат.
- Название:Windows Server 2012 R2 Storage, Security, & Networking Pocket Consultant
- Автор:
- Жанр:
- Год:неизвестен
- ISBN:нет данных
- Рейтинг книги:3 / 5. Голосов: 1
-
Избранное:Добавить в избранное
- Отзывы:
-
Ваша оценка:
Windows Server 2012 R2 Storage, Security, & Networking Pocket Consultant: краткое содержание, описание и аннотация
Предлагаем к чтению аннотацию, описание, краткое содержание или предисловие (зависит от того, что написал сам автор книги «Windows Server 2012 R2 Storage, Security, & Networking Pocket Consultant»). Если вы не нашли необходимую информацию о книге — напишите в комментариях, мы постараемся отыскать её.
Windows Server 2012 R2 Storage, Security, & Networking Pocket Consultant — читать онлайн бесплатно полную книгу (весь текст) целиком
Ниже представлен текст книги, разбитый по страницам. Система сохранения места последней прочитанной страницы, позволяет с удобством читать онлайн бесплатно книгу «Windows Server 2012 R2 Storage, Security, & Networking Pocket Consultant», без необходимости каждый раз заново искать на чём Вы остановились. Поставьте закладку, и сможете в любой момент перейти на страницу, на которой закончили чтение.
Интервал:
Закладка:
After you create a template or determine that you want to use an existing template, you can analyze and then configure the template by following these steps:
1.Open the Security Configuration And Analysis snap-in.
2.Press and hold or right-click the Security Configuration And Analysis node, and then tap or click Open Database to display the Open Database dialog box.
3.By default, the Open Database dialog box’s search path is set to %SystemDrive%\Users\%UserName%\Documents\Security\Database. As necessary, select options in the Open Database dialog box to navigate to a new location in which to save the database. In the File Name text box, enter a descriptive name for the database, such as Current Config Comparison, and then tap or click Open. The security database is created in the Security Database Files format with the.sdb file extension.
4.The Import Template dialog box is displayed with the default search path set to %SystemDrive%\Users\%UserName%\Documents\Security\Templates. As necessary, select options in the Import Template dialog box to navigate to a new template location. Select the security template you want to use, and then tap or click Open. Security template files end with the.inf file extension.
5.Press and hold or right-click the Security Configuration And Analysis node, and then tap or click Analyze Computer Now. When prompted to set the error log path, enter a new path or tap or click OK to use the default path.
6.Wait for the snap-in to complete the analysis of the template. If an error occurs during the analysis, you can view the error log by pressing and holding or right-clicking the Security Configuration And Analysis node and choosing View Log File.
When you are working with the Security Configuration And Analysis snap-in, you can review the differences between the template settings and the current computer settings. As Figure 5–9 shows, the template settings stored in the analysis database are listed in the Database Setting column, and the current computer settings are listed in the Computer Setting column. If a setting has not been analyzed, it is listed as Not Defined.
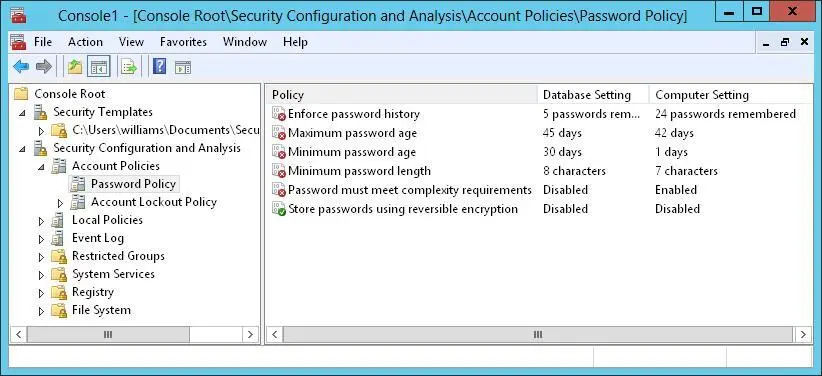
FIGURE 5–9Review the differences between the template settings and the current computer settings
You can make changes to a setting stored in the database by following these steps:
1.In the Security Configuration And Analysis snap-in, double-tap or double-click the setting with which you want to work.
2.In the Properties dialog box, shown in Figure 5-10, note the current computer setting. If information about the purpose of the setting is available, you can view this information by tapping or clicking the Explain tab.
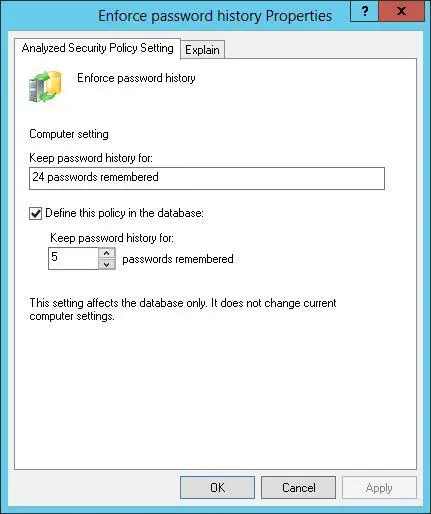
FIGURE 5-10Change a policy setting in the database before applying the template.
3.To define and apply the policy setting, select the Define This Policy In The Database check box. To clear this policy and not apply it, clear this check box.
4.If you enable the policy setting, specify how the policy setting is to be used by configuring any additional options.
5.Repeat this process as necessary. To save your database changes to the template, press and hold or right-click the Security Configuration And Analysis node, and then tap or click Save.
You can also use the Secedit command-line utility to analyze, review, and apply security templates. The basic technique is as follows:
1.Open an elevated administrator prompt.
2.Use Secedit /Import to import a security template into a working database.
3.Use Secedit /Analyze to compare the template settings to a computer’s current settings.
4.Use Secedit /Configure to apply the template settings.
Whether you are working with the graphical wizard or the command-line utility, you might want to create a rollback template before applying any settings. A rollback template is a reverse template that allows you to remove most settings applied with a template. The only settings that cannot be removed are those for access control lists on file system and registry paths.
At an elevated administrator prompt, you can create a rollback template by using the Secedit command-line utility. Enter the following:
secedit /generaterollback /db DatabaseName /cfg TemplateName /rbk RollBackName /log LogName
DatabaseName is the name of a new database that will be used to perform the rollback, TemplateName is the name of an existing security template for which you are creating a rollback template, RollBackName sets the name of a new security template in which the reverse settings should be stored, and LogName sets the name of an optional file for tracking the status of the rollback process.
In the following example, you create a rollback template for the “File Servers” template:
secedit /generaterollback /db rollback.db /cfg "file servers.inf" /rbk fs-orig.inf /log rollback.log
When you’re ready to apply the template, press and hold or right-click the Security Configuration And Analysis node, and then tap or click Configure Computer Now. When prompted to set the error log path, tap or click OK because the default path should be sufficient. To view the configuration error log, press and hold or right-click the Security Configuration And Analysis node, and then tap or click View Log File. Note any problems, and take action as necessary.
If you created a rollback template prior to applying a security template, you can restore the computer’s security settings to its previous state. To apply a rollback template, follow these steps:
1.In the Security Configuration And Analysis snap-in, press and hold or right-click the Security Configuration And Analysis node, and then tap or click Import Template.
2.In the Import Template dialog box, select the rollback template.
3.Select the Clear This Database Before Importing check box, and then tap or click Open.
4.Press and hold or right-click the Security Configuration And Analysis node, and then tap or click Configure Computer Now. Tap or click OK.
The only settings that cannot be restored are for access control lists on file system and registry paths. After the permissions on file system and registry paths have been applied, you cannot reverse the process automatically and must instead manually reverse the changes one at a time.
Deploying security templates to multiple computers
Rather than applying security templates to one computer at a time, you can deploy your security configurations to multiple computers through Group Policy. To do this, you need to import the security template into a GPO processed by the computers to which the template settings should apply. Then, when policy is refreshed, all computers within the scope of the GPO receive the security configuration.
Security templates apply only to the Computer Configuration portion of Group Policy. Before you deploy security configurations in this way, you should take a close look at the domain and organizational unit (OU) structure of your organization and make changes as necessary to ensure that the security configuration is applied only to relevant types of computers. Essentially, this means that you need to create OUs for the different types of computers in your organization, and then move the computer accounts for these computers into the appropriate OUs. Afterward, you need to create and link a GPO for each of the computer OUs. For example, you could create the following computer OUs:
Читать дальшеИнтервал:
Закладка:
Похожие книги на «Windows Server 2012 R2 Storage, Security, & Networking Pocket Consultant»
Представляем Вашему вниманию похожие книги на «Windows Server 2012 R2 Storage, Security, & Networking Pocket Consultant» списком для выбора. Мы отобрали схожую по названию и смыслу литературу в надежде предоставить читателям больше вариантов отыскать новые, интересные, ещё непрочитанные произведения.


Обсуждение, отзывы о книге «Windows Server 2012 R2 Storage, Security, & Networking Pocket Consultant» и просто собственные мнения читателей. Оставьте ваши комментарии, напишите, что Вы думаете о произведении, его смысле или главных героях. Укажите что конкретно понравилось, а что нет, и почему Вы так считаете.