Brad Williams - Professional WordPress Plugin Development
Здесь есть возможность читать онлайн «Brad Williams - Professional WordPress Plugin Development» — ознакомительный отрывок электронной книги совершенно бесплатно, а после прочтения отрывка купить полную версию. В некоторых случаях можно слушать аудио, скачать через торрент в формате fb2 и присутствует краткое содержание. Жанр: unrecognised, на английском языке. Описание произведения, (предисловие) а так же отзывы посетителей доступны на портале библиотеки ЛибКат.
- Название:Professional WordPress Plugin Development
- Автор:
- Жанр:
- Год:неизвестен
- ISBN:нет данных
- Рейтинг книги:4 / 5. Голосов: 1
-
Избранное:Добавить в избранное
- Отзывы:
-
Ваша оценка:
Professional WordPress Plugin Development: краткое содержание, описание и аннотация
Предлагаем к чтению аннотацию, описание, краткое содержание или предисловие (зависит от того, что написал сам автор книги «Professional WordPress Plugin Development»). Если вы не нашли необходимую информацию о книге — напишите в комментариях, мы постараемся отыскать её.
addresses modern plugin development for WordPress, the highly popular content management system (CMS). If you’re using WordPress to create and manage websites, WordPress plugins are the software that can extend or enhance CMS functionality. This book offers guidance on writing plugins for WordPress sites to share or sell to other users.
The second edition of
covers the building of advanced plugin development scenarios. It discusses the plugin framework and coding standards as well as dashboards, settings, menus, and related application programming interfaces (APIs). Additional topics include security, performance, data validation, and SQL statements.
• Learn about the power of hooks in WordPress
• Discover how JavaScript and Ajax will work in your site
• Understand key technologies: Block Editor/Gutenberg, JS/React, PHP, and the REST API
• Create and use custom post types and taxonomies.
• Creating custom dashboard menus and plugin settings
• Work with users and user data
• Schedule tasks and utilizing Cron
• Performance and security considerations
Written by experienced plugin developers,
also helps you internationalize and localize your WordPress website. Find out about debugging systems and optimizing your site for speed. As WordPress use continues to increase, you can elevate your professional knowledge of how to extend WordPress through plugins.
Professional WordPress Plugin Development — читать онлайн ознакомительный отрывок
Ниже представлен текст книги, разбитый по страницам. Система сохранения места последней прочитанной страницы, позволяет с удобством читать онлайн бесплатно книгу «Professional WordPress Plugin Development», без необходимости каждый раз заново искать на чём Вы остановились. Поставьте закладку, и сможете в любой момент перейти на страницу, на которой закончили чтение.
Интервал:
Закладка:
Now it's time to dissect the Settings API; you'll learn to use it through a step‐by‐step example.
Settings API Functions
The Settings API functions consist of three steps:
1 Tell WordPress the new settings you want it to manage for you. Doing so adds your settings into a list of authorized options (also known as whitelisting).
2 Define the settings (text areas, input boxes, and any HTML form element) and how they will be visually grouped together in sections.
3 Tell WordPress to display your settings in an actual form.
But first, you create a setting management page for your plugin.
Creating the Plugin Administration Page
The plugin page will be located at Settings ➪ PDev Settings:
My plugin
This page is empty for now. You will add form inputs later. Creating pages for plugins is covered in detail earlier in the “Plugin Settings” section of this chapter, so refer to it for more explanation about this code.
Registering New Settings
The next step is to register your new settings. The function you need here is register_setting()and three parameters, used as follows:
The register_setting()function accepts the following parameters:
option_group: Group name for your settings.
option_name: Name of an option to sanitize and save.
args: Data used to describe the setting when registered.type: Type of data associated with this setting. Valid values are string, boolean, integer, and number.description: Description of the data for this setting.sanitize_callback: Callback function to sanitize the option's value.show_in_rest: Whether the data with this setting should be included in the REST API.default: Default value when calling get_option().
Now let's register your plugin settings using the register_setting()function. The first parameter you'll set is the setting group name, and the second parameter is the option name as you would use it in a get_option()call. The group name can be anything actually, but it's just simpler to name it the same as the option that will get stored in the database.
The third parameter is an array of additional arguments defining the type of data. In this case, it's a string and references your callback function, here named pdev_plugin_validate_options(), that will be passed all the settings saved in your form. You'll define this function later.
Defining Sections and Settings
Now define what the settings will be more precisely by using the function add_settings_field()and how they will be visually grouped with the function add_settings_section().
The first function call, add_settings_section(), defines how the section on the page will show. The four required parameters it uses follow:
id: HTML ID tag for the section
title: Section title text that will show within an
tag
callback: Name of the callback function that will echo some explanations about that section
page: Settings page on which to show the section (that is, the ?page=pdev_plugin part of the page URL)
The second function call, add_settings_field(), describes how to add the form input. Its required parameters follow:
id: HTML ID tag for the section
title: Formatted title of the field, which is displayed as the label for the field on output
callback: Name of the callback function that will echo the form field
page: Settings page on which to show the section
section: Section of the settings page in which to show the field, as defined previously by the add_settings_section() function call
args: Additional arguments used when outputting the field
Now let's implement these new functions for your plugin settings as follows:
This function call registers an error message that displays to the user. add_settings_error()accepts the following parameters:
setting: Title of the setting to which this error applies
code: Slug name to identify the error, which is used as part of the HTML ID tag
message: Formatted message text to display, which is displayed inside styled
tags
type: Type of message, error or update
You can improve the validating function with a user notice if applicable, as shown here:
The function now compares the validated data with the original input and displays an error message if they differ (see Figure 3‐5).
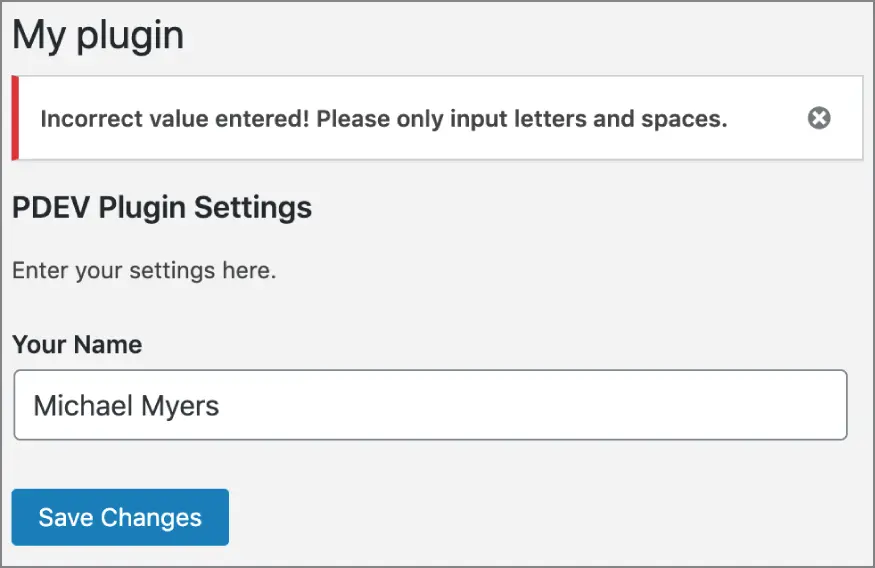
FIGURE 3‐5 : Error message
Expanding with Additional Field Types
You've now covered the different ways to create a settings page using the WordPress Settings API. Let's expand on that by adding additional form field types to your settings page. This is a more real‐world example showing how elaborate your settings page could be. At the end of this section, you'll review the entire plugin code as a whole.
First, you need to define additional settings fields using the add_settings_field()function. The following example updates the registration of those fields in your custom pdev_plugin_admin_init()function:
// Register and define the settings add_action('admin_init', 'pdev_plugin_admin_init'); function pdev_plugin_admin_init(){ //define the setting args $args = array( 'type' => 'string', 'sanitize_callback' => 'pdev_plugin_validate_options', 'default' => NULL ); //register our settings register_setting( 'pdev_plugin_options', 'pdev_plugin_options', $args ); //add a settings section add_settings_section( 'pdev_plugin_main', 'PDEV Plugin Settings', 'pdev_plugin_section_text', 'pdev_plugin' ); //create our settings field for name add_settings_field( 'pdev_plugin_name', 'Your Name', 'pdev_plugin_setting_name', 'pdev_plugin', 'pdev_plugin_main' ); //create our settings field for favorite holiday add_settings_field( 'pdev_plugin_fav_holiday', 'Favorite Holiday', 'pdev_plugin_setting_fav_holiday', 'pdev_plugin', 'pdev_plugin_main' ); //create our settings field for beast mode add_settings_field( 'pdev_plugin_beast_mode', 'Enable Beast Mode?', 'pdev_plugin_setting_beast_mode', 'pdev_plugin', 'pdev_plugin_main' ); }
As you can see in the preceding code sample, you register two new form fields for Favorite Holiday and Beast Mode. Both call custom functions for displaying each field on your settings page. Let's look at the pdev_plugin_setting_fav_holiday()function first.
// Display and select the favorite holiday select field function pdev_plugin_setting_fav_holiday() { // Get option 'fav_holiday' value from the database // Set to 'Halloween' as a default if the option does not exist $options = get_option( 'pdev_plugin_options', [ 'fav_holiday' => 'Halloween' ] ); $fav_holiday = $options['fav_holiday']; // Define the select option values for favorite holiday $items = array( 'Halloween', 'Christmas', 'New Years' ); echo " " . esc_html( $item ) . " "; }
This example registers a new select drop‐down field allowing the user to select their favorite holiday. First, you call get_option()to load the current setting value, if it exists. If the value does not exist, meaning the user has not selected and saved the selection yet, the default is set to Halloween. Next you set the $itemsvariable to an array of available holiday options to choose from.
Now it's time to loop through the available holiday options and display each one in the drop‐down field. We're using the WordPress core function selected(), which compares two values and, if they match, returns selected="selected", which will select that option value in the drop‐down.
Интервал:
Закладка:
Похожие книги на «Professional WordPress Plugin Development»
Представляем Вашему вниманию похожие книги на «Professional WordPress Plugin Development» списком для выбора. Мы отобрали схожую по названию и смыслу литературу в надежде предоставить читателям больше вариантов отыскать новые, интересные, ещё непрочитанные произведения.


Обсуждение, отзывы о книге «Professional WordPress Plugin Development» и просто собственные мнения читателей. Оставьте ваши комментарии, напишите, что Вы думаете о произведении, его смысле или главных героях. Укажите что конкретно понравилось, а что нет, и почему Вы так считаете.