Cheryl K. Smith - Raising Goats For Dummies
Здесь есть возможность читать онлайн «Cheryl K. Smith - Raising Goats For Dummies» — ознакомительный отрывок электронной книги совершенно бесплатно, а после прочтения отрывка купить полную версию. В некоторых случаях можно слушать аудио, скачать через торрент в формате fb2 и присутствует краткое содержание. Жанр: unrecognised, на английском языке. Описание произведения, (предисловие) а так же отзывы посетителей доступны на портале библиотеки ЛибКат.
- Название:Raising Goats For Dummies
- Автор:
- Жанр:
- Год:неизвестен
- ISBN:нет данных
- Рейтинг книги:3 / 5. Голосов: 1
-
Избранное:Добавить в избранное
- Отзывы:
-
Ваша оценка:
Raising Goats For Dummies: краткое содержание, описание и аннотация
Предлагаем к чтению аннотацию, описание, краткое содержание или предисловие (зависит от того, что написал сам автор книги «Raising Goats For Dummies»). Если вы не нашли необходимую информацию о книге — напишите в комментариях, мы постараемся отыскать её.
iscover the addictive joy of raising goats
Goats are amazing, multi-talented creatures that have been domesticated for over 10,000 years. As well as being a source of food, clothes, and milk, they’re wonderful companions: cute, intelligent, and playful—and often as friendly and attentive as dogs. In addition, they make endearing noises and—according to ancient Ethiopian legend—discovered coffee. So what’s holding you back? The new edition of
rebuts all your excuses, and shows you why having one—or, actually, a few—of these companionable ruminants (cud-chewing animals) in your life will bring you great joy, and, if you choose, unbeatable homemade milk and cheese—and possibly a cozy new sweater.
A happy goat aficionado since 1998, Cheryl K. Smith takes you from the grassroots of raising your goat—choosing and buying the breed you want, building and maintaining goat-friendly housing—to more elevated terrain, including how to build your own milk stand, participate in online goat shows (it’s a thing!), and even monetize your goat. You’ll also learn the fundamentals of proper care to make sure your goats are fed, kept healthy, and bred in ways that ensure they have the happiest life you can provide.
Study the history and breeds of goat, like the Nigerian Dwarf or Pygmy Live sustainably from and even profit from your goat Identify and alleviate common ailments Have fun raising the kids! Whether you’re researching buying a goat or learning on the hoof about the ones you have, this book has everything you need to see why getting your goat will bring years and years of joy.
Raising Goats For Dummies — читать онлайн ознакомительный отрывок
Ниже представлен текст книги, разбитый по страницам. Система сохранения места последней прочитанной страницы, позволяет с удобством читать онлайн бесплатно книгу «Raising Goats For Dummies», без необходимости каждый раз заново искать на чём Вы остановились. Поставьте закладку, и сможете в любой момент перейти на страницу, на которой закончили чтение.
Интервал:
Закладка:
Some of the common poisonous plants that might grow in your pasture or backyard include:
WeedsBracken fernButtercupCommon milkweedFoxgloveLantanaLocoweedPoke weedSpurgeSt. John’s WortWater hemlock and poison hemlock
TreesCyanide-producing trees such as cherry, chokecherry, elderberry, and plum (especially the wilted leaves from these trees)Ponderosa pineYew
Cultivated plantsAzaleaKaleLily of the valleyOleanderPoppyPotatoRhododendronRhubarb
 Many landscaping plants are poisonous, and a few are so deadly that even a few leaves can make your goat extremely sick. Don’t believe the old wives’ tale that goats always know what is poison or not. Before you bring your goats home, check your yard for these plants. The best resource for doing so is A Guide to Plant Poisoning of Animals in North America (Teton New Media), by Anthony P. Knight and Richard Walter. You can find many chapters of it online at the International Veterinary Information Service (
 www.ivis.org ). I can provide only limited information here, and so I recommend you check out the website and the book to make sure you’re familiar with the poisonous plants in your area.
If your goats can get their heads through a fence to the neighbor’s yard, make sure that poisonous plants aren’t growing within reach there.
If you find any of these plants, either remove them or make sure that your fencing will keep your goats away. If the poison plant is a tree, make sure that the leaves won’t fall into the pen in the autumn by either removing the tree or situating the pen far from the tree. Dried leaves can be the most deadly part of the tree.
You usually don’t need to freak out if one of your goats eats a little taste of any of these plants or trees, but you do need to keep an eye on him in case he shows signs of sickness. (See Chapter 11for more about poisons.) I had a rhododendron plant in my front yard for years, and when I let the goats out they sometimes took a little taste. I found it nerve-wracking and finally removed the plant, but none of my goats ever showed signs of poisoning.
I recommend that you talk to your neighbors about poisonous plants and ask them not to throw their garden trimmings into the yard as a treat for your goats without asking first. I lost a goat kid to oxalate poisoning from kale that a friendly neighbor had given my goats.
Building a Milk Stand
One essential item for goat owners is a milk stand, sometimes referred to as a stanchion. This device enables you to secure your goat not only for milking, but also for doing all the routine care and important tasks that I tell you about in Chapter 10.
You can purchase a metal milk stand at a livestock supply store or make a wood milk stand yourself, if you have the skills and equipment. Caprine Supply and other online livestock product suppliers sell the headpiece (technically, the headpiece itself is the stanchion) separately. For bigger goats, there is one that the head rests on instead of having a locking mechanism.
The simple, wooden milk stand in Figure 4-2, is for miniature goats and is easy to make. If you want to make one for a larger breed, you can lengthen the plywood and the side boards and make the legs longer. A similar milk stand can also be found online for only about $100.
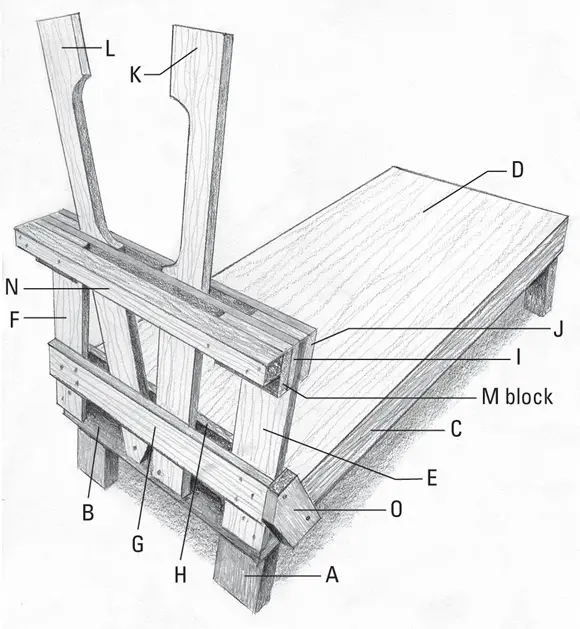
FIGURE 4-2:A milk stand.
Before you dive into hammering, gather your materials and equipment. You’ll need the following from your local lumberyard:
One 2 x 4 measuring 8 feet in length
One 1 x 6 measuring 10 feet in length
Two 1 x 4s measuring 10 feet in length
One 2 x 2 measuring 8 feet in length
One sheet of 5⁄8-inch plywood measuring 36 x 21½ inches
Pick up the following hardware:
One box of 100 1-inch deck screws
One box of 50 2-inch deck screws
One ¼-20 2½-inch bolt
One ¼-20 lock nut
One 4-inch hook-and-eye latch
Finally, make sure you have the following tools handy:
Drill
Drill bits: 1⁄8 inch and inch
Saw
Sandpaper (and a sander, if you have one)
Pencil
Square
Tape measure
Screwdriver
Clamp
The following sections cover all the steps for building.
Cutting the lumber into parts and marking the pieces
Start by doing the following:
1 Cut the 2 x 4 into four 14-inch-long leg pieces, and label each of these pieces A.
2 Using the remainder of the 2 x 4, cut a 20½-inch piece for the feed holder, and label the piece N.
3 Cut the 1 x 6 into two 20-inch end pieces and label each of these pieces B.
4 Using the remainder of the 1 x 6, cut two 36-inch side pieces, and label these pieces C.
5 Cut one of the 1 x 4s into four 21½-inch pieces, and label these pieces G, H, I, and J, respectively.
6 Using the remainder of the 1 x 4 from Step 5, cut one 18½-inch piece and label it F.
7 Using the remainder of the 1 x 4 from Step 5, cut two 4½-inch pieces, and label these pieces M.
8 Cut the second 1 x 4 into two 36-inch pieces, and label them K and L.
9 Using the remainder of the 1 x 4 from Step 8, cut one 18½-inch piece and label it E.
10 Using the remainder of the 1 x 4 from Step 8, cut two 12-inch pieces for braces and label it O.
You’re done cutting the lumber!
Attaching the legs to the base
Lay one end piece (B) on your work surface and screw two of the legs (A) to the inside of one end of the end piece (B) using 1-inch screws. Make sure that the screws are flush with the top and side of the end piece. Repeat with the other two legs and end piece.
 If you have a partner to hold the pieces, it will go faster. If you’re working alone, use a clamp to secure the pieces before screwing them together.
Attaching the side pieces to the base
Screw the side pieces (C) to the end pieces (B) using 2-inch screws. The legs and ends should be on the inside of the side pieces.
Finishing the platform
Turn the structure so it’s standing upright on the legs. Lay the plywood across the top lengthwise, making sure that one end of the plywood is flush with the end of the base. When you’re sure it’s square, drill holes with the 1⁄8-inch drill bit. Screw it all together with 2-inch deck screws.
It’s easier if you drill 1⁄8-inch starter holes first.
Preparing the stanchion
To prepare the stanchion, follow these steps:
1 With a tape measure, measure over 2½ inches from the top corner of piece F, and mark with a pencil.
2 From the same corner, measure down the side 5¾ inches, and make a mark across the piece.
3 Using your square as a ruler, draw a line from the first mark to the second mark.
4 Cut with your saw along the line.
5 Place the stanchion supports (E and F) on a table.
6 Place piece H flush with the top and side and place piece G across the lines you drew, 4 inches across.
Читать дальшеИнтервал:
Закладка:
Похожие книги на «Raising Goats For Dummies»
Представляем Вашему вниманию похожие книги на «Raising Goats For Dummies» списком для выбора. Мы отобрали схожую по названию и смыслу литературу в надежде предоставить читателям больше вариантов отыскать новые, интересные, ещё непрочитанные произведения.


Обсуждение, отзывы о книге «Raising Goats For Dummies» и просто собственные мнения читателей. Оставьте ваши комментарии, напишите, что Вы думаете о произведении, его смысле или главных героях. Укажите что конкретно понравилось, а что нет, и почему Вы так считаете.