Peter Kent - Cryptocurrency All-in-One For Dummies
Здесь есть возможность читать онлайн «Peter Kent - Cryptocurrency All-in-One For Dummies» — ознакомительный отрывок электронной книги совершенно бесплатно, а после прочтения отрывка купить полную версию. В некоторых случаях можно слушать аудио, скачать через торрент в формате fb2 и присутствует краткое содержание. Жанр: unrecognised, на английском языке. Описание произведения, (предисловие) а так же отзывы посетителей доступны на портале библиотеки ЛибКат.
- Название:Cryptocurrency All-in-One For Dummies
- Автор:
- Жанр:
- Год:неизвестен
- ISBN:нет данных
- Рейтинг книги:5 / 5. Голосов: 1
-
Избранное:Добавить в избранное
- Отзывы:
-
Ваша оценка:
Cryptocurrency All-in-One For Dummies: краткое содержание, описание и аннотация
Предлагаем к чтению аннотацию, описание, краткое содержание или предисловие (зависит от того, что написал сам автор книги «Cryptocurrency All-in-One For Dummies»). Если вы не нашли необходимую информацию о книге — напишите в комментариях, мы постараемся отыскать её.
, a collection of simple and straightforward resources that will get you up to speed on cryptocurrency investing and mining, blockchain, Bitcoin, and Ethereum.
Stop scouring a million different places on the web and settle in with this one-stop compilation of up-to-date and reliable info on what's been called the «21st century gold rush.» So, whether you're just looking for some fundamental knowledge about how cryptocurrency works, or you're ready to put some money into the markets, you'll find what you need in one of the five specially curated resources included in this book.
Cryptocurrency All-in-One For Dummies Gain an understanding of how cryptocurrency works and the blockchain technologies that power cryptocurrency Find out if you're ready to invest in the cryptocurrency market and how to make smart decisions with your cash Build a cryptocurrency mining rig out of optimized and specifically chosen computing hardware Dive into the details of leading cryptocurrencies like Bitcoin and Ethereum Perfect for anyone curious and excited about the potential that's been unlocked by the latest in cryptocurrency tech, this book will give you the foundation you need to become a savvy cryptocurrency consumer, investor, or miner before you know it.
Cryptocurrency All-in-One For Dummies — читать онлайн ознакомительный отрывок
Ниже представлен текст книги, разбитый по страницам. Система сохранения места последней прочитанной страницы, позволяет с удобством читать онлайн бесплатно книгу «Cryptocurrency All-in-One For Dummies», без необходимости каждый раз заново искать на чём Вы остановились. Поставьте закладку, и сможете в любой момент перейти на страницу, на которой закончили чтение.
Интервал:
Закладка:
Private blockchains are great for developers because they allow them to test ideas without using cryptocurrency. The developers’ ideas can remain a secret as well, because the data has not been published publicly.
Large institutions can capitalize on the security and permanence of blockchain technology without their transactions being public the way they are in traditional blockchains.
 Most of this minibook assumes you’re just finding out about blockchain for the first time and have little to no programming skills, but this section requires some knowledge of GitHub, Docker, and how to use your computer’s terminal. If you need a quick recap on coding before you dive in, Coding For Dummies by Nikhil Abraham (John Wiley & Sons, Inc.) provides a great overview on coding for nontechnical people. If you don’t plan to ever be hands-on with blockchain technology, you might want to skip the rest of this chapter.
In this section, you dive into building your first blockchain. You build it in two steps. The first step is to prepare your computer to create your private blockchain. Don’t worry — it’s made easier with tools from Docker and work that has been done by talented developers on GitHub. The second step is building your blockchain inside your Docker terminal.
Preparing your computer
You need to download some software on to your computer in order to try this blockchain project. Start by downloading Docker Desktop. Go to https://www.docker.com/get-started to download the correct version for your operating system.
Next, download GitHub Desktop from http://desktop.github.com . After you’ve installed GitHub Desktop, a pop-up screen asks you if you want to sign in to GitHub.com (if you already have an account). If you’re new to GitHub, click Create Your Free Account.
Now you need to create a place to store your blockchain data. Create a folder on your computer’s desktop called ethereum. You’ll use this folder to hold your future repository and other files. After you sign in or create a new GitHub account, GitHub Desktop presents you with a Let’s Get Started welcome screen. Click Create a New Repository on your Hard Drive, and then follow these steps to complete the process:
1 Name your repository ethereum, and give it a description of your choosing.
2 Point the Local Path to your desktop’s ethereum folder.
3 Click the Create Repository button.
4 Return to your web browser and go to www.github.com/Capgemini-AIE/ethereum-docker .You see the page shown in Figure 3-1.
5 Click the Code button.You’re given three choices: Clone, Open with GitHub Desktop, or Download Zip (see Figure 3-2).
6 Select the Open with GitHub Desktop option.The GitHub Desktop application reopens.In the GitHub Desktop application pop-up window, make sure the Local Path points to the project folder ethereum that you created on your desktop, and then click Clone.

FIGURE 3-1:Navigate to this page at GitHub.
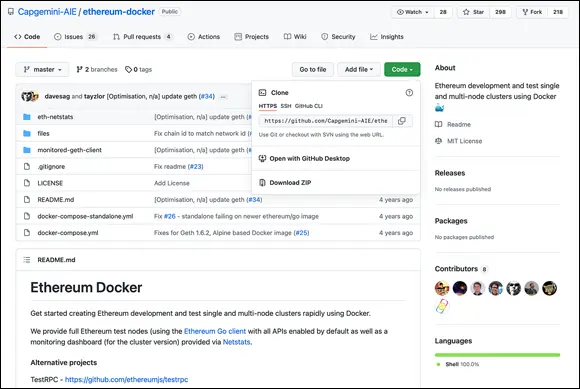
FIGURE 3-2:Open with GitHub Desktop.
Cloning from GitHub copies the information you need to build your new blockchain. Follow the steps in the next section to get started building your private blockchain.
Building your blockchain
You’re going to use the free Docker Desktop tool to build your blockchain. This tool gives you access to a virtual machine, cutting down the time required to set up and debug your system. Because of these features, it lets you create a stable environment for your blockchain, so you don’t have to worry about the settings on your machine, and you can get up and running faster.
Follow these steps:
1 Launch Docker Desktop on your computer. The Docker Desktop application launches a terminal you will use to build your blockchain.
2 Change directories in the terminal to ethereum.The files you create making the new blockchain will go into the desktop file you made in the preceding section. You need to give a command to your computer’s terminal in order to change directories. If you’re on a Mac or running Linux, enter the following command:cd ~/Desktop/ethereum/ethereum-docker/If you’re on a PC, enter the following command:cd ~\Desktop\ethereum\ethereum-docker\ If these commands don’t work for some reason, search the web for tutorials that explain how to change directories for your type of system.Now you can utilize the Ethereum–Docker files.
3 Create one stand-alone Ethereum node by entering the following command into your terminal: docker-compose -f docker-compose-standalone.yml up -dThis one line of code creates the following:One Ethereum bootstrapped containerOne Ethereum container that connects to the bootstrapped containerOne Netstats container with a web UI to view activity in the cluster
4 Take a look at your new blockchain by opening a web browser and going to http://$(docker-machine ip default):3000.
Congratulations! You’ve built your own private blockchain. If you’re so inclined, say a word of thanks to Graham Taylor and Andrew Dong, who put a lot of time into creating the Ethereum–Docker integration.
Chapter 4
Beholding the Bitcoin Blockchain
IN THIS CHAPTER
 Understanding where the Bitcoin blockchain came from
Diving into Bitcoin Cash
Straightening out some myths about Bitcoin
Staying safe when using Bitcoin
Mining for Bitcoins
Making a paper wallet to hold your Bitcoins
Warning! After reading this chapter, you may become hooked on this cool emerging technology. Read at your own peril.
Bitcoin demonstrates the purest aspects of blockchain technology. It’s the baseline that all other blockchains are compared to and the framework that nearly all have drawn upon. Knowing the basics of how the Bitcoin blockchain operates will allow you to better understand all the other technology you encounter in this ecosystem.
This chapter covers the fundamentals of how the Bitcoin blockchain operates. It offers safety tips to make your Bitcoin experience smoother and more successful and shows you practical things you can start doing now with Bitcoin. In these pages, you find out how to mine Bitcoin tokens, which gives you a new way to get your hands on Bitcoins without buying them. Finally, you discover how to transfer your tokens to paper wallets, and other practical ways to keep your tokens safe online. You can consider this chapter your quick and dirty introduction to Bitcoin. To dive deeper into Bitcoin, check out Book 3.
Читать дальшеИнтервал:
Закладка:
Похожие книги на «Cryptocurrency All-in-One For Dummies»
Представляем Вашему вниманию похожие книги на «Cryptocurrency All-in-One For Dummies» списком для выбора. Мы отобрали схожую по названию и смыслу литературу в надежде предоставить читателям больше вариантов отыскать новые, интересные, ещё непрочитанные произведения.


Обсуждение, отзывы о книге «Cryptocurrency All-in-One For Dummies» и просто собственные мнения читателей. Оставьте ваши комментарии, напишите, что Вы думаете о произведении, его смысле или главных героях. Укажите что конкретно понравилось, а что нет, и почему Вы так считаете.