David H. Lloyd - Practical Equine Dermatology
Здесь есть возможность читать онлайн «David H. Lloyd - Practical Equine Dermatology» — ознакомительный отрывок электронной книги совершенно бесплатно, а после прочтения отрывка купить полную версию. В некоторых случаях можно слушать аудио, скачать через торрент в формате fb2 и присутствует краткое содержание. Жанр: unrecognised, на английском языке. Описание произведения, (предисловие) а так же отзывы посетителей доступны на портале библиотеки ЛибКат.
- Название:Practical Equine Dermatology
- Автор:
- Жанр:
- Год:неизвестен
- ISBN:нет данных
- Рейтинг книги:5 / 5. Голосов: 1
-
Избранное:Добавить в избранное
- Отзывы:
-
Ваша оценка:
Practical Equine Dermatology: краткое содержание, описание и аннотация
Предлагаем к чтению аннотацию, описание, краткое содержание или предисловие (зависит от того, что написал сам автор книги «Practical Equine Dermatology»). Если вы не нашли необходимую информацию о книге — напишите в комментариях, мы постараемся отыскать её.
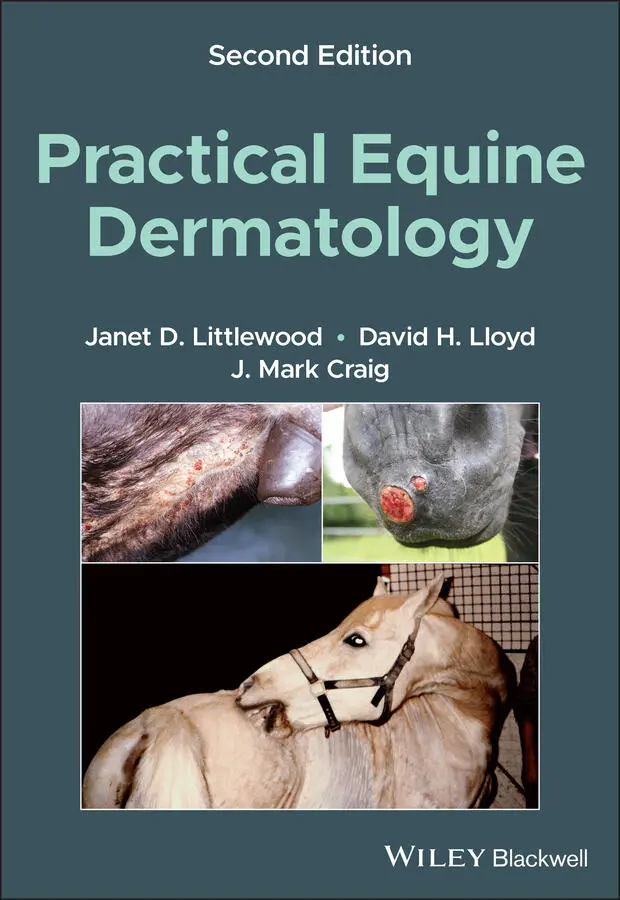
delivers a thorough exploration of common dermatological conditions affecting horses whilst also drawing attention to rarer conditions.
The book offers detailed advice on treatments and products currently available on the veterinary market in a problem-oriented layout that provides a practical approach to quick and efficient diagnosis. Clinical presentations, diagnostic features, and disorder management for each described condition are presented in an easy-to-digest bullet-point format supported by concise references and recommendations for further reading.
An ideal quick reference for veterinary practitioners on the key points of equine skin conditions, this new edition also includes:
A thorough introduction to the diagnostic approach, including taking an accurate history, the clinical examination, and diagnostic tests. Comprehensive exploration of pruritus, including contagious conditions, such as ectoparasites and helminth infestation, and non-contagious conditions, such as insect attack and atopic dermatitis. Practical discussion of crusting and scaling, including primary seborrhoea and infectious causes, such as superficial fungal infections and environmental factors. In-depth examination of ulcers and erosions, nodules and swellings, coat problems, and pigmentary disorders. Perfect for any practising veterinarian seeing equine cases in first opinion practice,
will also be of use to veterinary students with an interest in equine veterinary medicine.
Practical Equine Dermatology — читать онлайн ознакомительный отрывок
Ниже представлен текст книги, разбитый по страницам. Система сохранения места последней прочитанной страницы, позволяет с удобством читать онлайн бесплатно книгу «Practical Equine Dermatology», без необходимости каждый раз заново искать на чём Вы остановились. Поставьте закладку, и сможете в любой момент перейти на страницу, на которой закончили чтение.
Интервал:
Закладка:
Swabs
May be useful for bacteriology and fungal culture and collecting material for cytological examination.
If the sample is to be processed within 30 min of collection, a dry, sterile swab can be used for bacterial and fungal culture, and smears. Otherwise, place swabs into suitable transport media (e.g. Amies charcoal medium, or Copan ESwabs).
Samples collected from the skin surface may not be representative of the causative agent, so collect pus from an intact pustule or the underside of a freshly removed scab, or submit biopsy material for culture. Useful cultures may sometimes be obtained from a dry crust by rehydrating with sterile normal saline prior to processing.
Needle aspirates
This technique is used for sampling nodules, masses, and enlarged superficial lymph nodes.
A 20–22 g needle can be used, with or without a 5 ml syringe. The area to be aspirated should be carefully cleaned and disinfected.
The needle is inserted into the nodule ( Figure 1.6), mass, or lymph node and used to probe the tissue in several places, initially without aspirating, and subsequently whilst gently aspirating.
The needle is withdrawn from the tissue and detached from the syringe, which is then filled with a small amount of air, reattached to the needle, and the sample expressed directly onto a clean slide for cytology or onto a swab for culture. A second slide is placed over the sample to spread the material. The slides are then separated gently to avoid damaging cells and air‐dried prior to staining for microscopical examination.
Biopsy samples
Skin biopsies may be collected for a variety of reasons, including histopathology, fungal or bacterial culture, viral identification with electron microscopy, and immunohistochemistry. If in doubt, consult a pathologist as to the best way to process and transport the biopsy to the laboratory.

Figure 1.6 Fine needle aspiration of a nodular lesion.
Source: Courtesy of Liz Steeves.
There are three common ways to take biopsy samples: by excision, biopsy punch ( Figure 1.7), or shave biopsy (see Chapter 3). The most common is the punch biopsy technique described below.
Sedation is generally necessary, followed by local analgesia. For the distal limbs, a nerve block (low or high four‐point or abaxial sesamoid, depending on the area involved) may be performed or local infiltration below the sample site or as a ring block around the lesion. For facial and difficult to access sites, such as inguinal and perineal lesions, general anaesthesia may be required.
Areas that include primary lesions should be selected where possible and sites not marred by medication. Take multiple samples unless only one lesion type and stage is present.
Because sample orientation during histopathological processing cannot be predicted, ensure that the whole punch sample includes tissue of interest. If normal skin is to be included for comparison, this should be taken as a separate sample in an appropriately labelled pot. Where you wish to investigate the transition between lesional and healthy skin, take an elliptical excision sample with the long axis going from normal to abnormal.
The selected sites may be marked using a coloured marker. Try to avoid areas overlying superficial ligaments, blood vessels, nerves, or superficial synovial structures associated with tendons and joints. Figure 1.7 The punch biopsy procedure enables rapid sampling and is suitable for most equine lesions.Source: Courtesy of Harriet Brooks.
It is important not to prepare the site surgically before sampling, since this removes surface material which may be of great diagnostic value.
The selected site may be anaesthetised by injecting approximately 1–2 ml of mepivacaine or lignocaine hydrochloride without adrenaline into the subcutaneous tissue below the lesions.
Wait for 2–3 min and test for sensation at the site with a needle.
Use a 6–9 mm biopsy punch; generally, the larger the size of the punch is better. Ensure the cutting edge is sharp.
Apply the punch with rotating movements in one direction to limit artefacts until through the skin, then withdraw. The sample may be attached to underlying structures by a thin attachment. Grasp the sample gently with small haemostat forceps or a hypodermic needle at the subcutaneous portion, lift from the surrounding tissue, and cut free using sharp scissors.
Place the sample in the correct transport medium. For normal histopathology, 10% neutral buffered formalin is used. Keep samples for culture moist by wrapping in a sterile gauze swab soaked with sterile normal saline and consult the microbiology laboratory about the appropriate medium for submission.
Clean around biopsy sites with diluted 2% chlorhexidine or povidone‐iodine solution and suture using a single interrupted suture of 2–0 monofilament nylon. For sites where it might be difficult to remove sutures at a later date, an absorbable suture may be more appropriate.
Topical antibiotic powder or spray may be used; bandages or adhesive dressings may be needed at some sites.
Submit samples in appropriately labelled pots together with a fully completed submission form, including pertinent clinical history, in order to get the best value from your histopathologist and microbiologist.
Other samples
Collection and examination and/or analysis of forage and bedding may also be valuable.
Diagnostic investigations specific to individual diseases will be covered in the relevant chapters.
REFERENCES AND FURTHER READING
1 Cowell, R. and Tyler, R. (2001) Diagnostic Cytology and Hematology of the Horse (2nd edition). St Louis, Mosby Inc.
2 Sloet, M.M. and Grinwis, G.C.M. (2018) Clinical pathology in equine dermatology. Equine Veterinary Education, 30: 377–385.
Конец ознакомительного фрагмента.
Текст предоставлен ООО «ЛитРес».
Прочитайте эту книгу целиком, купив полную легальную версию на ЛитРес.
Безопасно оплатить книгу можно банковской картой Visa, MasterCard, Maestro, со счета мобильного телефона, с платежного терминала, в салоне МТС или Связной, через PayPal, WebMoney, Яндекс.Деньги, QIWI Кошелек, бонусными картами или другим удобным Вам способом.
Интервал:
Закладка:
Похожие книги на «Practical Equine Dermatology»
Представляем Вашему вниманию похожие книги на «Practical Equine Dermatology» списком для выбора. Мы отобрали схожую по названию и смыслу литературу в надежде предоставить читателям больше вариантов отыскать новые, интересные, ещё непрочитанные произведения.


Обсуждение, отзывы о книге «Practical Equine Dermatology» и просто собственные мнения читателей. Оставьте ваши комментарии, напишите, что Вы думаете о произведении, его смысле или главных героях. Укажите что конкретно понравилось, а что нет, и почему Вы так считаете.