Stephen R. Bolsover - Cell Biology
Здесь есть возможность читать онлайн «Stephen R. Bolsover - Cell Biology» — ознакомительный отрывок электронной книги совершенно бесплатно, а после прочтения отрывка купить полную версию. В некоторых случаях можно слушать аудио, скачать через торрент в формате fb2 и присутствует краткое содержание. Жанр: unrecognised, на английском языке. Описание произведения, (предисловие) а так же отзывы посетителей доступны на портале библиотеки ЛибКат.
- Название:Cell Biology
- Автор:
- Жанр:
- Год:неизвестен
- ISBN:нет данных
- Рейтинг книги:3 / 5. Голосов: 1
-
Избранное:Добавить в избранное
- Отзывы:
-
Ваша оценка:
Cell Biology: краткое содержание, описание и аннотация
Предлагаем к чтению аннотацию, описание, краткое содержание или предисловие (зависит от того, что написал сам автор книги «Cell Biology»). Если вы не нашли необходимую информацию о книге — напишите в комментариях, мы постараемся отыскать её.
Cell Biology: A Short Course
Cell Biology: A Short Course
Cell Biology: A Short Course
Cell Biology — читать онлайн ознакомительный отрывок
Ниже представлен текст книги, разбитый по страницам. Система сохранения места последней прочитанной страницы, позволяет с удобством читать онлайн бесплатно книгу «Cell Biology», без необходимости каждый раз заново искать на чём Вы остановились. Поставьте закладку, и сможете в любой момент перейти на страницу, на которой закончили чтение.
Интервал:
Закладка:
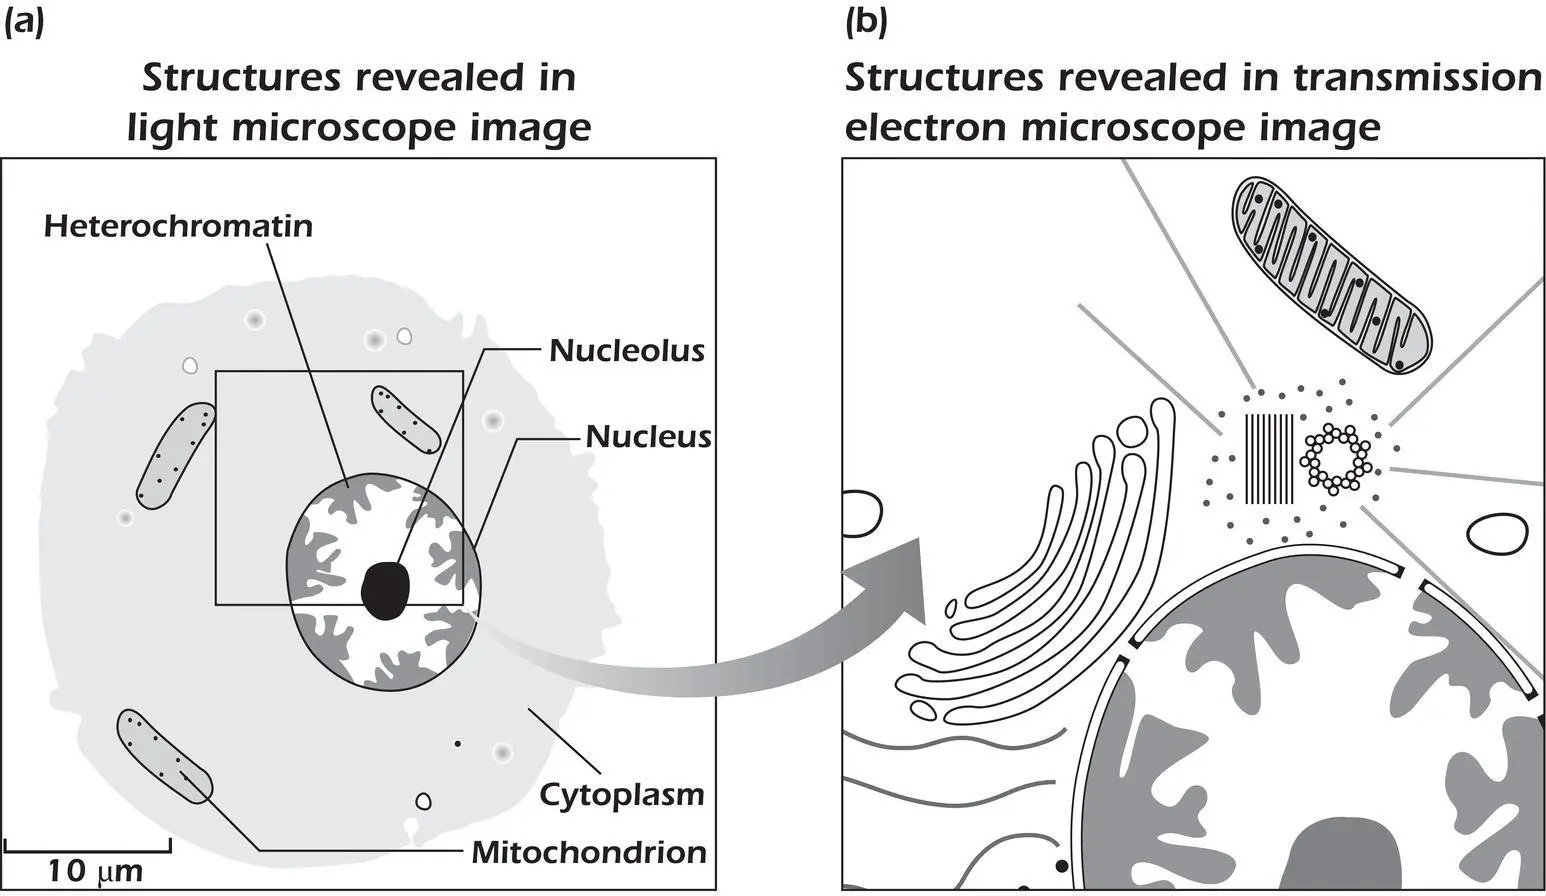
 Figure 1.11.Cell structure as seen through light and transmission electron microscopes. For the identity of the structures revealed by the electron microscope, see Figure 1.2.
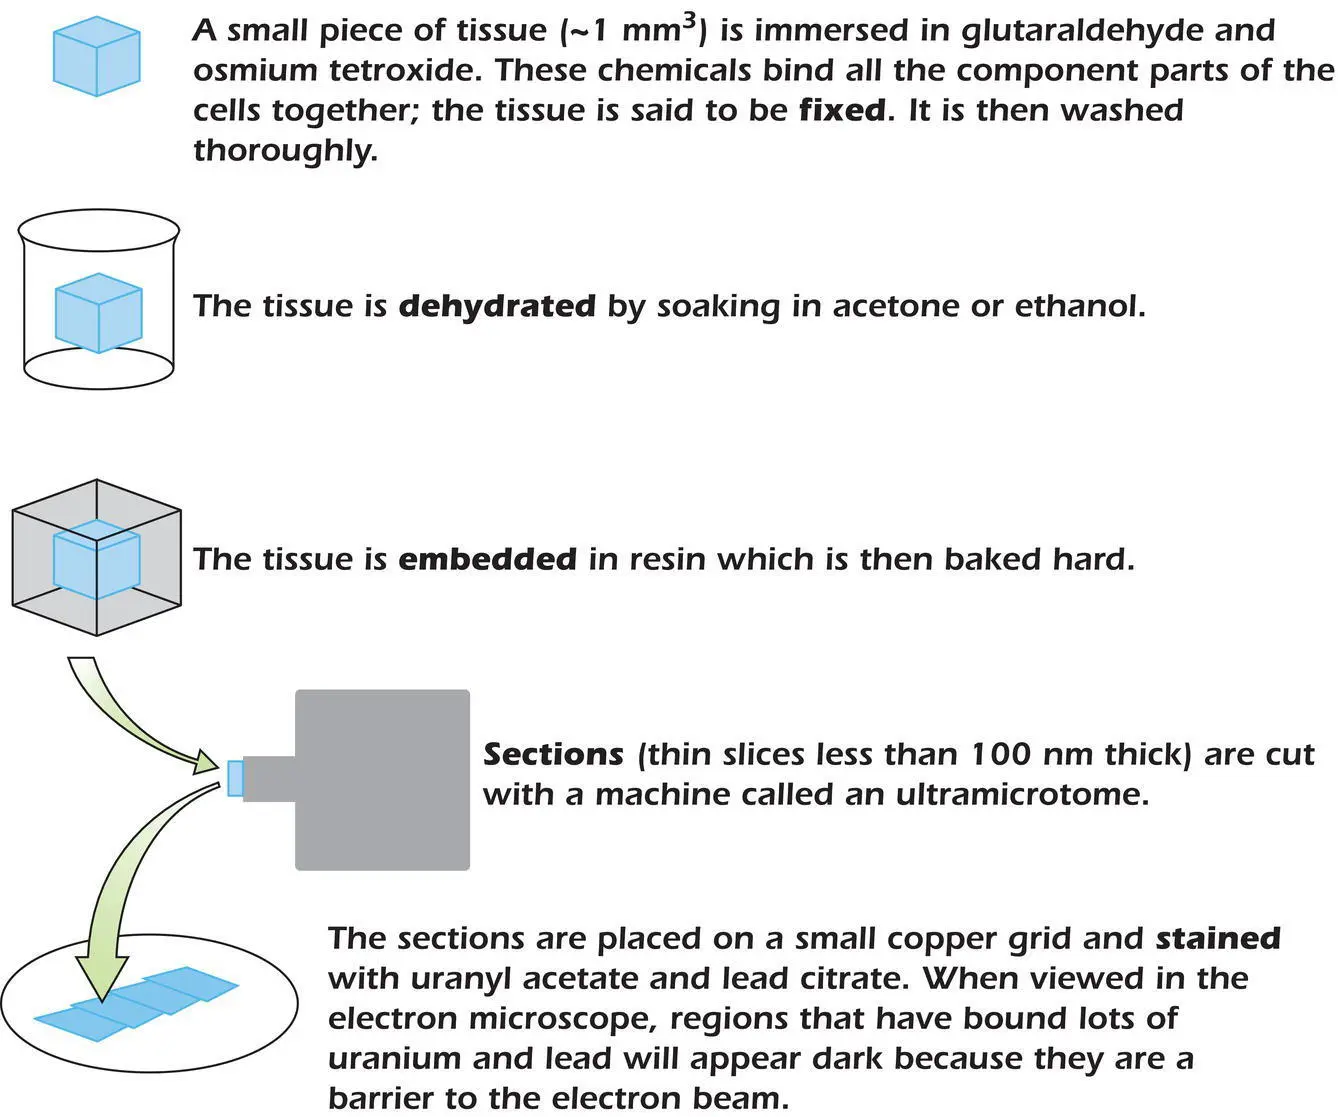
Figure 1.12.Preparation of tissue for electron microscopy.
The Scanning Electron Microscope
Whereas the image in a transmission electron microscope is formed by electrons transmitted through the specimen, in the scanning electron microscope it is formed from electrons that are reflected back from the surface of a specimen as the electron beam scans rapidly back and forth over it. These reflected electrons are detected and used to generate a picture on a display monitor. The scanning electron microscope operates over a wide magnification range, from 10 times to 100 000 times, and has a wide depth of focus.The images created give an excellent impression of the three‐dimensional shape of objects ( Figure 1.7). The scanning electron microscope is therefore particularly useful for providing topographical information on the surfaces of cells or tissues. Modern instruments have a resolution of about 1 nm.
 FLUORESCENCE MICROSCOPY
A major advance in light microscopy was the development of the fluorescence microscope. Fluorescentmolecules emit light when they are illuminated with light of a shorter wavelength. Familiar examples are the hidden signature in bank passbooks, which is written in fluorescent ink that glows blue (wavelength about 450 nm) when illuminated with ultraviolet light (UV) (wavelength about 360 nm), and the whitener in fabric detergents that causes your white shirt to glow blue when illuminated by the ultraviolet light in a club. The fluorescent dye Hoechst 33342 has a similar wavelength dependence: it is excited by UV light and emits blue light. However, it differs from the dyes used in ink or detergent in that it binds tightly to the DNA in the nucleus and only fluoresces when so bound. Figure 1.13a shows the optical path through a microscope set up to look at a preparation stained with Hoechst. White light from an arc lamp passes through an excitation filter that allows only UV light to pass. This light then strikes the heart of the fluorescence microscope: a special mirror called a dichroic mirror that reflects light of wavelengths shorter than a designed cutoff but transmits light of longer wavelength. To view Hoechst, we use a dichroic mirror of cutoff wavelength 400 nm, which therefore reflects the UV excitation light down through the objective lens and onto the specimen. Any Hoechst bound to DNA in the preparation will emit blue light. Some of this will be captured by the objective lens and, because its wavelength is greater than 400 nm, will not be reflected by the dichroic mirror but will instead pass through. An emission filter, set to pass only blue light, cuts out any scattered UV light. The blue light now passes to the eye or camera in the usual way. Image (b) shows a field of cells cultured from rat brain after staining with Hoechst. Only the nuclei are seen, as bright ovals.
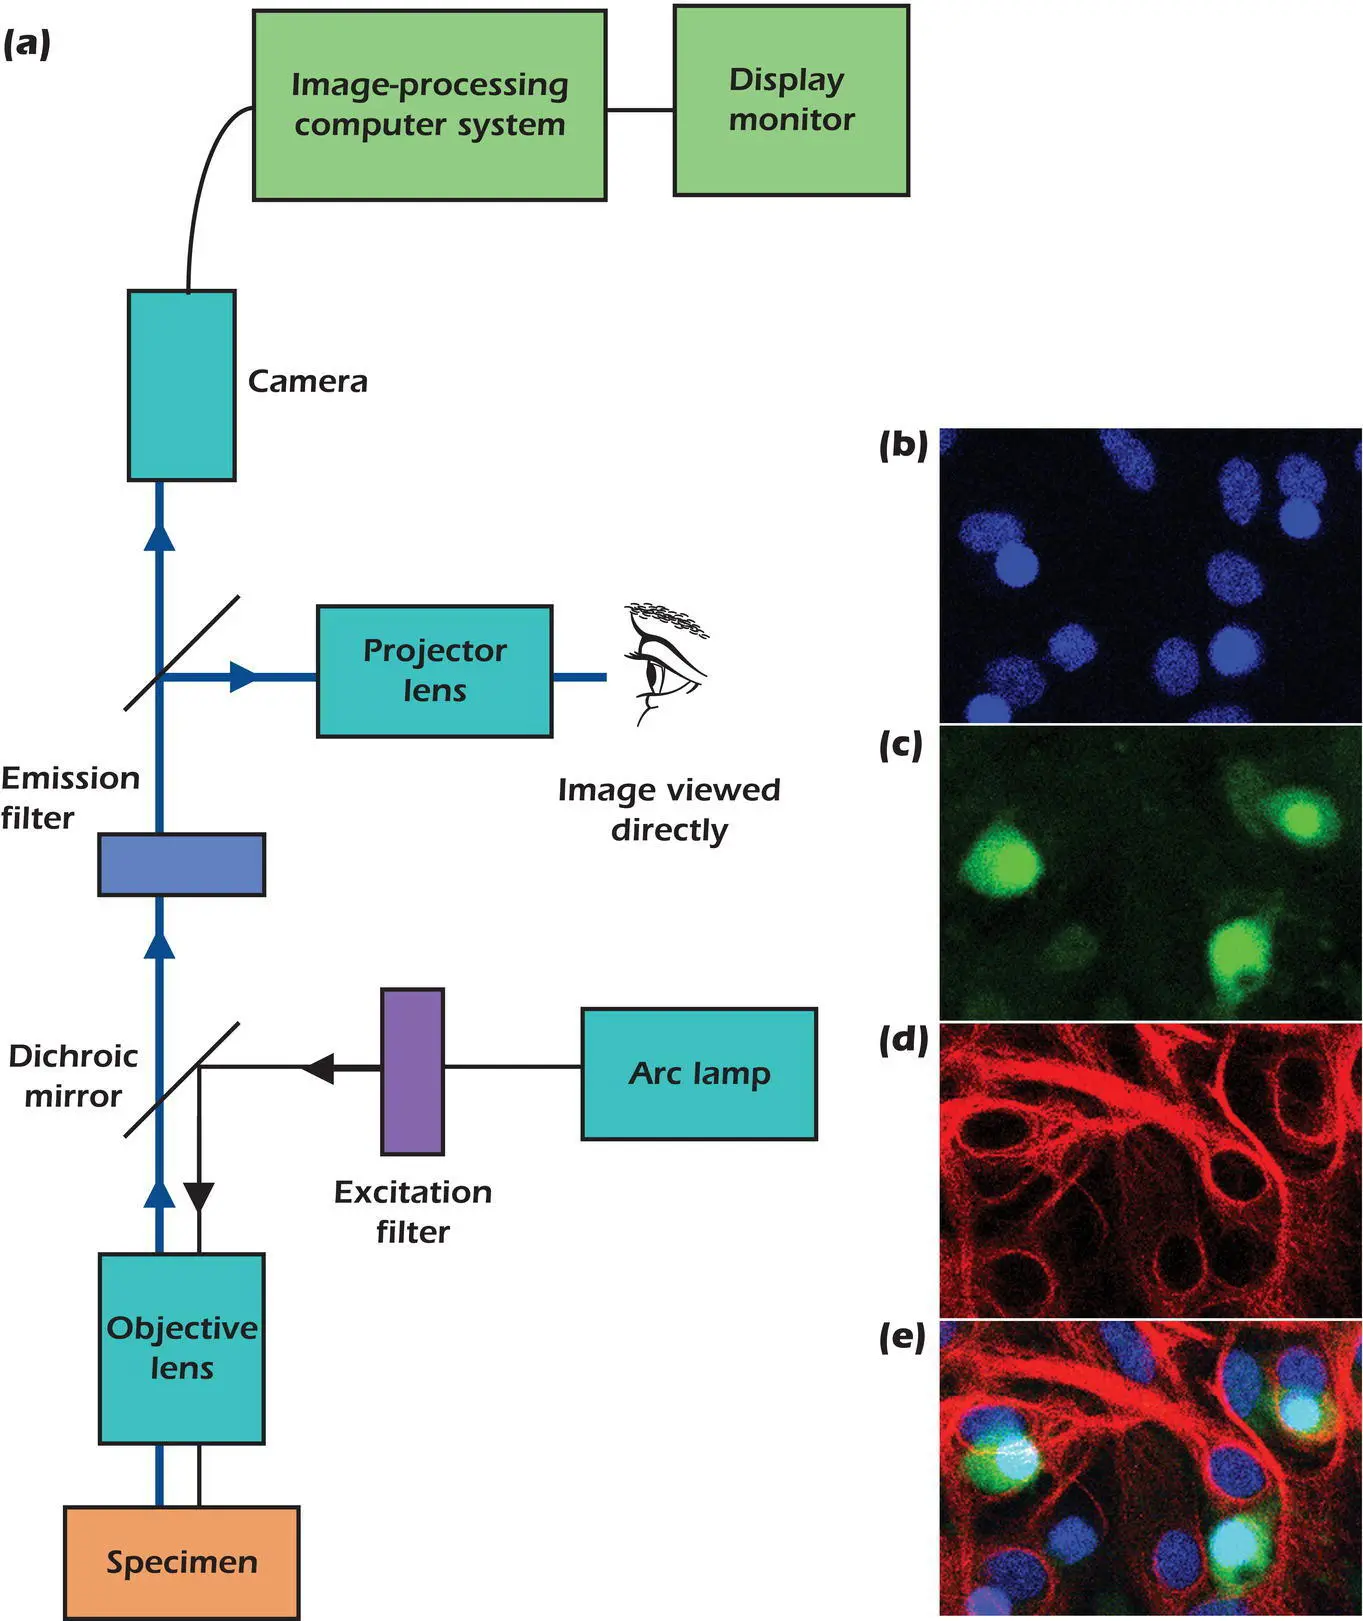
Figure 1.13.(a) Basic design of a fluorescence light microscope. (b–d) Cultured brain cells labeled with (b) Hoechst to label DNA, (c) fluorescently labeled antibody against ELAV, (d) fluorescently labeled antibody against glial‐specific intermediate filament. (e) Three fluorescence images merged.
Although some of the structures and chemicals found in cells can be selectively stained by specific fluorescent dyes such as Hoechst, others are most conveniently revealed by using antibodies. In this technique an animal (usually a mouse, rabbit, or goat) is injected with a protein or other molecule of interest. The animal's immune system recognizes the chemical as foreign and generates antibodies that bind to (and therefore help neutralize) the chemical. Some blood is then taken from the animal and the antibodies purified. The antibodies can then be labeled by attaching a fluorescent dye. Images (c) and (d) show the same field of brain cells but with the excitation filter, dichroic mirror, and emission filter changed so as to reveal in (c) a protein called ELAV that is found only in neurons; then in (d) an intermediate filament protein (page 228) found only in glial cells. The antibody that binds to ELAV is labeled with a fluorescent dye that is excited by blue light and fluoresces green. The antibody that binds to the glial filaments is labeled with a dye that is excited by green light and fluoresces red. Because these wavelength characteristics are different, the location of the three chemicals – DNA, ELAV, and intermediate filament – can be revealed independently in the same specimen. Panel (e) shows the three images superimposed.
The technique just described is primary immunofluorescenceand requires that the antibody to the chemical of interest be labeled with a dye. Only antibodies to chemicals that many laboratories study are so labeled. In order to reveal other chemicals, scientists use secondary immunofluorescence.In this approach, a commercial company injects an animal (e.g. a goat) with an antibody from another animal (e.g. a rabbit). The goat then makes “goat anti‐rabbit” antibody. This, the secondary antibody,is purified and labeled with a dye. All the scientist has to do is make or buy a rabbit antibody that binds to the protein of interest. No further modification of this specialized primary antibodyis necessary. Once the primary antibody has bound to the specimen and excess antibody rinsed off, the specimen is then exposed to the fluorescent secondary antibody that binds selectively to the primary antibody. Viewing the stained preparation in a fluorescence microscope then reveals the location of the chemical of interest. The same dye‐labeled secondary antibody can be used in other laboratories or at other times to reveal the location of many different proteins because the specificity is determined by the unlabeled primary antibody.
Increasing the Resolution of Fluorescence Microscopes
The resolution and precision of fluorescence microscopes have steadily improved with time. In 1979 a team in Amsterdam invented the confocal light microscopethat scanned a point of excitation light across the specimen to markedly reduce the contribution of out‐of‐focus light. In 1987 a team in Cambridge developed a prototype of a commercial system and within a couple of years all major microscope manufacturers began offering confocal light microscopes.
A series of advanced microscopy techniques start with confocal microscopy and then use clever optical approaches to dramatically improve the resolution so that objects considerably smaller than the wavelength of light are revealed. Collectively these techniques are known as super‐resolution microscopy.One such technique is Stimulated Emission Depletion Microscopy (STED), in which the excitation spot is surrounded by a doughnut of light of a different wavelength that actually de‐excites the dye. Figure 1.14shows one use of STED. Over 100 proteins are associated with the nuclear pores that perforate the nuclear envelope ( Figure 1.2). Göttfert and coworkers used an antibody that recognizes one of these proteins, called gp210, labeled with a dye that emits red light, and a second antibody, labeled with a green emitter, against the transport machinery inside the pore. Figure 1.14shows how an uninterpretable fuzz of red and green fluorescence in the standard confocal image is resolved into beautiful images by STED, revealing how eight gp210 molecules surround the pore. Data like these contribute to our present understanding of the eightfold symmetry of the structure that braces the pore to keep it open (Figure 12.10 on page 211). Super‐resolution microscopes can resolve objects down to tens of nanometers in size and can visualize biological structures previously thought to be unresolvable using light.
Читать дальшеИнтервал:
Закладка:
Похожие книги на «Cell Biology»
Представляем Вашему вниманию похожие книги на «Cell Biology» списком для выбора. Мы отобрали схожую по названию и смыслу литературу в надежде предоставить читателям больше вариантов отыскать новые, интересные, ещё непрочитанные произведения.


Обсуждение, отзывы о книге «Cell Biology» и просто собственные мнения читателей. Оставьте ваши комментарии, напишите, что Вы думаете о произведении, его смысле или главных героях. Укажите что конкретно понравилось, а что нет, и почему Вы так считаете.