John III Beumer - Fundamentals of Implant Dentistry
Здесь есть возможность читать онлайн «John III Beumer - Fundamentals of Implant Dentistry» — ознакомительный отрывок электронной книги совершенно бесплатно, а после прочтения отрывка купить полную версию. В некоторых случаях можно слушать аудио, скачать через торрент в формате fb2 и присутствует краткое содержание. Жанр: unrecognised, на английском языке. Описание произведения, (предисловие) а так же отзывы посетителей доступны на портале библиотеки ЛибКат.
- Название:Fundamentals of Implant Dentistry
- Автор:
- Жанр:
- Год:неизвестен
- ISBN:нет данных
- Рейтинг книги:5 / 5. Голосов: 1
-
Избранное:Добавить в избранное
- Отзывы:
-
Ваша оценка:
Fundamentals of Implant Dentistry: краткое содержание, описание и аннотация
Предлагаем к чтению аннотацию, описание, краткое содержание или предисловие (зависит от того, что написал сам автор книги «Fundamentals of Implant Dentistry»). Если вы не нашли необходимую информацию о книге — напишите в комментариях, мы постараемся отыскать её.
Fundamentals of Implant Dentistry — читать онлайн ознакомительный отрывок
Ниже представлен текст книги, разбитый по страницам. Система сохранения места последней прочитанной страницы, позволяет с удобством читать онлайн бесплатно книгу «Fundamentals of Implant Dentistry», без необходимости каждый раз заново искать на чём Вы остановились. Поставьте закладку, и сможете в любой момент перейти на страницу, на которой закончили чтение.
Интервал:
Закладка:
Surgical guides may be used for fully guided or semiguided surgery or both ( Fig 5-19). Fully guided implant surgery controls implant surgery by allowing for the preparation of the osteotomies and placement of the implants through the guide. The fully guided surgical guide also accounts for the angulation and depth of the implants. As a result, the fully guided protocol is the most predictable protocol for implant placement. In certain situations, the surgery may be accomplished using a flapless approach (see Fig 1-16) 104; however, great care must be used in patient selection to avoid postsurgical complications and to ensure that the implants are properly positioned within the bone. Fully guided surgery has increased in use and popularity, particularly with the immediate loading scenarios employed by many clinicians.
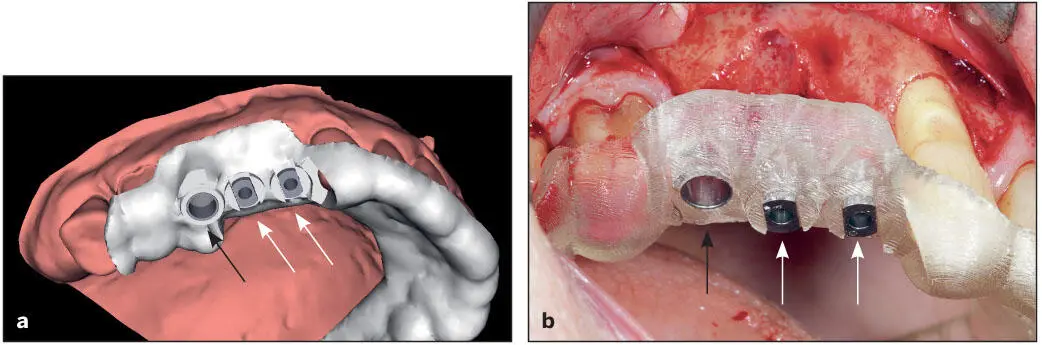
Fig 5-19 A tooth-borne surgical guide designed for both fully guided (black arrows) and semiguided (white arrows) implant surgery. (a) Surgical guide designed. (b) Manufactured surgical guide with the metal sleeve inserts. This is verified for proper fit and stability. (Courtesy of Dr A. Pozzi.)
Some partially edentulous cases require the use of semiguided surgical drill guides, primarily because the mesiodistal space available is insufficient to house the drill sleeves used in fully guided implant surgery. Semiguided surgical drill guides permit the initial preparation of the osteotomy sites with twist drills and control the direction and angulation of the initial preparations. However, the final preparations and the depth of implant placement is completed freehand and dependent on the surgical operator’s judgment. As a result, it is slightly less accurate than the fully guided protocol. 105
The diameters of the fully guided drill sleeves (bushings) vary according to the implant manufacturer and are able to accommodate the drills and the implants being placed (see Figs 5-18and 5-19). The metal sleeves for the semiguided surgical guides are smaller in diameter and allow for only a few drill sizes in the initial preparation of the osteotomies, while the completion of the osteotomies and placement of the implants are performed freehand.
Surgical guides for the fully edentulous patient may be one piece, two pieces, or more depending on the surgical procedure and the necessity of adjunctive therapy. Multiple-piece surgical guides are comprised of a series of stackable templates and when used together can be employed for bone reduction, osteotomy preparation, and placement of the implants and orientation of the conversion (provisional) prosthesis when an immediate loading protocol is employed (see Figs 5-15band 5-15f). The foundation (base) portion of the guide is typically used as a bone reduction guide in addition to supporting the surgical guide used for the guided implant surgery protocol. The bone screws used to secure the template are interspersed between implant sites. Flaps should be designed to ensure adequate exposure of the bone and placement of the foundation template. Use of a positioning jig enhances proper positioning of the foundation template prior to placement of the bone fixation screws (see Figs 8-69d to 8-69f). The surgical guide with the metal drill sleeves is then attached to the foundation template in preparation for the osteotomies and placement of the implants (see Fig 8-70).
Navigation-guided implant placement
The concept of navigation-guided implant placement has recently been introduced, and several practitioners have been testing its application ( Fig 5-20). During the CBCT scan, the patient wears a custom jig with radiopaque markers. Treatment is digitally planned using specifically tailored software. At the time of the procedure, once the unit is calibrated to the patient tracker that is rigidly fitted to the patient’s dentition, the unit scanner is able to detect the patient in 3D and is superimposed onto the CBCT taken prior to surgery. Similar markers on the handpieces allow the unit to compute the virtual space where the implant drills are located and see the surrounding bone and vital structures. The surgeon views the monitor in order to prepare the osteotomy sites and place the implants in the planned positions. Deviation from the planned implant position sounds off an alarm to alert the surgical team. The patient’s head movement and position do not necessarily affect this process. While promising, this procedure is dependent on proper scanning and calibration methods to the tracking units as well as rigid fixation of the patient tracking device.
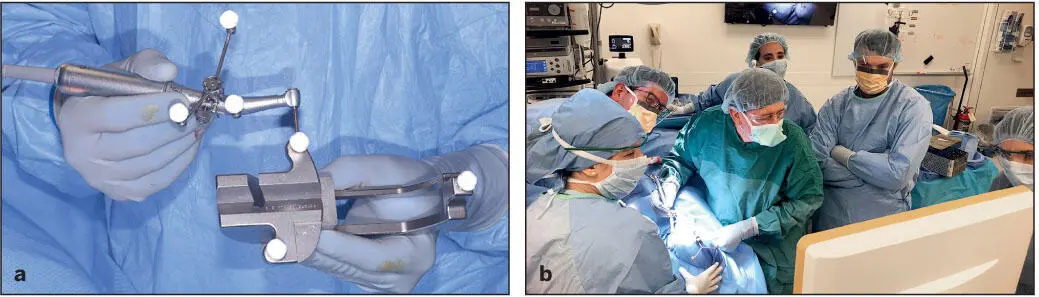
Fig 5-20 (a) Triple reflective marker spheres are anchored to the handpiece. This allows the system to triangulate its position. This image shows the calibration jig also bearing triple spheres. This allows the software to locate the tip of the osteotomy bur as it relates to the handpiece. (b) The osteotomy site is being created. In this patient, zygomatic implants are planned.
There are available haptic training simulators that provide a close-to-real feel of the procedures and drilling. A less experienced clinician would be able to practice the procedure as many times as they prefer prior to the actual procedure. This can be particularly helpful for a beginning clinician.
Robotic surgery
Another recent development is the introduction of robotic surgery for implant placement. With this method, the team determines the desired implant location with a fully computerized automation system, and the dental implants are placed in the planned positions. While accuracy has not been fully validated by systematic clinical trials, along with the influx of artificial intelligence, the future of automated implant treatment planning and placement appears promising.
Design and fabrication of abutments, frameworks, and prostheses
In terms of design and fabrication of dental prostheses, digital technologies have changed the methods for restoring implants. Traditionally, implant prostheses were fabricated by casting via the lost wax technique, where the abutments, frameworks, or copings are built in wax and cast in metal. This was followed by veneering these structures with ceramic or acrylic resin. This option is still a viable treatment method, and manufacturing companies provide relevant components in the form of UCLA castable abutments and plastic burnout sleeves that can facilitate the fabrication process. However, this protocol has some manufacturing-related limitations because it is labor intensive and requires considerable human handling and skills. As the restoration will be cast and subsequently veneered, it has to be heated several times, which may influence the connection surface quality and the precision of component fit. 18Casting was found to cause rotational misfit of abutments and framework misfit. This is even more prominent for base metal alloys. This is further accentuated with the anatomical contouring of implant restorations, which use more metal.
On the contrary, digital technologies in the form of CAD/CAM overcome several of the traditional casting problems and provide the clinicians with more flexibility and options to treat implant patients. It has been established that CAD/CAM processing for implant dentistry has the advantages of (1) producing accurately fitting components, (2) ease of customizing components, (3) manufacturing components from esthetic materials, and (4) allowing simpler implant restoration concepts. In addition, because CAD/CAM processing avoids using noble metals and reduces human processing, it is a cost-effective method of fabrication. 14
Читать дальшеИнтервал:
Закладка:
Похожие книги на «Fundamentals of Implant Dentistry»
Представляем Вашему вниманию похожие книги на «Fundamentals of Implant Dentistry» списком для выбора. Мы отобрали схожую по названию и смыслу литературу в надежде предоставить читателям больше вариантов отыскать новые, интересные, ещё непрочитанные произведения.


Обсуждение, отзывы о книге «Fundamentals of Implant Dentistry» и просто собственные мнения читателей. Оставьте ваши комментарии, напишите, что Вы думаете о произведении, его смысле или главных героях. Укажите что конкретно понравилось, а что нет, и почему Вы так считаете.