Doug Lowe - Electronics All-in-One For Dummies
Здесь есть возможность читать онлайн «Doug Lowe - Electronics All-in-One For Dummies» — ознакомительный отрывок электронной книги совершенно бесплатно, а после прочтения отрывка купить полную версию. В некоторых случаях можно слушать аудио, скачать через торрент в формате fb2 и присутствует краткое содержание. Жанр: unrecognised, на английском языке. Описание произведения, (предисловие) а так же отзывы посетителей доступны на портале библиотеки ЛибКат.
- Название:Electronics All-in-One For Dummies
- Автор:
- Жанр:
- Год:неизвестен
- ISBN:нет данных
- Рейтинг книги:5 / 5. Голосов: 1
-
Избранное:Добавить в избранное
- Отзывы:
-
Ваша оценка:
Electronics All-in-One For Dummies: краткое содержание, описание и аннотация
Предлагаем к чтению аннотацию, описание, краткое содержание или предисловие (зависит от того, что написал сам автор книги «Electronics All-in-One For Dummies»). Если вы не нашли необходимую информацию о книге — напишите в комментариях, мы постараемся отыскать её.
Electronics All-in-One For Dummies,
Electronics All-in-One For Dummies
Electronics All-in-One For Dummies — читать онлайн ознакомительный отрывок
Ниже представлен текст книги, разбитый по страницам. Система сохранения места последней прочитанной страницы, позволяет с удобством читать онлайн бесплатно книгу «Electronics All-in-One For Dummies», без необходимости каждый раз заново искать на чём Вы остановились. Поставьте закладку, и сможете в любой момент перейти на страницу, на которой закончили чтение.
Интервал:
Закладка:
Nearly all bad solder joints are caused by one of three things: not allowing the wire and pad to heat sufficiently, applying too much solder, or melting the solder with the soldering iron instead of with the wire lead. Here are some indications of a bad solder joint:
The pad and lead aren’t completely covered with solder, enabling you to see through one side of the hole through which the lead passes. Either you didn’t apply quite enough solder, or the pad wasn’t quite hot enough to accept the solder.
The lead is loose in the hole or the solder isn’t firmly attached to the pad. One possible reason for this is that you moved the lead before the solder had completely cooled. FIGURE 7-4:A good solder joint.
The solder isn’t shiny. Shiny solder indicates solder that heated, flowed, and then cooled properly. If the solder gets just barely hot enough to melt, then flows over a wire or pad that isn’t heated sufficiently, it will be dull when it cools. (Unfortunately, the new lead-free solder almost always cools dull, so it looks like a bad solder joint even when the joint is good!)
Solder overflows the pad and touches an adjacent pad. This can happen if you apply too much solder. It can also happen if the pad didn’t get hot enough to accept the solder, which can cause the solder to flow off the pad and onto an adjacent pad. If solder spills over from one pad to an adjacent pad, your circuit may not work correctly.
Desoldering
Desoldering refers to the process of undoing a soldered joint. You may have to do this if you discover that a solder joint is less than satisfactory, if a component fails, or if you connect your circuit incorrectly.
To desolder a solder connection, you need a desoldering bulb and a desoldering braid. Figure 7-5 shows these tools.
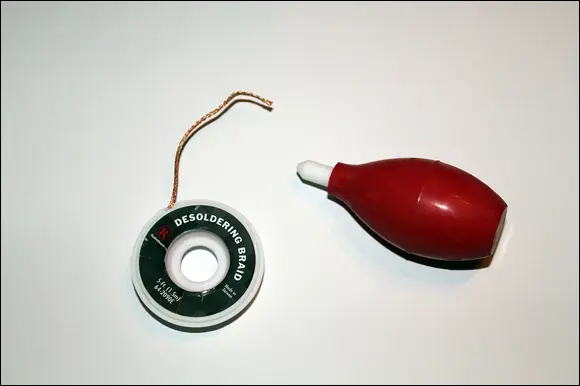
FIGURE 7-5:A desoldering bulb and a desoldering braid.
Here are the steps for undoing a solder joint:
1 Apply the hot soldering iron to the joint you need to remove.Give it a second for the solder to melt.
2 Squeeze the desoldering bulb to expel the air it contains, and then touch the tip of the desoldering bulb to the molten solder joint and release the bulb.As the bulb expands, it will suck the solder off the joint and into the bulb.
3 If the desoldering bulb didn’t completely free the lead, apply heat again and touch the remaining molten solder with the desoldering braid.The desoldering braid is specially designed to draw solder up much like a candlewick draws up wax.
4 Use needle-nose pliers or tweezers to remove the lead. Do not try to remove the lead with your fingers after you have desoldered the connection. The lead will remain hot for a while after you have desoldered it.
Chapter 8
Measuring Circuits with a Multimeter
IN THIS CHAPTER
 Familiarizing yourself with a multimeter
Measuring current, voltage, and resistance
Looking at your first electronic equation: Ohm’s Law
Wouldn’t it be great if every circuit you ever built worked right the first time you built it? You’d quickly develop a reputation as an electronic genius and in no time at all you’d be the president of Intel.
But in the real world, a circuit doesn’t always work right the first time. When it doesn’t, you can scratch your head, stare at it, put a dead chicken in a bag and swing it over your head, or you can pull out your test equipment and analyze the circuit to find out what went wrong.
In this chapter, you learn how to use one of the electronic guru’s favorite tools: the multimeter. Learn how to use it well. It will be your trusty companion throughout your electronic journeys.
Looking at Multimeters
You know those late-night commercials that try to sell you those amazing kitchen gadgets that are like a combination blender, juicer, food processor, mixer, and snow cone maker all in one? A multimeter is kind of like one of those crazy kitchen gadgets, except that, unlike the crazy kitchen gadgets, a multimeter really can do all the things it claims it can do. And, unlike the crazy kitchen gadgets, the things a multimeter can do turn out to be genuinely useful.
Along with a good soldering iron, a good multimeter is the most important item in your toolbox. Learn how to use it, and your electronic exploits will be much more fruitful.
Figure 8-1 shows a simple, inexpensive multimeter. This one can be purchased from almost any hardware store for under $20. If you shop around, however, you can often find a basic multimeter for under $10 and sometimes for as little as $5.
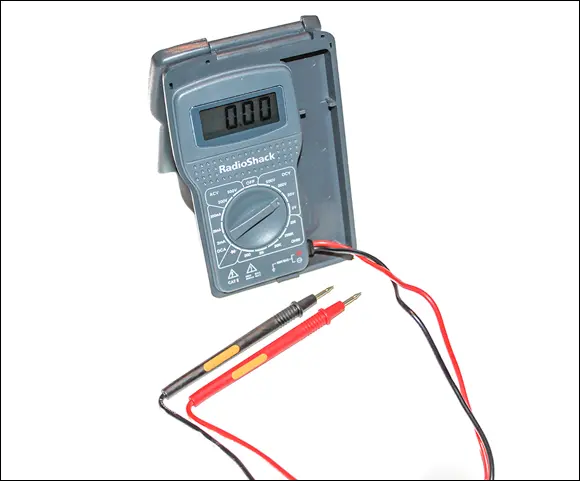
FIGURE 8-1:You can buy a basic multimeter like this one for under $20.
Of course, you can also spend much more, but if you’re just getting started, an inexpensive multimeter is fine. Eventually, you’ll want to invest a little more money in a better-quality multimeter.
The multimeter shown in Figure 8-1 is a digital multimeter, which displays its values using a digital display that shows the actual numbers for the measurements being taken. The alternative to a digital multimeter is an analog multimeter, which shows its readings by moving a needle across a printed scale. To determine the value of a measurement, you simply read the scale behind the needle.
Figure 8-2 shows a typical analog multimeter. This one happens to be one of my favorites. Even though it’s old enough to be called vintage, it’s still an excellent and accurate meter. One of the benefits of spending a little more to buy quality equipment is that the equipment will give you many years — sometimes decades — of reliable service.
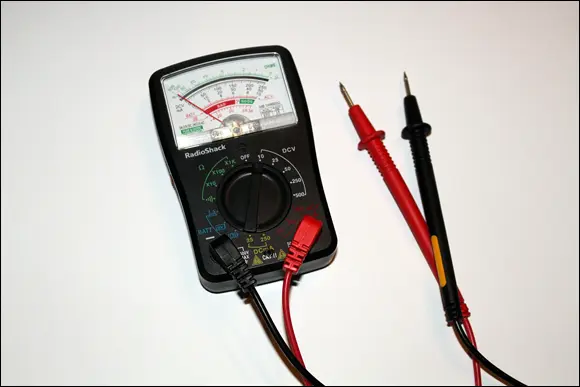
FIGURE 8-2:An analog multimeter.
For the most precise measurements, you can pick up a lab-quality bench-top multimeter such as the one shown in Figure 8-3. These meters usually cost $100 or more but offer additional features such as data logging, USB or network connectivity, and a wide array of test leads useful for different circumstances.
The following paragraphs describe the various parts that make up a typical multimeter:
Display or meter: Indicates the value of the measurement being taken. In a digital multimeter, the display is a number that indicates the amperage (current), voltage, or resistance being measured. In an analog meter, the current, voltage, or resistance is indicated by a needle that moves across a printed scale. To read the value, you look straight down at the needle and read the scale printed behind it. FIGURE 8-3:A bench-top multimeter.
Selector: Most multimeters — digital or analog — have a dial that you can turn to tell the meter what you want to measure. The various settings on this dial indicate not only the type of measurement you want to make (voltage, current, or resistance) but also the range of the expected measurements. The range is indicated by the maximum amount of voltage, current, or resistance that can be measured. Higher ranges let you measure higher values but with less precision. For example, the analog multimeter shown in Figure 8-2 has the following ranges for reading DC voltage: 2.5 V, 10 V, 50 V, 250 V, and 500 V. If you use the 2.5 V range, you can easily tell differences of a tenth of a volt, such as the difference between 1.6 and 1.7 V. But when the range is set to the 500 V range, you’ll be lucky to pick out differences of 10 volts.
Читать дальшеИнтервал:
Закладка:
Похожие книги на «Electronics All-in-One For Dummies»
Представляем Вашему вниманию похожие книги на «Electronics All-in-One For Dummies» списком для выбора. Мы отобрали схожую по названию и смыслу литературу в надежде предоставить читателям больше вариантов отыскать новые, интересные, ещё непрочитанные произведения.


Обсуждение, отзывы о книге «Electronics All-in-One For Dummies» и просто собственные мнения читателей. Оставьте ваши комментарии, напишите, что Вы думаете о произведении, его смысле или главных героях. Укажите что конкретно понравилось, а что нет, и почему Вы так считаете.