Wei-Meng Lee - C# 2008 Programmer's Reference
Здесь есть возможность читать онлайн «Wei-Meng Lee - C# 2008 Programmer's Reference» весь текст электронной книги совершенно бесплатно (целиком полную версию без сокращений). В некоторых случаях можно слушать аудио, скачать через торрент в формате fb2 и присутствует краткое содержание. Город: Indianapolis, Год выпуска: 2009, ISBN: 2009, Издательство: Wiley Publishing, Inc., Жанр: Программирование, на английском языке. Описание произведения, (предисловие) а так же отзывы посетителей доступны на портале библиотеки ЛибКат.
- Название:C# 2008 Programmer's Reference
- Автор:
- Издательство:Wiley Publishing, Inc.
- Жанр:
- Год:2009
- Город:Indianapolis
- ISBN:978-0-470-28581-7
- Рейтинг книги:4 / 5. Голосов: 1
-
Избранное:Добавить в избранное
- Отзывы:
-
Ваша оценка:
C# 2008 Programmer's Reference: краткое содержание, описание и аннотация
Предлагаем к чтению аннотацию, описание, краткое содержание или предисловие (зависит от того, что написал сам автор книги «C# 2008 Programmer's Reference»). Если вы не нашли необходимую информацию о книге — напишите в комментариях, мы постараемся отыскать её.
C# 2008 Programmer's Reference — читать онлайн бесплатно полную книгу (весь текст) целиком
Ниже представлен текст книги, разбитый по страницам. Система сохранения места последней прочитанной страницы, позволяет с удобством читать онлайн бесплатно книгу «C# 2008 Programmer's Reference», без необходимости каждый раз заново искать на чём Вы остановились. Поставьте закладку, и сможете в любой момент перейти на страницу, на которой закончили чтение.
Интервал:
Закладка:
This chapter explained the parts that make up a .NET assembly. Splitting your application into multiple assemblies and modules will make your application easier to manage and update. At the same time, the CLR will only load the required assembly and modules, thereby making your application more efficient. If you have a shared assembly that can be used by other applications, consider deploying it into the Global Assembly Cache (GAC).
Part II
Application Development Using C#
Chapter 16
Developing Windows Applications
Chapters 16-19 show how you can use the C# language to create a different type of application. This chapter tackles Windows application development. The best way to learn a language is to actually work on a real project from the beginning to deployment. So, this chapter leads you through creating a Windows application that performs some useful tasks and then shows you how to deploy it using a technique in Visual Studio known as ClickOnce.
Specifically, the Windows application you build in this chapter demonstrates how to:
□ Programmatically access FTP servers using the FtpWebRequestand FtpWebResponseclasses (both derived from the WebRequestand WebResponseclasses in the System.Netnamespace)
□ Incorporate printing capability in your Windows application using the PrintDocumentclass (located in the System.Drawing.Printingnamespace)
□ Deploy a Windows application using ClickOnce. You will also see how to programmatically cause an application to update itself.
The Project
The project in this chapter is a photo viewer Windows application that accesses an FTP server. Using this application, users can upload photos to an FTP server and also download and view images stored on the FTP server. The application is useful for companies that may need to access images uploaded by their partners. Insurance companies, for instance, may need to access photographs of car damage taken by auto body shop mechanics to facilitate estimating the cost of repair. Rather than build a complex web application, the shops and insurance companies can simply use this application to quickly upload and view photos. Users can also print the photos directly from the application.
Figure 16-1 shows how the application will look like when it is completed.
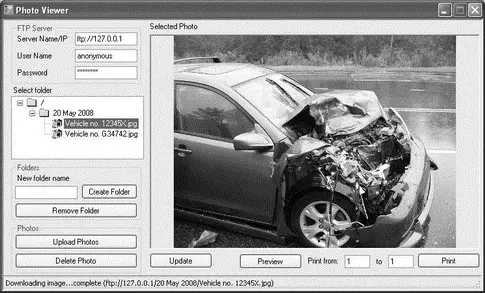
Figure 16-1
Configuring the FTP Server
Before you start writing the code of this application, you first need to configure FTP service for your computer. For this project, use the FTP service on your development machine.
By default, FTP service is not installed in Windows (note that FTP service is not available on Windows Vista Home editions). To add FTP Service to your computer, select Control Panel→Add or Remove Programs. Click the Add/Remove Windows Component tab, select Internet Information Services (IIS), and click the Details button. Select File Transfer Protocol (FTP) Service, and click OK.
To configure the FTP service on your computer, launch the Internet Information Services management console window by typing the command inetmgrin the Run window. Your FTP site should look like Figure 16-2.
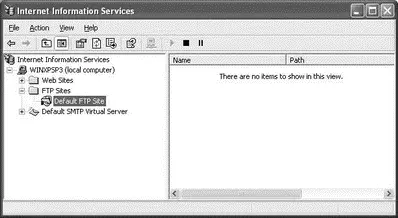
Figure 16-2
Right-click the Default FTP Site item, and select Properties. Click the Security Accounts tab. Ensure that the Allow Anonymous Connections checkbox is checked (see Figure 16-3) to enable an anonymous user to log in to your FTP service.
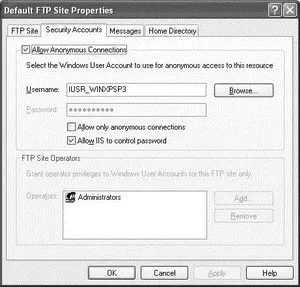
Figure 16-3
Next, click on the Home Directory tab, and check the Write checkbox (see Figure 16-4). This allows users to your FTP service to upload files and create directories on the FTP server.
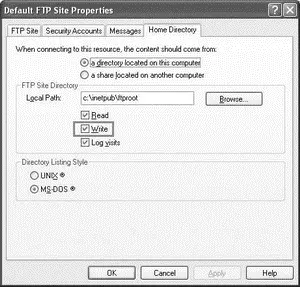
Figure 16-4
Click OK to finish the configuration of the FTP service.
Creating the Application
Using Visual Studio 2008, create a new Windows application and name it PhotoViewer. Populate the default Form1with the controls shown in Figure 16-5. These controls are:
| Control | Text | Name |
|---|---|---|
Buttoncontrols (4) |
Create Folder | btnCreateFolder |
| Remove Folder | btnRemoveFolder |
|
| Upload Photos | btnUploadPhotos |
|
| Delete Photo | btnDeletePhoto |
|
GroupBoxcontrols (3) |
FTP Server | |
| Folders | ||
| Photos | ||
Labelcontrols (6) |
Server Name/IP | |
| User Name | ||
| Password | ||
| Select folder | ||
| New folder name | ||
| Selected Photo | ||
PictureBox |
PictureBox1 |
|
TextBoxcontrols (4) |
txtFTPServer |
|
txtUserName |
||
txtPassword |
||
txtNewFolderName |
||
ToolStripStatusLabel |
ToolStripStatusLabel1 | ToolStripStatusLabel1 |
TreeView |
TreeView1 |
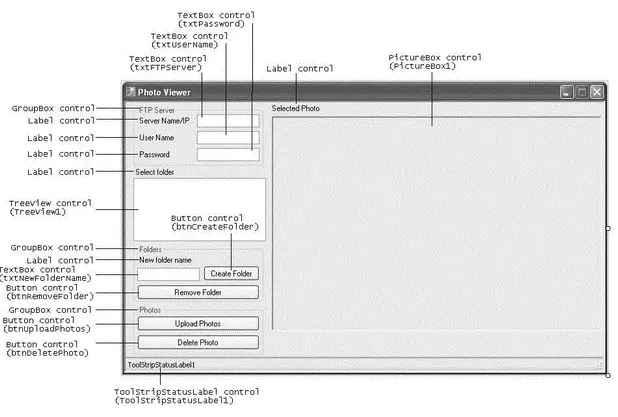
Figure 16-5
The source code for this project can be downloaded from Wrox's web site at www.wrox.com.
You'll also need to add an ImageListcontrol ( ImageList1) to Form1to contain three images representing an opened folder, a closed folder, and an image file. You can specify these images in the control's Imageproperty (see Figure 16-6).
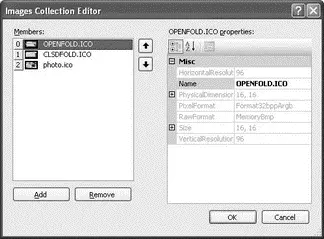
Figure 16-6
Set the control properties in the following table.
| Control | Property | Value |
|---|---|---|
TreeView1 |
ImageList |
ImageList1 |
PictureBox1 |
SizeMode |
Zoom |
txtPassword |
PasswordChar |
"*" |
Using Application Settings
When users launch the PhotoViewerapplication, they need to supply three pieces of information to access the FTP Server:
Интервал:
Закладка:
Похожие книги на «C# 2008 Programmer's Reference»
Представляем Вашему вниманию похожие книги на «C# 2008 Programmer's Reference» списком для выбора. Мы отобрали схожую по названию и смыслу литературу в надежде предоставить читателям больше вариантов отыскать новые, интересные, ещё непрочитанные произведения.


Обсуждение, отзывы о книге «C# 2008 Programmer's Reference» и просто собственные мнения читателей. Оставьте ваши комментарии, напишите, что Вы думаете о произведении, его смысле или главных героях. Укажите что конкретно понравилось, а что нет, и почему Вы так считаете.