Wei-Meng Lee - C# 2008 Programmer's Reference
Здесь есть возможность читать онлайн «Wei-Meng Lee - C# 2008 Programmer's Reference» весь текст электронной книги совершенно бесплатно (целиком полную версию без сокращений). В некоторых случаях можно слушать аудио, скачать через торрент в формате fb2 и присутствует краткое содержание. Город: Indianapolis, Год выпуска: 2009, ISBN: 2009, Издательство: Wiley Publishing, Inc., Жанр: Программирование, на английском языке. Описание произведения, (предисловие) а так же отзывы посетителей доступны на портале библиотеки ЛибКат.
- Название:C# 2008 Programmer's Reference
- Автор:
- Издательство:Wiley Publishing, Inc.
- Жанр:
- Год:2009
- Город:Indianapolis
- ISBN:978-0-470-28581-7
- Рейтинг книги:4 / 5. Голосов: 1
-
Избранное:Добавить в избранное
- Отзывы:
-
Ваша оценка:
C# 2008 Programmer's Reference: краткое содержание, описание и аннотация
Предлагаем к чтению аннотацию, описание, краткое содержание или предисловие (зависит от того, что написал сам автор книги «C# 2008 Programmer's Reference»). Если вы не нашли необходимую информацию о книге — напишите в комментариях, мы постараемся отыскать её.
C# 2008 Programmer's Reference — читать онлайн бесплатно полную книгу (весь текст) целиком
Ниже представлен текст книги, разбитый по страницам. Система сохранения места последней прочитанной страницы, позволяет с удобством читать онлайн бесплатно книгу «C# 2008 Programmer's Reference», без необходимости каждый раз заново искать на чём Вы остановились. Поставьте закладку, и сможете в любой момент перейти на страницу, на которой закончили чтение.
Интервал:
Закладка:
using System;
using System.Collections.Generic;
using System.Linq;
using System.Text;
namespace Base64Codec {
public class Helper {
public byte[] Decode(string base64string) {
byte[] binaryData;
try {
binaryData =
Convert.FromBase64String(base64string);
return binaryData;
} catch (Exception) {
return null;
}
}
public string Encode(byte[] binaryData) {
string base64String;
try {
base64String =
Convert.ToBase64String(
binaryData, 0, binaryData.Length);
return base64String;
} catch (Exception) {
return string.Empty;
}
}
}
}
To create a strong name for the assembly, you need to sign it. The easiest way is to use the Properties page of the project in Visual Studio 2008. Right-click on the project name in Solution Explorer, and select Properties. Select the Signing tab (see Figure 15-28), and check the Sign The Assembly checkbox. Select from the Choose A Strong Name Key File dropdown list to specify a name for the strong name file.
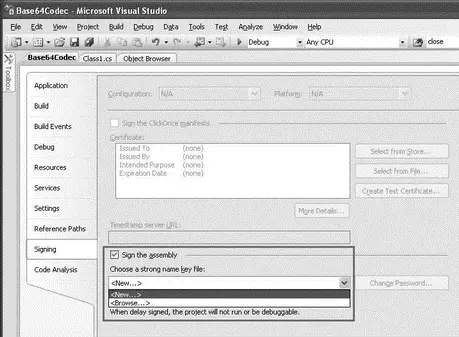
Figure 15-28
In the Create Strong Name Key dialog (see Figure 15-29), specify a name to store the pair of keys ( KeyFile.snk, for instance). You also have the option to protect the file with a password. Click OK.
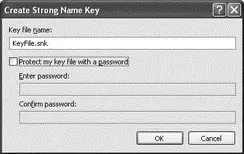
Figure 15-29
An SNK file is a binary file containing the pair of public and private keys.
A strong name file is now created in your project (see Figure 15-30).
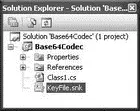
Figure 15-30
Alternatively, you can also use the command line to generate the strong name file:
sn -k KeyFile.snk
With .NET, you can create different versions of the same assembly and share them with other applications. To specify version information, you can edit the AssemblyInfo.csfile, located under the Properties item in Solution Explorer (see Figure 15-31).
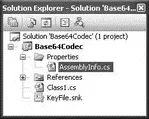
Figure 15-31
In the AssemblyInfo.csfile, locate the following lines:
...
// You can specify all the values or you can default the Build and Revision Numbers
// by using the '*' as shown below:
// [assembly: AssemblyVersion("1.0.*")]
[assembly: AssemblyVersion("1.0.0.0")]
[assembly: AssemblyFileVersion("1.0.0.0")]
The version number of an assembly is specified using the following format:
[Major Version, Minor Version, Build Number, Revision]
The AssemblyVersionattribute is used to identify the version number of an assembly. Applications that use this particular assembly reference this version number. If this version number is changed, applications using this assembly will not be able to find it and will break.
The AssemblyFileVersionattribute is used to specify the version number of the assembly, and it shows up in the properties page of the assembly (more on this in a later section).
Build the Class Library project so that Visual Studio 2008 will now generate the shared assembly and sign it with the strong name. To examine the shared assembly created, navigate to the bin\Debug folder of the project and type in the following command:
ildasm Base64Codec.dll
Figure 15-32 shows the public key stored in the manifest of the shared assembly.

Figure 15-32
You can obtain the public key token of the shared assembly by using the following command:
sn -T Base64Codec.dll
Figure 15-33 shows the public key token displayed in the console window. Note this number because you will use it for comparison later.
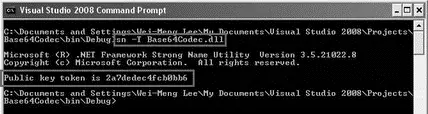
Figure 15-33
The Global Assembly Cache
Now that you have created a shared assembly, the next task is to put it into the GAC. The GAC is a central repository of .NET assemblies that can be shared by all applications. There are several reasons why you should put your shared assembly into the GAC, some of which are:
□ Security— Assemblies stored in the GAC are required to be signed with a cryptographic key. This makes it difficult for others to tamper with your assembly, such as replacing or injecting your shared assembly with malicious code.
□ Version management— Multiple versions of the same assembly can reside in the GAC so that each application can find and use the version of your assembly to which it was compiled. This helps to avoid DLL Hell, where applications compiled to different versions of your assembly can potentially break because they are all forced to use a single version of your assembly.
□ Faster loading— Assemblies are verified when they are first installed in the GAC, eliminating the need to verify an assembly each time it is loaded from the GAC. This improves the startup speed of your application if you load many shared assemblies.
The GAC is located in \Assembly. In most cases, it is C:\Windows\Assembly. When you navigate to this folder by using Windows Explorer, the Assembly Cache Viewer launches to display the list of assemblies stored in it (see Figure 15-34).
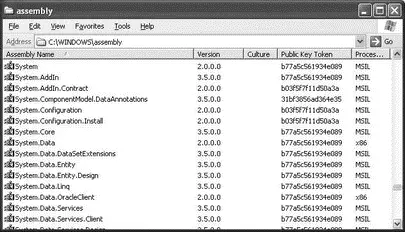
Figure 15-34
Putting the Shared Assembly into GAC
To put the shared assembly that you have just built into the GAC, drag and drop it onto the Assembly Cache Viewer. Alternatively, you can also use the gacutil.exeutility to install the shared assembly into the GAC (see Figure 15-35):
Интервал:
Закладка:
Похожие книги на «C# 2008 Programmer's Reference»
Представляем Вашему вниманию похожие книги на «C# 2008 Programmer's Reference» списком для выбора. Мы отобрали схожую по названию и смыслу литературу в надежде предоставить читателям больше вариантов отыскать новые, интересные, ещё непрочитанные произведения.


Обсуждение, отзывы о книге «C# 2008 Programmer's Reference» и просто собственные мнения читателей. Оставьте ваши комментарии, напишите, что Вы думаете о произведении, его смысле или главных героях. Укажите что конкретно понравилось, а что нет, и почему Вы так считаете.