Mark Murphy - Beginning Android
Здесь есть возможность читать онлайн «Mark Murphy - Beginning Android» весь текст электронной книги совершенно бесплатно (целиком полную версию без сокращений). В некоторых случаях можно слушать аудио, скачать через торрент в формате fb2 и присутствует краткое содержание. Город: New York, Год выпуска: 2009, ISBN: 2009, Издательство: Apress, Жанр: Программирование, на английском языке. Описание произведения, (предисловие) а так же отзывы посетителей доступны на портале библиотеки ЛибКат.

- Название:Beginning Android
- Автор:
- Издательство:Apress
- Жанр:
- Год:2009
- Город:New York
- ISBN:978-1-4302-2420-4
- Рейтинг книги:3 / 5. Голосов: 1
-
Избранное:Добавить в избранное
- Отзывы:
-
Ваша оценка:
Beginning Android: краткое содержание, описание и аннотация
Предлагаем к чтению аннотацию, описание, краткое содержание или предисловие (зависит от того, что написал сам автор книги «Beginning Android»). Если вы не нашли необходимую информацию о книге — напишите в комментариях, мы постараемся отыскать её.
Dear Reader,
First, welcome to the world of Android! We’re entering a new era of mobile application development, one marked by open platforms and open source, to take ‘walled gardens’ and make them green houses for any and all to participate in. Android is relatively easy for developers, and I believe that this innovation will help generate a large ecosystem of developers and consumers within a very short time. This means that budding developers such as yourself will have many opportunities to design and build your own applications and you’ll have a huge and hungry customer base.
Second, welcome to the book! Its purpose is to start you on your way with building Android applications, and to help you master the learning curve. Android is already a rich framework, comparable in many ways to the richness Android of desktop Java environments. This means that there is a lot of cool stuff for you to pick up along your journey in order to create the slickest, most useful apps Android you can imagine.
The source code for the code samples in this book is all available from the Apress site, so you can stay as hands-on and practical as you like while I introduce you to the core of Android, and invite you to experiment with the various classes and APIs we’ll be looking at. By the time you’ve finished this book, you’ll be creating your own Android applications and asking yourself what your next great application will be…!
Enjoy! Mark Murphy
Beginning Android — читать онлайн бесплатно полную книгу (весь текст) целиком
Ниже представлен текст книги, разбитый по страницам. Система сохранения места последней прочитанной страницы, позволяет с удобством читать онлайн бесплатно книгу «Beginning Android», без необходимости каждый раз заново искать на чём Вы остановились. Поставьте закладку, и сможете в любой момент перейти на страницу, на которой закончили чтение.
Интервал:
Закладка:
The Manual tab is fairly self-explanatory: provide a latitude and longitude and click the Send button to submit that location to the emulator. The emulator, in turn will notify any location listeners of the new position.
Discussion of the GPX and KML options is beyond the scope of this book.
Placing Calls and Messages
If you want to simulate incoming calls or SMS messages to the Android emulator, DDMS can handle that as well.
On the Emulator Control tab, above the Location Controls group, is the Telephony Actions group (see Figure 37-13).
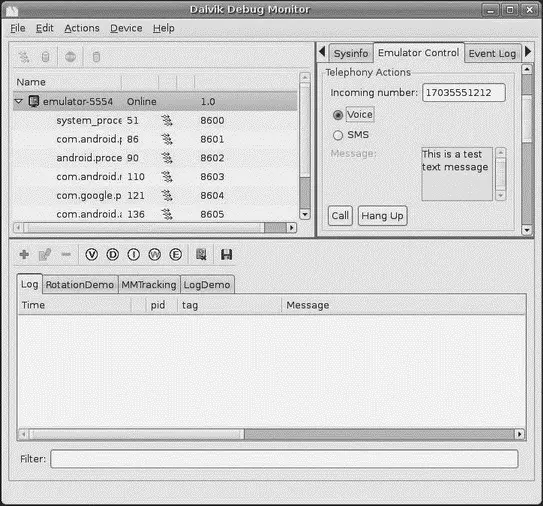
Figure 37-13. DDMS telephony controls
To simulate an incoming call, fill in a phone number, choose the Voice radio button, and click Call. At that point, the emulator will show the incoming call, allowing you to accept it (via the green phone button) or reject it (via the red phone button) seen in Figure 37-14.
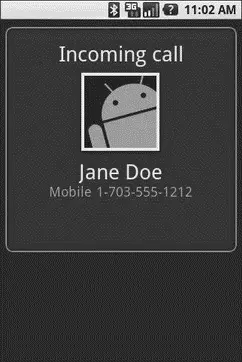
Figure 37-14. Simulated incoming call
To simulate an incoming text message, fill in a phone number, choose the SMS radio button, enter a message in the provided text area, and click Send. The text message will then appear as a notification as shown in Figure 37-15.

Figure 37-15. Simulated text message
Of course, you can click on the notification to view the message in the full-fledged Messaging application as you can see in Figure 37-16.
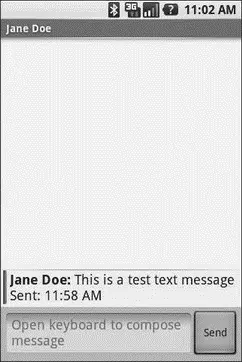
Figure 37-16. Simulated text message, in Messaging application
Put it On My Card
The T-Mobile G1 has a microSD card slot. Many other Android devices are likely to have similar forms of removable storage, which the Android platform refers to generically as an “SD card”.
SD cards are strongly recommended to be used by developers as the holding pen for large data sets: images, movie clips, audio files, etc. The T-Mobile G1, in particular, has a relatively paltry amount of on-board flash memory, so the more you can store on an SD card, the better.
Of course, the challenge is that, while the G1 has an SD card by default, the emulator does not. To make the emulator work like the G1, you need to create and “insert” an SD card into the emulator.
Creating a Card Image
Rather than require emulators to somehow have access to an actual SD card reader and use actual SD cards, Android is set up to use card images. An image is simply a file that the emulator will treat as if it were an SD card volume. If you are used to disk images used with virtualization tools (e.g., VirtualBox), the concept is the same: Android uses a disk image representing the SD card contents.
To create such an image, use the mksdcardutility, provided in the tools/directory of your SDK installation. This takes two main parameters:
1. The size of the image, and hence the size of the resulting “card.” If you just supply a number, it is interpreted as a size in bytes. Alternatively, you can append Kor Mto the number to indicate a size in kilobytes or megabytes, respectively.
2. The filename under which to store the image.
For example, to create a 1GB SD card image, to simulate the G1’s SD card in the emulator, you could run:
mksdcard 1024M sdcard.img
Inserting the Card
To have your emulator use this SD card image, start the emulator with the -sdcardswitch, containing a fully-qualified path to the image file you created using mksdcard. While there will be no visible impact — there is no icon or anything in Android showing that you have a card mounted — the /sdcardpath will now be available for reading and writing.
To put files on the /sdcard, either use the File Explorer in DDMS or adb pushand adb pullfrom the console.
CHAPTER 38
Where Do We Go from Here?
Obviously, this book does not cover everything. And while your number-one resource (besides the book) is going to be the Android SDK documentation, you are likely to need information beyond what’s covered in either of those places.
Searching online for “android” and a class name is a good way to turn up tutorials that reference a given Android class. However, bear in mind that tutorials written before late August 2008 are probably written for the M5 SDK and, therefore, will require considerable adjustment to work properly in current SDKs.
Beyond randomly hunting around for tutorials, though, this chapter outlines some resources to keep in mind.
Questions. Sometimes with Answers.
The official places to get assistance with Android are the Android Google Groups. With respect to the SDK, there are three to consider following:
• Android Beginners, [34] http://groups.google.com/group/android-beginners
a great place to ask entry-level questions
• Android Developers, [35] http://groups.google.com/group/android-developers
best suited for more-complicated questions or ones that delve into less-used portions of the SDK
• Android Discuss, [36] http://groups.google.com/group/android-discuss
designed for free-form discussion of anything Android-related, not necessarily for programming questions and answers
You might also consider these:
• The Android tutorials and programming forums at anddev.org [37] http://anddev.org/
• The #androidIRC channel on freenode
Heading to the Source
The source code to Android is now available. Mostly this is for people looking to enhance, improve, or otherwise fuss with the insides of the Android operating system. But, it is possible that you will find the answers you seek in that code, particularly if you want to see how some built-in Android component does its thing.
The source code and related resources can be found at the Android Open Source Project Web site. [38] http://source.android.com
Here, you can
• Download [39] http://source.android.com/download
or browse [40] http://git.source.android.com/
the source code
• File bug reports [41] http://source.android.com/report-bugs
against the operating system itself
• Submit patches [42] http://source.android.com/submit-patches
and learn about the process for how such patches get evaluated and approved
Интервал:
Закладка:
Похожие книги на «Beginning Android»
Представляем Вашему вниманию похожие книги на «Beginning Android» списком для выбора. Мы отобрали схожую по названию и смыслу литературу в надежде предоставить читателям больше вариантов отыскать новые, интересные, ещё непрочитанные произведения.


Обсуждение, отзывы о книге «Beginning Android» и просто собственные мнения читателей. Оставьте ваши комментарии, напишите, что Вы думаете о произведении, его смысле или главных героях. Укажите что конкретно понравилось, а что нет, и почему Вы так считаете.