1. Entity-escape the angle brackets in the string resource (e.g., this is %1$s).
2. Retrieve the string resource as normal, though it will not be styled at this point (e.g., getString(R.string.funky_format)).
3. Generate the format results, being sure to escape any string values you substitute in, in case they contain angle brackets or ampersands.
String. format( getString(R.string.funky_format),
TextUtils. htmlEncode(strName));
4. Convert the entity-escaped HTML into a Spannedobject via Html.fromHtml().
someTextView. setText(Html
. fromHtml(resultFromStringFormat));
To see this in action, let’s look at the Resources/Stringsdemo, which can be found in the Source Code area of http://apress.com. Here is the layout file:
android:orientation="vertical"
android:layout_width="fill_parent"
android:layout_height="fill_parent"
>
android:orientation="horizontal"
android:layout_width="fill_parent"
android:layout_height="wrap_content"
>
android:layout_width="wrap_content"
android:layout_height="wrap_content"
android:text="@string/btn_name"
/>
android:layout_width="fill_parent"
android:layout_height="wrap_content"
/>
android:layout_width="fill_parent"
android:layout_height="wrap_content"
/>
As you can see, it is just a button, a field, and a label. The intent is for somebody to enter their name in the field, then click the button to cause the label to be updated with a formatted message containing their name.
The Button in the layout file references a string resource ( @string/btn_name), so we need a string resource file ( res/values/strings.xml):
StringsDemo
Name:
My name is %1$s
The app_nameresource is automatically created by the activityCreatorscript. The btn_namestring is the caption of the Button, while our styled string format is in funky_format.
Finally, to hook all this together, we need a pinch of Java:
packagecom.commonsware.android.resources;
importandroid.app.Activity;
importandroid.os.Bundle;
importandroid.text.TextUtils;
importandroid.text.Html;
importandroid.view.View;
importandroid.widget.Button;
importandroid.widget.EditText;
importandroid.widget.TextView;
public classStringsDemo extendsActivity {
EditText name;
TextView result;
@Override
publicvoid onCreate(Bundle icicle) {
super. onCreate(icicle);
setContentView(R.layout.main);
name = (EditText) findViewById(R.id.name);
result = (TextView) findViewById(R.id.result);
Button btn = (Button) findViewById(R.id.format);
btn. setOnClickListener( newButton. OnClickListener() {
publicvoid onClick(View v) {
applyFormat();
}
});
}
privatevoid applyFormat() {
String format = getString(R.string.funky_format);
String simpleResult = String. format(format,
TextUtils. htmlEncode(name. getText(). toString()));
result. setText(Html. fromHtml(simpleResult));
}
}
The string resource manipulation can be found in applyFormat(), which is called when the button is clicked. First, we get our format via getString()— something we could have done at onCreate()time for efficiency. Next, we format the value in the field using this format, getting a Stringback, since the string resource is in entity-encoded HTML. Note the use of TextUtils.htmlEncode()to entity-encode the entered name, in case somebody decides to use an ampersand or something. Finally, we convert the simple HTML into a styled text object via Html.fromHtml()and update our label.
When the activity is first launched, we have an empty label (see Figure 19-1).
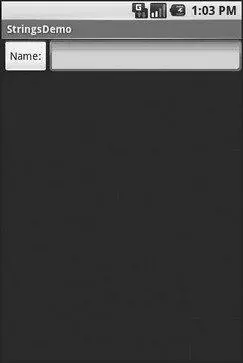
Figure 19-1. The StringsDemo sample application, as initially launched
However, if we fill in a name and click the button, we get the result seen in Figure 19-2.
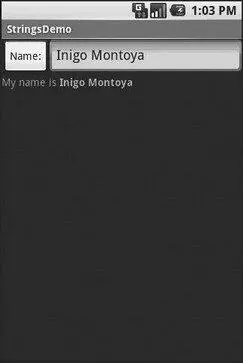
Figure 19-2. The same application, after filling in some heroic figure’s name
Android supports images in the PNG, JPEG, and GIF formats. GIF is officially discouraged, however; PNG is the overall preferred format. Images can be used anywhere that requires a Drawable, such as the image and background of an ImageView.
Using images is simply a matter of putting your image files in res/drawable/and then referencing them as a resource. Within layout files, images are referenced as @drawable/...where the ellipsis is the base name of the file (e.g., for res/drawable/foo.png, the resource name is @drawable/foo). In Java, where you need an image resource ID, use R.drawable.plus the base name (e.g., R.drawable.foo).
If you need a Uri to an image resource, you can use one of two different string formats for the path:
• android.resource://com.example.app/..., where com.example.appis the name of the Java package used by your application in AndroidManifest.xmland ...is the numeric resource ID for the resource in question (e.g., the value of R.drawable.foo)
• android.resource://com.example.app/raw/..., where com.example.appis the name of the Java package used by your application in AndroidManifest.xmland ...is the textual name of the raw resource (e.g., foofor res/drawable/foo.png)
Note that Android ships with some image resources built in. Those are addressed in Java with an android.R.drawableprefix to distinguish them from application-specific resources (e.g., android.R.drawable.picture_frame).
Let’s update the previous example to use an icon for the button instead of the string resource. This can be found as Resources/Images. First, we slightly adjust the layout file, using an ImageButtonand referencing a drawable named @drawable/icon:
Читать дальше
