Chris Tyler - Fedora Linux
Здесь есть возможность читать онлайн «Chris Tyler - Fedora Linux» весь текст электронной книги совершенно бесплатно (целиком полную версию без сокращений). В некоторых случаях можно слушать аудио, скачать через торрент в формате fb2 и присутствует краткое содержание. Год выпуска: 2006, ISBN: 2006, Издательство: O'Reilly, Жанр: ОС и Сети, на английском языке. Описание произведения, (предисловие) а так же отзывы посетителей доступны на портале библиотеки ЛибКат.

- Название:Fedora Linux
- Автор:
- Издательство:O'Reilly
- Жанр:
- Год:2006
- ISBN:978-0-596-52682-5
- Рейтинг книги:5 / 5. Голосов: 1
-
Избранное:Добавить в избранное
- Отзывы:
-
Ваша оценка:
Fedora Linux: краткое содержание, описание и аннотация
Предлагаем к чтению аннотацию, описание, краткое содержание или предисловие (зависит от того, что написал сам автор книги «Fedora Linux»). Если вы не нашли необходимую информацию о книге — напишите в комментариях, мы постараемся отыскать её.
Fedora Linux: A Complete Guide to Red Hat's Community Distribution In this book, you'll learn how to:
Install Fedora and perform basic administrative tasks
Configure the KDE and GNOME desktops
Get power management working on your notebook computer and hop on a wired or wireless network
Find, install, and update any of the thousands of packages available for Fedora
Perform backups, increase reliability with RAID, and manage your disks with logical volumes
Set up a server with file sharing, DNS, DHCP, email, a Web server, and more
Work with Fedora's security features including SELinux, PAM, and Access Control Lists (ACLs)
Whether you are running the stable version of Fedora Core or bleeding-edge Rawhide releases, this book has something for every level of user. The modular, lab-based approach not only shows you how things work - but also explains why--and provides you with the answers you need to get up and running with Fedora Linux.
Fedora Linux — читать онлайн бесплатно полную книгу (весь текст) целиком
Ниже представлен текст книги, разбитый по страницам. Система сохранения места последней прочитанной страницы, позволяет с удобством читать онлайн бесплатно книгу «Fedora Linux», без необходимости каждый раз заново искать на чём Вы остановились. Поставьте закладку, и сможете в любой момент перейти на страницу, на которой закончили чтение.
Интервал:
Закладка:
Note that, as before, the filesystem was resized to be slightly smaller than the desired size, then expanded to fill the LV after the LV was resized.
When you're done, type rebootor press Ctrl-Alt-Delete to restart the system.
6.1.1.5. Managing LVM in rescue mode
To reduce or substantially grow the root filesystem, you'll have to boot from a device other than your normal disk. The most convenient way to do this is to boot from the Fedora Core installation media; when the boot screen appears ( Figure 1-1 ), type linux rescueand press Enter.
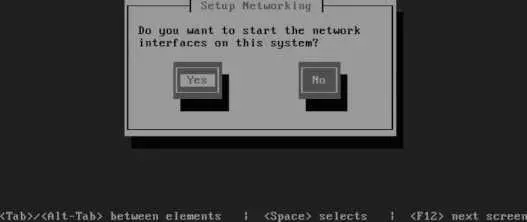
After prompting you for the language ( Figure 1-5 ) and keyboard type ( Figure 1-6 ) the same way it does for a network installation (use the arrow keys and Enter to select the correct value for each), the system will ask if you wish to start the network interfaces, as shown in Figure 6-6 . Select No by pressing Tab and then Enter.
Figure 6-6. Rescue mode network interface dialog
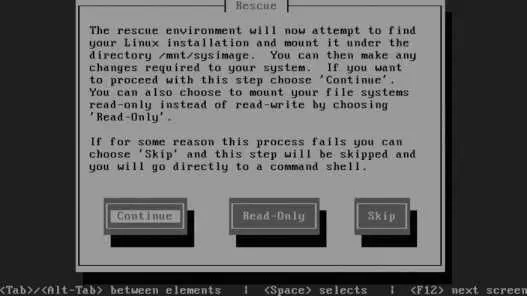
The next screen, shown in Figure 6-7 , enables you to select filesystem mounting; select Skip by pressing Tab twice and then pressing Enter.
Figure 6-7. Rescue mode filesystem mounting dialog
You will then be presented with a shell prompt ( sh-3.1# ). The LVM device nodes will not be present until you scan for them and activate them:
sh-3.1# lvm vgscan
Reading all physical volumes. This may take a while...
Found volume group "main" using metadata type lvm2
sh-3.1# lvm vgchange -ay
3 logical volume(s) in volume group "main" now active
The LVM device nodes will be created in /dev/mapper/ and /dev// . The /dev/dm- nodes are not created.
You can now resize the root partition:
sh-3.1# fsck -f /dev/main/root
WARNING: couldn't open /etc/fstab: No such file or directory
e2fsck 1.38 (30-Jun-2005)
Pass 1: Checking inodes, blocks, and sizes
Pass 2: Checking directory structure
Pass 3: Checking directory connectivity
Pass 4: Checking reference counts
Pass 5: Checking group summary information
/dev/main/root: 134009/1532576 files (0.5% non-contiguous), 793321/1531904 blocks
sh-3.1# resize2fs /dev/main/root 5600M
resize2fs 1.38 (30-Jun-2005)
Resizing the filesystem on /dev/main/root to 1433600 (4k) blocks.
The filesystem on /dev/main/root is now 1433600 blocks long.
sh-3.1# lvreduce /dev/main/root --size 5650M
Rounding up size to full physical extent 5.53 GB
WARNING: Reducing active logical volume to 5.53 GB
THIS MAY DESTROY YOUR DATA (filesystem etc.)
Do you really want to reduce root? [y/n]: y
Reducing logical volume root to 5.53 GB
Logical volume root successfully resized
sh-3.1# resize2fs /dev/main/root
resize2fs 1.38 (30-Jun-2005)
Resizing the filesystem on /dev/main/root to 1449984 (4k) blocks.
The filesystem on /dev/main/root is now 1449984 blocks long.
Type exitor press Ctrl-D to exit from the rescue-mode shell. The system will then reboot; don't forget to remove the installation media.
6.1.2. How Does It Work?
LVM works by dividing storage space into same-sized pieces called extents , which may be anywhere from 1 to 128 MB in size. The extents that make up physical storage are called physical extents (PEs); the extents that make up logical volumes are called logical extents (LEs).
Obviously, each LE exists as a PE somewhere in the LVM system. A kernel facility called the device mapper converts between LE and PE extent numbers. When the physical extents are changedas the result of a pvmove , for examplethe logical extent numbers remain the same, providing continuity for the filesystem.
Extents tend to be fairly largeanywhere from 8 KB to 16 GB in size, but typically in the 1 to 128 MB range (32 MB is the default extent size used during installation). Larger extent sizes cause a reduction in the LVM overhead because the extent tables are smaller and need to be consulted less often. However, LVs and PVs must be a multiple of the extent size, so a large size limits granularity. The extent size can be configured when the VG is created, either at boot time or by using the --physicalextentsize argument to vgcreate .
A large, efficient extent size is usually too big for effective copy-on-write operation during snapshots, so a smaller chunk size is used for copy-on-write management. This can be configured using the --chunksize option to lvcreate .
6.1.3. What About...
6.1.3.1. ...taking multiple snapshots of a filesystem?
It is possible to take multiple snapshots of a filesystem. For example, you could have snapshots of /home for each day in the preceding week, making it even easier for your users to restore their own files in the case of accidental deletion or damage. However, when you have multiple snapshots in place, a single write can trigger a lot of copy-on-write activityso don't go overboard, or your write performance could really suffer.
6.1.3.2. ...improving performance?
The LVM system has striping capability, which spreads data over multiple PVs. Data can be read from multiple PVs simultaneously, increasing throughput in some cases.
To enable striping, use the -i (stripe-count) and -I (stripe-size) arguments to the lvcreate command:
# lvcreate main -i 3 -I 8 --name mysql --size 20G
The stripe count must be equal to or less than the number of PVs in the VG, and the stripe size (which is in kilobytes) must be a power of 2 between 4 and 512.
You can also select striping in the LV Properties area of the Create New Logical Volume dialog ( Figure 6-4 ).
6.1.3.3. ...LVM mirroring?
To protect data integrity, recent versions of LVM provide a mirroring capability, which stores two copies of each physical extent on two different disks. However, this is noted as a technology preview capability in Fedora Core 6, meaning that it's at a beta-test stage.
An alternative approach that is stable, proven, and provides a wider range of configuration options is to layer LVM on top of the md RAID system (discussed in Lab 6.2, "Managing RAID ").
6.1.3.4. ...using LVM with RAID?
LVM can be layered on top of the Linux md RAID driver, which combines the flexibility of LVM with striping, mirroring, and advanced error-correction capabilities. See Lab 6.2, "Managing RAID ," for details on how this is configured.
Читать дальшеИнтервал:
Закладка:
Похожие книги на «Fedora Linux»
Представляем Вашему вниманию похожие книги на «Fedora Linux» списком для выбора. Мы отобрали схожую по названию и смыслу литературу в надежде предоставить читателям больше вариантов отыскать новые, интересные, ещё непрочитанные произведения.


Обсуждение, отзывы о книге «Fedora Linux» и просто собственные мнения читателей. Оставьте ваши комментарии, напишите, что Вы думаете о произведении, его смысле или главных героях. Укажите что конкретно понравилось, а что нет, и почему Вы так считаете.