Chris Tyler - Fedora Linux
Здесь есть возможность читать онлайн «Chris Tyler - Fedora Linux» весь текст электронной книги совершенно бесплатно (целиком полную версию без сокращений). В некоторых случаях можно слушать аудио, скачать через торрент в формате fb2 и присутствует краткое содержание. Год выпуска: 2006, ISBN: 2006, Издательство: O'Reilly, Жанр: ОС и Сети, на английском языке. Описание произведения, (предисловие) а так же отзывы посетителей доступны на портале библиотеки ЛибКат.

- Название:Fedora Linux
- Автор:
- Издательство:O'Reilly
- Жанр:
- Год:2006
- ISBN:978-0-596-52682-5
- Рейтинг книги:5 / 5. Голосов: 1
-
Избранное:Добавить в избранное
- Отзывы:
-
Ваша оценка:
Fedora Linux: краткое содержание, описание и аннотация
Предлагаем к чтению аннотацию, описание, краткое содержание или предисловие (зависит от того, что написал сам автор книги «Fedora Linux»). Если вы не нашли необходимую информацию о книге — напишите в комментариях, мы постараемся отыскать её.
Fedora Linux: A Complete Guide to Red Hat's Community Distribution In this book, you'll learn how to:
Install Fedora and perform basic administrative tasks
Configure the KDE and GNOME desktops
Get power management working on your notebook computer and hop on a wired or wireless network
Find, install, and update any of the thousands of packages available for Fedora
Perform backups, increase reliability with RAID, and manage your disks with logical volumes
Set up a server with file sharing, DNS, DHCP, email, a Web server, and more
Work with Fedora's security features including SELinux, PAM, and Access Control Lists (ACLs)
Whether you are running the stable version of Fedora Core or bleeding-edge Rawhide releases, this book has something for every level of user. The modular, lab-based approach not only shows you how things work - but also explains why--and provides you with the answers you need to get up and running with Fedora Linux.
Fedora Linux — читать онлайн бесплатно полную книгу (весь текст) целиком
Ниже представлен текст книги, разбитый по страницам. Система сохранения места последней прочитанной страницы, позволяет с удобством читать онлайн бесплатно книгу «Fedora Linux», без необходимости каждый раз заново искать на чём Вы остановились. Поставьте закладку, и сможете в любой момент перейти на страницу, на которой закончили чтение.
Интервал:
Закладка:
The first argument ( 2345 ) is a list of the runlevels in which this service will run by default; this information is used to initially set up the system and to handle chkconfig 's reset argument. If the default for this service is to have it turned off in all runlevels, the value - is used. The second argument is the sequence number (00 through 99) for the start link; the value 90 shown here means that the name of the start link will be S90xfs . The third argument is the sequence number for the kill link, which in this case yields a kill-link name of K10xfs .
When service scripts are called, they are passed a keyword such as start , stop , restart , or reload , indicating the action the script must take.
4.6.3. What About...
4.6.3.1. ...creating my own runlevel?
You can use the system-config-services or chkconfig tools to create a custom set of services for a runlevel and then use that either as the default runlevel or an option on the boot menu.
This technique is particularly useful on laptops, which may be used in different locations and need different services in each location.
4.6.3.2. ...creating my own service?
To create a service:
1. Create a service script in /etc/rc.d/init.d . Include a chkconfig line as described in the previous section. (You may want to examine an existing service file to see how it works.)
2. Run the command chkconfig --add service to set up the default service links.
You can then configure your service in the same way as any of the other services, using system-config-services , service , and chkconfig .
4.6.4. Where Can I Learn More?
The manpages for chkconfig , ntsysv , and init
4.7. Managing Users and Groups
In an age of viruses, worms, and identity theft, keeping information private and secure has taken on great importance. Managing user identity creates the framework for system securityeven on a single-user system, where a distinction is maintained between using the system as the normal user and using the system as the root user.
4.7.1. How Do I Do That?
Almost everyone identifies themselves as both an individual and as a member of several groups. Linux uses separate user and group identities to reconstruct this two-level structure inside the system.
For example, company employee Richard might be all of the following:
A member of the IT department
Located at the company's Toronto office
The leader of the team putting together the big sales pitch to Acme, Ltd.
Part of the Christmas party committee
A player in the Tuesday evening company soccer league
(And that doesn't even touch on life outside of the company!)
The system administrator configures Richard's account to indicate his many involvements within the company. At the user level, the name richard is assigned to him, and a password and home directory are assigned. richard is then placed into the groups it , toronto , acmeproposal , christmas , and soccer .
Fedora Core extends this system using a scheme called user private group (UPG), which means that Richard also has his own private group, also named richard . UPG makes a lot of sense when you look at permissions.
4.7.1.1. Managing users graphically
The Fedora GUI tool for managing users and groups is system-config-users , which is accessed through the menu under System→Administration→"Users and Groups." After you supply the root password, the window shown in Figure 4-8 will appear.
Figure 4-8. The Users and Groups configuration window
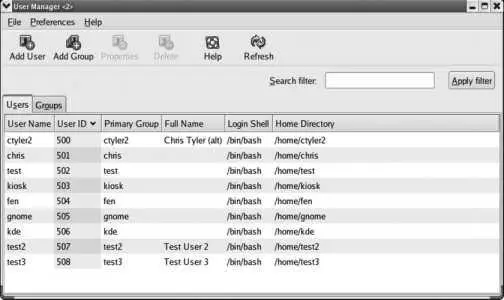
This window has two tabs, one for managing groups and one for managing users.
To add a user, click on the Add User icon. The window shown in Figure 4-9 will be displayed.
Figure 4-9. The Create New User window
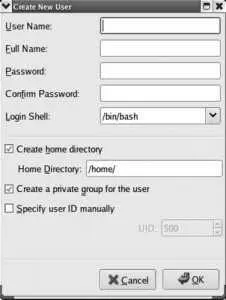
Fill in each of the fields:
User Name
The account name (username) you wish to use (such as jane ). This is what the user will enter when she logs in to the system. It should be an opaque string (no spaces) and consist of letters, digits, dashes, underscores, and periods. Although you can use uppercase characters, traditional user names are all-lowercase for ease of typing.
Full Name
The actual name of the user, in upper- and lowercase ( Jane Smith ). This information is optional and is used for reference only.
Password and Confirm Password
Type the new user's password twice.
Login shell
For most users, this field should be left as is; it can always be changed (using chsh ) later. If you are creating a user account that will never be used for logging in (such as an account used exclusively for email access or file sharing), select /sbin/nologin for the shell.
Create home directory
This should almost always be left checked.
Create a private group for the user
This enables the Fedora User Private Group scheme (which is a great idea), so it should almost always be left checked.
Specify a user ID manually
This controls whether the numeric user ID will be automatically or manually assigned. The only time you would want to specify it manually is when you are configuring the same user ID on two systems. In that case, check the box and enter the user ID in the UID field; otherwise, leave it unchecked.
Once you have filled in all of these fields, click OK. You will be returned to the main User and Group configuration window ( Figure 4-8 ).
To edit a user, double-click on the user's name, or highlight the name and click the Properties icon. An edit window will appear with four tabs, enabling you to edit values that cannot be set during the creation of the account; Figure 4-10 shows each of these tabs.
Figure 4-10. The four tabs of the User Properties window
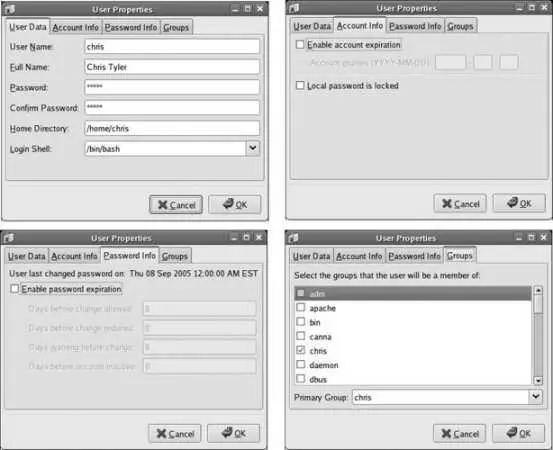
The four tabs are:
User Data
Contains fields similar to those in the Create New User dialog ( Figure 4-9 ).
Account Info
Allows you to set an expiry date for the account or lock (disable) the account.
Password Info
Configures password expiration (also called password aging ). You can set the number of days before a change is required, to force users to change passwords periodically; the number of days after a change before another change is permitted, to prevent a user from gaming the forced password change by using a temporary password and then immediately switching back to her regular password; how far in advance the user will be warned about an impending password expiry; and the number of days of inactivity permitted before the account is locked as abandoned.
Groups
This tab is one of the least used, but most useful. Here you configure the groups to which the user belongs. In the case of our fictional example of Richard, you would check the it , toronto , acmeproposal , christmas , and soccer groups. By default, the user is automatically assigned to a group with the same name as his username. The significance of groups is that they can be used to manage file access.
Читать дальшеИнтервал:
Закладка:
Похожие книги на «Fedora Linux»
Представляем Вашему вниманию похожие книги на «Fedora Linux» списком для выбора. Мы отобрали схожую по названию и смыслу литературу в надежде предоставить читателям больше вариантов отыскать новые, интересные, ещё непрочитанные произведения.


Обсуждение, отзывы о книге «Fedora Linux» и просто собственные мнения читателей. Оставьте ваши комментарии, напишите, что Вы думаете о произведении, его смысле или главных героях. Укажите что конкретно понравилось, а что нет, и почему Вы так считаете.