Chris Tyler - Fedora Linux
Здесь есть возможность читать онлайн «Chris Tyler - Fedora Linux» весь текст электронной книги совершенно бесплатно (целиком полную версию без сокращений). В некоторых случаях можно слушать аудио, скачать через торрент в формате fb2 и присутствует краткое содержание. Год выпуска: 2006, ISBN: 2006, Издательство: O'Reilly, Жанр: ОС и Сети, на английском языке. Описание произведения, (предисловие) а так же отзывы посетителей доступны на портале библиотеки ЛибКат.

- Название:Fedora Linux
- Автор:
- Издательство:O'Reilly
- Жанр:
- Год:2006
- ISBN:978-0-596-52682-5
- Рейтинг книги:5 / 5. Голосов: 1
-
Избранное:Добавить в избранное
- Отзывы:
-
Ваша оценка:
Fedora Linux: краткое содержание, описание и аннотация
Предлагаем к чтению аннотацию, описание, краткое содержание или предисловие (зависит от того, что написал сам автор книги «Fedora Linux»). Если вы не нашли необходимую информацию о книге — напишите в комментариях, мы постараемся отыскать её.
Fedora Linux: A Complete Guide to Red Hat's Community Distribution In this book, you'll learn how to:
Install Fedora and perform basic administrative tasks
Configure the KDE and GNOME desktops
Get power management working on your notebook computer and hop on a wired or wireless network
Find, install, and update any of the thousands of packages available for Fedora
Perform backups, increase reliability with RAID, and manage your disks with logical volumes
Set up a server with file sharing, DNS, DHCP, email, a Web server, and more
Work with Fedora's security features including SELinux, PAM, and Access Control Lists (ACLs)
Whether you are running the stable version of Fedora Core or bleeding-edge Rawhide releases, this book has something for every level of user. The modular, lab-based approach not only shows you how things work - but also explains why--and provides you with the answers you need to get up and running with Fedora Linux.
Fedora Linux — читать онлайн бесплатно полную книгу (весь текст) целиком
Ниже представлен текст книги, разбитый по страницам. Система сохранения места последней прочитанной страницы, позволяет с удобством читать онлайн бесплатно книгу «Fedora Linux», без необходимости каждый раз заново искать на чём Вы остановились. Поставьте закладку, и сможете в любой момент перейти на страницу, на которой закончили чтение.
Интервал:
Закладка:
Order Deny,Allow
Allow From All
7.4.3. What About...
7.4.3.1. ...a client that uses the older LPD protocol?
If you wish to share the printer with a client that knows only the older Line Printer Daemon (LPD) protocol, such as an older Linux/Unix system or a Windows NT system, you will need to install the cups-lpd package.
To enable the service, start the Services tool (System→Administration→Services), select the On Demand Services tab, select the checkbox labeled "cups-lpd," and click Save. You can also enable the service by editing /etc/xinetd.d/cups-lpd , which looks like this:
# default: off
# description: Allow applications using the legacy lpd protocol
# to communicate with CUPS
service printer
{
disable = yes
socket_type = stream
protocol = tcp
wait = no
user = lp
server = /usr/lib/cups/daemon/cups-lpd
}
Change the disable line to the following:
disable = no
Save the file and restart the xinetd service:
# service xinetd restart
Stopping xinetd: [ OK ]
Starting xinetd: [ OK ]
LPD printer sharing requires the printer port 515 (printer:tcp) to be opened in your firewall.
LPD emulation is enabled globally; there is no provision to share only some printers, or to share only with certain clients
7.4.3.2. ...configuring sharing from the command line?
Fedora does not provide a facility for configuring printer sharing from the command line. The only available option is to edit /etc/cups/cupsd.conf and insert the appropriate Allow and Deny directives (or, if you're accessing from a remote system, you may want to use X tunneling via SSHsee Lab 4.10, "Remote Management Using SSH ").
7.4.4. Where Can I Learn More?
The CUPS manual: http://localhost:631/documentation.html
The manpage for cups-lpd
7.5. Using the Apache Web Server
Apache is the most widely used web server and is a standard part of Fedora Core. One of the reasons that it has garnered a majority market share is that it is highly configurable and can therefore meet a wide range of web-serving needs. Despite the number of options available, Fedora Core ships Apache with a default configuration that is ready to meet most basic web-serving needs.
7.5.1. How Do I Do That?
Before configuring Apache, it's a good idea to make a backup copy of the original configuration file:
# cp /etc/httpd/conf/httpd.conf /etc/httpd/conf/httpd.conf-original
7.5.1.1. Starting Apache
Apache is not enabled by default. To start it, use the Services tool or enter this command:
# service httpd start
To ensure that Apache starts each time the system is booted, enable the httpd service.
Whenever the Apache configuration is changed, you must instruct Apache to reload its configuration:
# service httpd reload
Alternately, you can use the Restart button in the Services tool.
7.5.1.2. Testing Apache
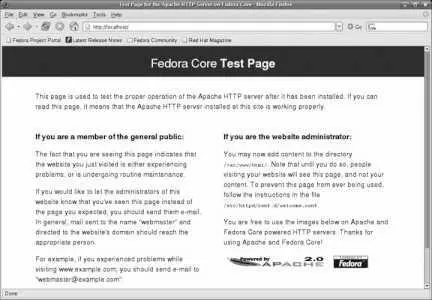
Using a web browser on the machine running Apache, access the web location http://localhost/ . You will see the test page shown in Figure 7-16 .
Figure 7-16. Apache test page confirming operation of the web server
Once you can view this web page on the server, you can attempt to access the page from a remote system using the IP address of the server (such as http://192.168.100.1/ ), or, if DNS has been set up to allow it, the server's hostname (e.g., http://fedorabook.com/ ).
If you can access the web page on the server but not from a remote system, then the firewall configuration may require adjustment.
7.5.1.3. Installing your own web content
Once the web server is running, place the content you wish to serve in the directory /var/www/html . The default page for each directory is index.html ; once you have created /var/www/html/index.html , the test page ( Figure 7-16 ) will no longer appear.
Create subdirectories within /var/www/html to create any directory structure you want. These directories will be reflected in the URLs accessible through the web server. For example, you could create the directory /var/www/html/photos/ :
# mkdir /var/www/html/ photos
That directory will be accessible using the URI http:///photos/ .
7.5.1.4. Changing the default configuration
The default Apache configuration serves all web content from one directory: /var/www/html . To perform more advanced web serving, the default configuration needs to be modified.
Apache can be configured by using Fedora's graphical configuration tool or by editing configuration files, but you can't alternate between the two approaches. Most experienced Apache administrators prefer to directly edit the configuration file because it provides direct access to all of Apache's features and because it is more convenient when accessing a remote server. However, Fedora's graphical configuration tool is quite powerful and is a good place to start if you're not familiar with Apache setup.
7.5.1.5. Configuring Apache graphically
To configure Apache graphically, select System→Administration→Server Settings→HTTP (or in KDE, Administration→Server Settings→HTTP). The httpd configuration dialog, a simple tabbed window (shown in Figure 7-17), will appear.
Figure 7-17. Graphical configuration tool for Apache httpd
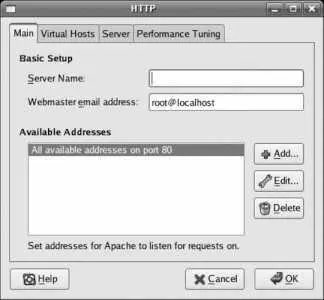
Start with the Main tab and enter the server name and webmaster's email address. The server name must contain only alphanumeric characters; it will be used as a hostname and combined with the current domain name to build a fully qualified domain name (FQDN).
The webmaster's address is displayed in server error messages and could be harvested by web spiders, so it is a good idea to use a disposable email alias and change it frequently to thwart spammers.
The Available Addresses area is used only if you wish to prevent the web server from using some network interfaces, or if you wish to use a nonstandard TCP/IP port (the default for HTTP is port 80). This is usually left at the default setting.
The Virtual Hosts tab shown in Figure 7-18 is used to configure Apache to respond to requests for multiple web sitesfor example, www.fedorabook.com and www.tylers.info . By default, a single entry is present, labeled Default Virtual Host.
Figure 7-18. Virtual host configuration
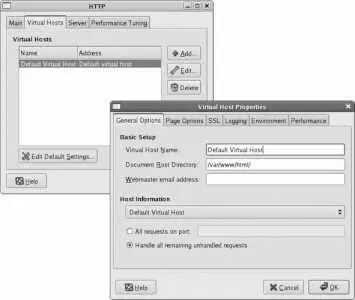
To edit an existing entry or add a new entry, use the Edit or Add buttons. In either case, the window shown on the right of Figure 7-18 will appear, with these tabs:
Читать дальшеИнтервал:
Закладка:
Похожие книги на «Fedora Linux»
Представляем Вашему вниманию похожие книги на «Fedora Linux» списком для выбора. Мы отобрали схожую по названию и смыслу литературу в надежде предоставить читателям больше вариантов отыскать новые, интересные, ещё непрочитанные произведения.


Обсуждение, отзывы о книге «Fedora Linux» и просто собственные мнения читателей. Оставьте ваши комментарии, напишите, что Вы думаете о произведении, его смысле или главных героях. Укажите что конкретно понравилось, а что нет, и почему Вы так считаете.