Chris Tyler - Fedora Linux
Здесь есть возможность читать онлайн «Chris Tyler - Fedora Linux» весь текст электронной книги совершенно бесплатно (целиком полную версию без сокращений). В некоторых случаях можно слушать аудио, скачать через торрент в формате fb2 и присутствует краткое содержание. Год выпуска: 2006, ISBN: 2006, Издательство: O'Reilly, Жанр: ОС и Сети, на английском языке. Описание произведения, (предисловие) а так же отзывы посетителей доступны на портале библиотеки ЛибКат.

- Название:Fedora Linux
- Автор:
- Издательство:O'Reilly
- Жанр:
- Год:2006
- ISBN:978-0-596-52682-5
- Рейтинг книги:5 / 5. Голосов: 1
-
Избранное:Добавить в избранное
- Отзывы:
-
Ваша оценка:
Fedora Linux: краткое содержание, описание и аннотация
Предлагаем к чтению аннотацию, описание, краткое содержание или предисловие (зависит от того, что написал сам автор книги «Fedora Linux»). Если вы не нашли необходимую информацию о книге — напишите в комментариях, мы постараемся отыскать её.
Fedora Linux: A Complete Guide to Red Hat's Community Distribution In this book, you'll learn how to:
Install Fedora and perform basic administrative tasks
Configure the KDE and GNOME desktops
Get power management working on your notebook computer and hop on a wired or wireless network
Find, install, and update any of the thousands of packages available for Fedora
Perform backups, increase reliability with RAID, and manage your disks with logical volumes
Set up a server with file sharing, DNS, DHCP, email, a Web server, and more
Work with Fedora's security features including SELinux, PAM, and Access Control Lists (ACLs)
Whether you are running the stable version of Fedora Core or bleeding-edge Rawhide releases, this book has something for every level of user. The modular, lab-based approach not only shows you how things work - but also explains why--and provides you with the answers you need to get up and running with Fedora Linux.
Fedora Linux — читать онлайн бесплатно полную книгу (весь текст) целиком
Ниже представлен текст книги, разбитый по страницам. Система сохранения места последней прочитанной страницы, позволяет с удобством читать онлайн бесплатно книгу «Fedora Linux», без необходимости каждый раз заново искать на чём Вы остановились. Поставьте закладку, и сможете в любой момент перейти на страницу, на которой закончили чтение.
Интервал:
Закладка:
The Linux resolver uses the file /etc/nsswitch to determine possible ways of resolving a hostname to an IP address. The default configuration is to check /etc/hosts first, and then try DNS.
The caching nameserver first checks its cache to see if it already has the answer to the query, and if it does, it returns that answer to the client. Otherwise, it contacts one of the root nameservers (listed in /var/named/named.ca ) by sending a UDP packet to port 53. The root nameserver sends back a reply referring the caching nameserver to the authoritative nameserver for the appropriate top-level domain (TLD). The caching nameserver then sends another query, this time to the TLD nameserver, which replies with a referral to the next nameserver down the chain. This happens recursively until a nameserver that knows the answer is foundor until the possibilities are exhausted and a nameserver finally returns an NXDOMAIN (nonexistent domain) response.
Slave zones are transferred from master zones when the master zone notifies the slave of the need for an update, or when an update is mandated by the refresh time value in the zone's SOA record. The transfer is always initiated by the slave side.
In addition to the resource records discussed in this lab, DNS supports a number of other record types that can be used to serve information, such as host hardware and OS configuration, geographical locations, email server authorization (Sender Policy Framework), and more, but these records are much less commonly used.
Reverse address resolution is performed by reversing the bytes of the dotted-quad IP address and using that as a domain name within the in-addr.arpa TLD. The resource record returned is a pointer (PTR) record.
For example, to discover the hostname of 216.183.93.224 , a query is made for 224.93.183.216.in-addr.arpa :
$ dig 224.93.183.216.in-addr.arpa ptr
; <<>> DiG 9.3.1 <<>> 224.93.183.216.in-addr.arpa ptr
;; global options: printcmd
;; Got answer:
;; ->>HEADER<<- opcode: QUERY, status: NOERROR, id: 10860
;; flags: qr rd ra; QUERY: 1, ANSWER: 1, AUTHORITY: 1, ADDITIONAL: 1
;; QUESTION SECTION:
;224.93.183.216.in-addr.arpa. IN PTR
;; ANSWER SECTION:
224.93.183.216.in-addr.arpa. 38204 IN PTR global.proximity.on.ca.
;; AUTHORITY SECTION:
93.183.216.in-addr.arpa. 38204 IN NS ns1.scratchtelecom.com.
;; ADDITIONAL SECTION:
ns1.scratchtelecom.com. 172567 IN A 216.183.93.250
;; Query time: 1 msec
;; SERVER: 127.0.0.1#53(127.0.0.1)
;; WHEN: Sun Mar 5 00:21:39 2006
;; MSG SIZE rcvd: 133
The host or nslookup commands will automatically convert an IP address into this type of query:
$ host 216.183.93.224
224.93.183.216.in-addr.arpa domain name pointer global.proximity.on.ca.
$ nslookup 216.183.93.224
Server: 127.0.0.1
Address: 127.0.0.1#53
Non-authoritative answer:
224.93.183.216.in-addr.arpa name = global.proximity.on.ca.
Authoritative answers can be found from:
93.183.216.in-addr.arpa nameserver = ns1.scratchtelecom.com.
ns1.scratchtelecom.com internet address = 216.183.93.250
The Fedora graphical configuration tool for DNS is called system-config-bind .
7.3.3. What About...
7.3.3.1. ...changing from one nameserver to another?
Be sure that you never leave an obsolete nameserver active. For example, if your name service was provided by an ISP and you take over the name service, ensure that the ISP's nameserver no longer contain entries for your domain; otherwise, customers of that ISP may not be able to reach your system because they will receive obsolete DNS information.
7.3.4. Where Can I Learn More?
The manpages for named and named_selinux ; dig , nslookup , and host ; nsswitch.conf , hosts , and resolv.conf
The BIND 9 Administrator's Reference Manual in PDF format ( /usr/share/doc/bind-9.3.2/arm/Bv9ARM.pdf ) or HTML format ( file:///usr/share/doc/bind-9.3.1/arm/Bv9ARM.html )
7.4. Configuring a CUPS Print Server
The Common Unix Printing System (CUPS) printer daemon can also be used as a print server, enabling other computers on the local network to access the printers it controls.
7.4.1. How Do I Do That?
Start the Printer Configuration tool shown in Figure 7-14 . Highlight the printer you wish to share, select the checkbox labeled Shared, and then click Apply.
Figure 7-14. Printer configuration: sharing properties
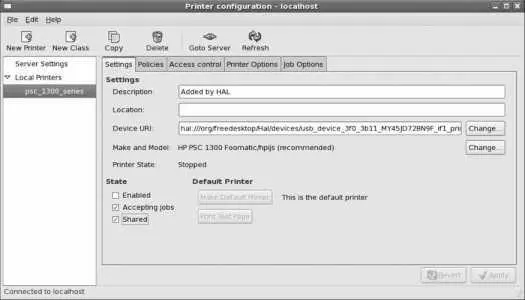
Next, click on Server Settings on the lefthand side and select the checkbox labeled "Share published printers connected to this system." Click Apply.
You will need to open the IPP port 631 (ipp:tcp) in your firewall configuration (see Lab 8.1, "Prevent Unwanted Connections").
Your printer will now be accessible to other systems.
7.4.1.1. Accessing a CUPS printer from Windows XP
To add a CUPS printer to a Windows XP system, select "Printers and Faxes" from the Start menu and click on "Add a printer." The Add Printer Wizard will appear.
Click Next to advance past the introduction. On the next page, select "A network printer, or a printer attached to another computer," and click Next. The window shown in Figure 7-15 will appear.
Figure 7-15. Adding a CUPS printer to a Windows XP system
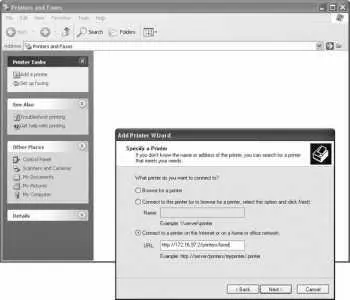
Select "Connect to a printer on the Internet or on a home or office network," and enter a URI in this form:
http:// server :631/printers/ printername
Replace server with the hostname of the CUPS server if the Windows system can resolve that hostname using DNS; if you haven't configured DNS, use the IP address instead. Replace printername with the name of the printer as it is known to CUPS.
Click Next.
Select the manufacturer and printer model, and click Next (or, if the printer drivers are on a CD, click "Have a Disk" and select the disk location). Then click Finish to set up the printer. You can now use the CUPS printer from any Windows applications.
7.4.2. How Does It Work?
CUPS uses the Internet Print Protocol (IPP), which is based on the same HTTP protocol used by the Web. One shared virtual directory is mapped to each printer.
The CUPS configuration files are stored in /etc/cups , and the format of the main configuration file /etc/cups/cupsd.conf is very similar to the Apache configuration file (discussed in Lab 7.5, "Using the Apache Web Server "). Printer sharing is therefore enabled and disabled using Allow and Deny directives in the same way that they would be used to control access to an Apache directory. For example, global access to the printer laser0 could be configured like this:
Читать дальшеИнтервал:
Закладка:
Похожие книги на «Fedora Linux»
Представляем Вашему вниманию похожие книги на «Fedora Linux» списком для выбора. Мы отобрали схожую по названию и смыслу литературу в надежде предоставить читателям больше вариантов отыскать новые, интересные, ещё непрочитанные произведения.


Обсуждение, отзывы о книге «Fedora Linux» и просто собственные мнения читателей. Оставьте ваши комментарии, напишите, что Вы думаете о произведении, его смысле или главных героях. Укажите что конкретно понравилось, а что нет, и почему Вы так считаете.