Andrew Hudson - Fedora™ Unleashed, 2008 edition
Здесь есть возможность читать онлайн «Andrew Hudson - Fedora™ Unleashed, 2008 edition» весь текст электронной книги совершенно бесплатно (целиком полную версию без сокращений). В некоторых случаях можно слушать аудио, скачать через торрент в формате fb2 и присутствует краткое содержание. Город: Indianapolis, Год выпуска: 2008, ISBN: 2008, Издательство: Sams Publishing, Жанр: ОС и Сети, на английском языке. Описание произведения, (предисловие) а так же отзывы посетителей доступны на портале библиотеки ЛибКат.

- Название:Fedora™ Unleashed, 2008 edition
- Автор:
- Издательство:Sams Publishing
- Жанр:
- Год:2008
- Город:Indianapolis
- ISBN:978-0-672-32977-7
- Рейтинг книги:5 / 5. Голосов: 1
-
Избранное:Добавить в избранное
- Отзывы:
-
Ваша оценка:
Fedora™ Unleashed, 2008 edition: краткое содержание, описание и аннотация
Предлагаем к чтению аннотацию, описание, краткое содержание или предисловие (зависит от того, что написал сам автор книги «Fedora™ Unleashed, 2008 edition»). Если вы не нашли необходимую информацию о книге — напишите в комментариях, мы постараемся отыскать её.
Finding information you need is not always easy. This short index provides a list of common tasks discussed inside this book. Browse the table of contents or index for detailed listings and consult the specified chapter for in-depth discussions about each subject.
left How Do I…?
See…
How Do I…?
See…
left Back up my system?
Chapter 13
Partition a hard drive?
Appendix B, Chapters 1, 35
left Build a new Linux kernel?
Chapter 36
Play MP3s and other music?
Chapter 7
left Burn a CD?
Chapter 7
Print a file?
Chapter 8
left Change a password?
Chapter 4
Read a text file?
Chapter 4
left Change the date and time?
Chapter 32
Read or send email?
Chapter 21
left Compress a file?
Chapter 13
Read or post to newsgroups?
Chapter 5
left Configure a modem?
Chapter 2
Reboot Fedora?
Chapter 1
left Configure a printer?
Chapter 8
Rescue my system?
Chapter 13
left Configure a scanner?
Chapter 7
Set up a DNS server?
Chapter 23
left Configure a sound card?
Chapter 7
Set up a firewall?
Chapter 14
left Configure my desktop settings?
Chapter 3
Set up a web server?
Chapter 15
left Connect to the Internet?
Chapter 5
Set up an FTP server?
Chapter 20
left Control a network interface?
Chapter 14
Set up Samba with SWAT?
Chapter 19
left Copy files or directories?
Chapters 13, 32
Set up wireless networking?
Chapter 14
left Create a boot disk to boot Fedora?
Chapter 1
Shut down Fedora?
Chapter 1
left Create a database?
Chapter 16
Use a spreadsheet?
Chapter 6
left Create a user?
Chapter 4
Use Instant Messaging?
Chapter 5
left Delete a file or directory?
Chapter 32
Watch television on my computer?
Chapter 7
left Get images from a digital camera?
Chapter 7
Edit a text file?
Chapter 4
left Install Fedora?
Chapter 1
Make Fedora more secure?
Chapter 14
left Log in to Fedora?
Chapter 1
Mount a CD-ROM or hard drive?
Chapter 35
Fedora™ Unleashed, 2008 edition — читать онлайн бесплатно полную книгу (весь текст) целиком
Ниже представлен текст книги, разбитый по страницам. Система сохранения места последней прочитанной страницы, позволяет с удобством читать онлайн бесплатно книгу «Fedora™ Unleashed, 2008 edition», без необходимости каждый раз заново искать на чём Вы остановились. Поставьте закладку, и сможете в любой момент перейти на страницу, на которой закончили чтение.
Интервал:
Закладка:
First we change to the target directory, and then
► x— Extract files from a tararchive.
► p— Preserve permissions.
► f— Read from -, the temporary buffer that holds the tar'ed files.
Compressing, Encrypting, and Sending tarStreams
The file copy techniques using the tarcommand in the previous section can also be used to quickly and securely copy a directory structure across a LAN or the Internet (using the sshcommand). One way to make use of these techniques is to use the following command line to first compress the contents of a designated directory, and then decompress the compressed and encrypted archive stream into a designated directory on a remote host:
$ tar cvzf - data_folder | ssh remote_host '( cd ~/ mybackup_dir ; tar xvzf - )'
The tarcommand is used to create, list, and compress the files in the directory named data_folder. The output is piped through the ssh(secure shell) command and sent to the remote computer named remote_host. On the remote computer, the stream is then extracted and saved in the directory named /mybackup_dir. You are prompted for a pass word to send the stream.
Copying Files Using cp
To copy files, we could use the cpcommand. The general format of the command when used for simple copying is the following:
$ cp -a source_directory target_directory
The -aargument is the same as giving -dpR, which would be
► -d— Dereferences symbolic links (never follows symbolic links) and copies the files to which they point, instead of copying the links.
► -p— Preserves all file attributes if possible. (File ownership might interfere.)
► -R— Copies directories recursively.
You can also use the cpcommand to quickly replicate directories and retain permissions by using the -avRcommand-line options. Using these options preserves file and directory permissions, gives verbose output, and recursively copies and re-creates subdirectories. You can also create a log of the backup during the backup by redirecting the standard output like this:
# cp -avR directory_to_backup destination_vol_or_dir 1>/root/backup_log.txt
or
# cp -avR fedora /test2 1>/root/backup_log.txt
This example makes an exact copy of the directory named /fedoraon the volume named /test2, and saves a backup report named backup_log.txtunder /root.
Using mcto Copy Files
The Midnight Commander is a command-line file manager that is useful for copying, moving, and archiving files and directories. The Midnight Commander has a look and feel similar to the Norton Commander of DOS fame. When you execute mcat a shell prompt, a dual-pane view of the files is displayed. It contains drop-down menu choices and function keys to manipulate files. It also uses its own virtual file system, enabling it to mount FTP directories and display the contents of tarfiles, gzipped tarfiles ( .tar.gzor .tgz), bzipfiles, DEBfiles, and RPMfiles, as well as extract individual files from them. As if that were not enough, mc contains a File Undelete virtual file system for ext2/3partitions. By using cdto "change directories" to an FTP server's URL, you can transfer files with the FTP protocol. The default font chosen for Fedora makes the display of mcugly when used in a ttyconsole (as opposed to an xterm), but does not affect its performance.
Figure 13.4 shows the default dual-panel display. Pressing the F9 key drops down the menu, and pressing F1 displays the Help file. A "feature" in the default GNOME terminal intercepts the F10 key used to exit mc, so use F9 instead to access the menu item to quit, or simply click on the menu bar at the bottom with your mouse. The configuration files are well documented, and it would appear easy to extend the functionality of mcfor your system if you understand shell scripting and regular expressions. It is an excellent choice for file management on servers not running X.
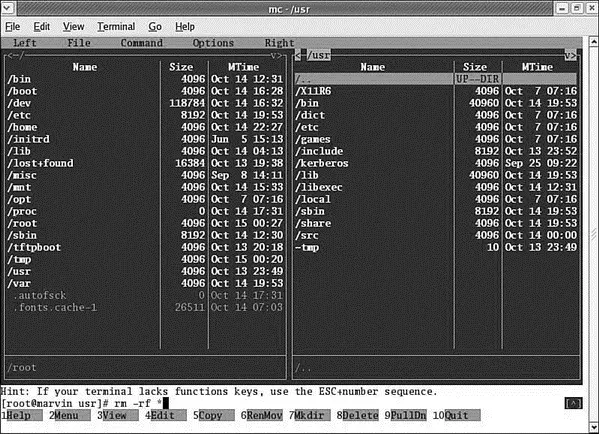
FIGURE 13.4 The Midnight Commander is a highly versatile file tool. If it does not display properly on your screen, launch it with the -aargument to force ASCII mode.
System Rescue
There will come a time when you need to engage in system rescue efforts. This need arises when the system will not even start Linux so that you can recover any files. This problem is most frequently associated with the boot loader program or partition table, but it could be that critical system files have been inadvertently deleted or corrupted. If you have been making backups properly, these kinds of system failures are easily, although not quickly, recoverable through a full restore. Still, valuable current data might not have been backed up since the last scheduled backup, and the backup archives could be found to be corrupt, incomplete, or missing. A full restore also takes time you might not have. If the problem causing the system failure is simply a damaged boot loader, a damaged partition table, a missing library, or misconfiguration, a quick fix can get the system up and running and the data can then be retrieved easily.
This section first examines a way to back up and restore the boot loader itself or, having failed to do that, restore it by hand. It then looks at a few alternatives to booting the damaged system so that you can inspect it, fix it, or retrieve data from it.
The Fedora Rescue Disc
Fedora provides a rescue disc hidden in the installation DVD. To use it, insert the disc and reboot the computer, booting from the DVD just as you did when you installed Fedora originally. At the intro screen, press the F1 key to see all the available choices, but simply enter linux rescue at the LILO boot prompt to enter rescue mode, like so:
boot: linux rescue
You will learn more about the rescue mode later in this section, but feel free to explore it at any time. A graphical interface is not available, so you need to bone up on your command-line skills. If necessary, you can perform all the operations discussed in this section from rescue mode.
Backing Up and Restoring the Master Boot Record
The Master Boot Record (MBR) is the first 512 bytes of a hard disk. It contains the boot loader code in the first 446 bytes and the partition table in the next 64 bytes; the last two bytes identify that sector as the MBR. The MBR can become corrupted, so it makes sense to back it up.
This example uses the dd command as root to back up the entire MBR. If the boot loader code changes from the time you make this image and restore the old code, the system will not boot when you restore it all; it is easy enough to keep a boot floppy disk handy and then rerun LILO if that is what you are using.
To copy the entire MBR to a file, use this:
# dd if=/dev/hda of=/tmp/hdambr bs=512 count=1
To restore the entire MBR, use this:
Читать дальшеИнтервал:
Закладка:
Похожие книги на «Fedora™ Unleashed, 2008 edition»
Представляем Вашему вниманию похожие книги на «Fedora™ Unleashed, 2008 edition» списком для выбора. Мы отобрали схожую по названию и смыслу литературу в надежде предоставить читателям больше вариантов отыскать новые, интересные, ещё непрочитанные произведения.


![Andrew Radford - Linguistics An Introduction [Second Edition]](/books/397851/andrew-radford-linguistics-an-introduction-second-thumb.webp)


Обсуждение, отзывы о книге «Fedora™ Unleashed, 2008 edition» и просто собственные мнения читателей. Оставьте ваши комментарии, напишите, что Вы думаете о произведении, его смысле или главных героях. Укажите что конкретно понравилось, а что нет, и почему Вы так считаете.