Andrew Hudson - Fedora™ Unleashed, 2008 edition
Здесь есть возможность читать онлайн «Andrew Hudson - Fedora™ Unleashed, 2008 edition» весь текст электронной книги совершенно бесплатно (целиком полную версию без сокращений). В некоторых случаях можно слушать аудио, скачать через торрент в формате fb2 и присутствует краткое содержание. Город: Indianapolis, Год выпуска: 2008, ISBN: 2008, Издательство: Sams Publishing, Жанр: ОС и Сети, на английском языке. Описание произведения, (предисловие) а так же отзывы посетителей доступны на портале библиотеки ЛибКат.

- Название:Fedora™ Unleashed, 2008 edition
- Автор:
- Издательство:Sams Publishing
- Жанр:
- Год:2008
- Город:Indianapolis
- ISBN:978-0-672-32977-7
- Рейтинг книги:5 / 5. Голосов: 1
-
Избранное:Добавить в избранное
- Отзывы:
-
Ваша оценка:
Fedora™ Unleashed, 2008 edition: краткое содержание, описание и аннотация
Предлагаем к чтению аннотацию, описание, краткое содержание или предисловие (зависит от того, что написал сам автор книги «Fedora™ Unleashed, 2008 edition»). Если вы не нашли необходимую информацию о книге — напишите в комментариях, мы постараемся отыскать её.
Finding information you need is not always easy. This short index provides a list of common tasks discussed inside this book. Browse the table of contents or index for detailed listings and consult the specified chapter for in-depth discussions about each subject.
left How Do I…?
See…
How Do I…?
See…
left Back up my system?
Chapter 13
Partition a hard drive?
Appendix B, Chapters 1, 35
left Build a new Linux kernel?
Chapter 36
Play MP3s and other music?
Chapter 7
left Burn a CD?
Chapter 7
Print a file?
Chapter 8
left Change a password?
Chapter 4
Read a text file?
Chapter 4
left Change the date and time?
Chapter 32
Read or send email?
Chapter 21
left Compress a file?
Chapter 13
Read or post to newsgroups?
Chapter 5
left Configure a modem?
Chapter 2
Reboot Fedora?
Chapter 1
left Configure a printer?
Chapter 8
Rescue my system?
Chapter 13
left Configure a scanner?
Chapter 7
Set up a DNS server?
Chapter 23
left Configure a sound card?
Chapter 7
Set up a firewall?
Chapter 14
left Configure my desktop settings?
Chapter 3
Set up a web server?
Chapter 15
left Connect to the Internet?
Chapter 5
Set up an FTP server?
Chapter 20
left Control a network interface?
Chapter 14
Set up Samba with SWAT?
Chapter 19
left Copy files or directories?
Chapters 13, 32
Set up wireless networking?
Chapter 14
left Create a boot disk to boot Fedora?
Chapter 1
Shut down Fedora?
Chapter 1
left Create a database?
Chapter 16
Use a spreadsheet?
Chapter 6
left Create a user?
Chapter 4
Use Instant Messaging?
Chapter 5
left Delete a file or directory?
Chapter 32
Watch television on my computer?
Chapter 7
left Get images from a digital camera?
Chapter 7
Edit a text file?
Chapter 4
left Install Fedora?
Chapter 1
Make Fedora more secure?
Chapter 14
left Log in to Fedora?
Chapter 1
Mount a CD-ROM or hard drive?
Chapter 35
Fedora™ Unleashed, 2008 edition — читать онлайн бесплатно полную книгу (весь текст) целиком
Ниже представлен текст книги, разбитый по страницам. Система сохранения места последней прочитанной страницы, позволяет с удобством читать онлайн бесплатно книгу «Fedora™ Unleashed, 2008 edition», без необходимости каждый раз заново искать на чём Вы остановились. Поставьте закладку, и сможете в любой момент перейти на страницу, на которой закончили чтение.
Интервал:
Закладка:
# tar cv /etc > etc.tar
The result is the same.
All files in the /etcdirectory will be saved to a file named etc.tar. With an impressive array of options (see the man page), taris quite flexible and powerful in combination with shell scripts. With the -zoption, it can even create and restore gzipcompressed archives, whereas the -joption works with bzipped files.
tarIf you want to create a full backup,
# tar cjvf fullbackup.tar.bz2 /
creates a bzip2-compressed tarball (the joption) of the entire system.
To perform an incremental backup, you must locate all the files that have been changed since the last backup. For simplicity, assume that you do incremental backups on a daily basis. To locate the files, use the findcommand:
# find / -newer name_of_last_backup_file ! -a -type f -print
When run alone, findgenerates a list of files systemwide and prints it to the screen. The ! -a -typeeliminates everything but regular files from the list; otherwise, the entire directory would be sent to tareven if the contents were not all changed.
Pipe the output of the find command to taras follows:
# find / -newer name_of_last_backup_file ! -type d -print |\
tar czT- backup_file_name_or_device_name
Here, the T -option gets the filenames from a buffer (where the -is the shorthand name for the buffer).
The tarcommand can back up to a raw device (one with no file system) as well as a formatted partition. For example,
# tar cvzf /dev/hdd /boot /etc /home
backs up those directories to device /dev/hdd(not /dev/hda1, but to the unformatted device itself).
The tarcommand can also back up over multiple floppy disks:
# tar czvMf /dev/fd0 /home
backs up the contents of /homeand spreads the file out over multiple floppies, prompting you with this message:
Prepare volume #2 for '/dev/fd0' and hit return:
tarThe xpoption in tarrestores the files from a backup and preserves the file attributes as well, and tarcreates any subdirectories it needs. Be careful when using this option because the backups might have been created with either relative or absolute paths. You should use the tvfoption with tarto list the files in the archive before extracting them so that you know where they will be placed.
For example, to restore a tararchive compressed with bzip2,
# tar xjvf fedoratest.tar.bz2
To list the contents of a tararchive compressed with bzip2,
# tar tjvf fedoratest.tar.bz2
drwxrwxr-x paul/paul 0 2003-09-04 18:15:05 fedoratest/
-rw-rw-r-- paul/paul 163 2003-09-03 22:30:49 fedoratest/fedora_screenshots.txt
-rw-rw-r-- paul/paul 840 2003-09-01 19:27:59 fedoratest/fedora_guideline.txt
-rw-rw-r-- paul/paul 1485 2003-09-01 18:14:23 fedoratest/style-sheet.txt
-rw-rw-r-- paul/paul 931 2003-09-01 19:02:00 fedoratest/fedora_TOC.txt
Note that because the pathnames do not start with a backslash, they are relative path names and install in your current working directory. If they were absolute pathnames, they would install exactly where the paths state.
The GNOME File Roller
The GNOME desktop file archiving graphical application File Roller ( file-roller) views, extracts, and creates archive files using tar, gzip, bzip, compress, zip, rar, lha, and several other compression formats. Note that File Roller is only a front end to the command-line utilities that actually provide these compression formats; if they are not installed, File Roller cannot use that format.
File Roller does not complain if you select a compression format that is not supported by installed software until after you attempt to create the archive. Install any needed compression utilities first.
File Roller is well integrated with the GNOME desktop environment to provide convenient drag-and-drop functionality with the Nautilus file manager. To create a new archive, select Archive, New to open the New Archive dialog box and navigate to the directory where you want the archive to be kept. Type your archive's name in the Selection: /root text box at the bottom of the New Archive dialog box. Use the Archive type drop-down menu to select a compression method. Now, drag the files that you want to be included from Nautilus into the empty space of the File Roller window, and the animated icons will show that files are being included in the new archive. When you are finished, a list of files will be shown in the previously blank File Roller window (see Figure 13.1). To save the archive, simply select Archive, Close. Opening an archive is as easy as using the Archive, Open dialog to select the appropriate archive file.
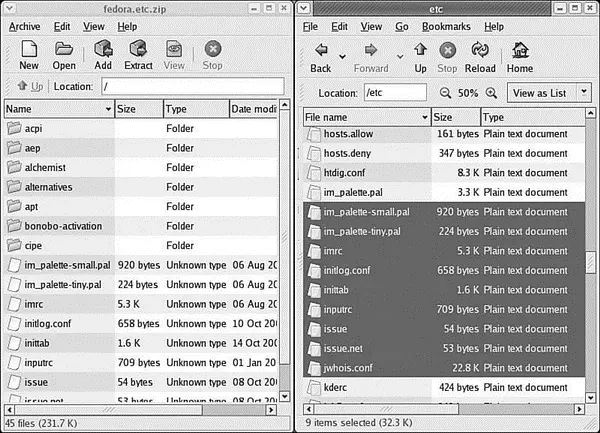
FIGURE 13.1 Drag and drop files to build an archive with the GNOME File Roller.
The KDE Archiving Tools (KDE arkand kdat)
Fedora provides you with the KDE arkand kdatGUI tools for backups; they are installed only if you select the KDE desktop during installation. Archiving has traditionally been a function of the system administrator and has not been seen as a task for the individual user, so no elaborate GUI was believed necessary. Backing up has also been seen as a script-driven, automated task in which a GUI is not as useful.
You launch arkfrom the command line. It is integrated with the KDE desktop (as File Roller is with GNOME), so it might be a better choice if you use KDE. This application provides a graphical interface to viewing, creating, adding to, and extracting from archived files as shown in Figure 13.2. Several configuration options are available with arkto ensure its compatibility with MS Windows. You can drag and drop from the KDE desktop or Konqueror file browser to add or extract files, or you can use the arkmenus.
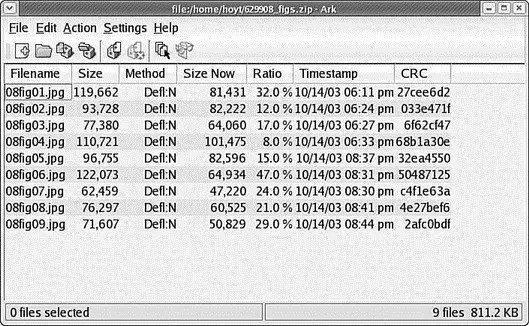
FIGURE 13.2 Here, the contents of a . zipfile containing some JPEGs are displayed.
As long as the associated command-line programs are installed, ark can work with tar, gzip, bzip2, zip, and lha files (the latter four being compression methods used to save space by compaction of the archived files).
Existing archives are opened after the application itself has launched. You can add files and directories to the archive or delete them from the archive, as shown in Figure 13.3. After opening the archive, you can extract all its contents or individual files. You can also perform searches, using patterns (all *.jpgfiles, for example) to select files.
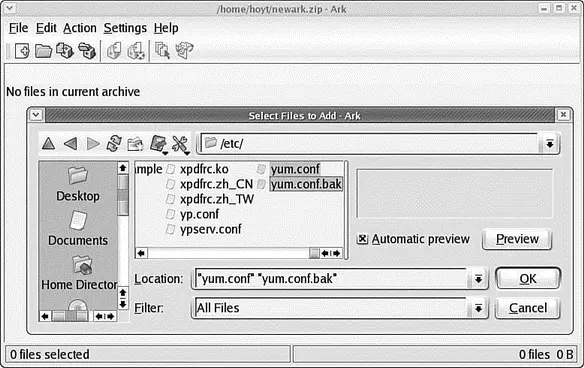
FIGURE 13.3 The opening view of arkpresented as a simple GUI browser. Here, several files are being selected to add to the new archive.
Интервал:
Закладка:
Похожие книги на «Fedora™ Unleashed, 2008 edition»
Представляем Вашему вниманию похожие книги на «Fedora™ Unleashed, 2008 edition» списком для выбора. Мы отобрали схожую по названию и смыслу литературу в надежде предоставить читателям больше вариантов отыскать новые, интересные, ещё непрочитанные произведения.


![Andrew Radford - Linguistics An Introduction [Second Edition]](/books/397851/andrew-radford-linguistics-an-introduction-second-thumb.webp)


Обсуждение, отзывы о книге «Fedora™ Unleashed, 2008 edition» и просто собственные мнения читателей. Оставьте ваши комментарии, напишите, что Вы думаете о произведении, его смысле или главных героях. Укажите что конкретно понравилось, а что нет, и почему Вы так считаете.