Andrew Hudson - Fedora™ Unleashed, 2008 edition
Здесь есть возможность читать онлайн «Andrew Hudson - Fedora™ Unleashed, 2008 edition» весь текст электронной книги совершенно бесплатно (целиком полную версию без сокращений). В некоторых случаях можно слушать аудио, скачать через торрент в формате fb2 и присутствует краткое содержание. Город: Indianapolis, Год выпуска: 2008, ISBN: 2008, Издательство: Sams Publishing, Жанр: ОС и Сети, на английском языке. Описание произведения, (предисловие) а так же отзывы посетителей доступны на портале библиотеки ЛибКат.

- Название:Fedora™ Unleashed, 2008 edition
- Автор:
- Издательство:Sams Publishing
- Жанр:
- Год:2008
- Город:Indianapolis
- ISBN:978-0-672-32977-7
- Рейтинг книги:5 / 5. Голосов: 1
-
Избранное:Добавить в избранное
- Отзывы:
-
Ваша оценка:
Fedora™ Unleashed, 2008 edition: краткое содержание, описание и аннотация
Предлагаем к чтению аннотацию, описание, краткое содержание или предисловие (зависит от того, что написал сам автор книги «Fedora™ Unleashed, 2008 edition»). Если вы не нашли необходимую информацию о книге — напишите в комментариях, мы постараемся отыскать её.
Finding information you need is not always easy. This short index provides a list of common tasks discussed inside this book. Browse the table of contents or index for detailed listings and consult the specified chapter for in-depth discussions about each subject.
left How Do I…?
See…
How Do I…?
See…
left Back up my system?
Chapter 13
Partition a hard drive?
Appendix B, Chapters 1, 35
left Build a new Linux kernel?
Chapter 36
Play MP3s and other music?
Chapter 7
left Burn a CD?
Chapter 7
Print a file?
Chapter 8
left Change a password?
Chapter 4
Read a text file?
Chapter 4
left Change the date and time?
Chapter 32
Read or send email?
Chapter 21
left Compress a file?
Chapter 13
Read or post to newsgroups?
Chapter 5
left Configure a modem?
Chapter 2
Reboot Fedora?
Chapter 1
left Configure a printer?
Chapter 8
Rescue my system?
Chapter 13
left Configure a scanner?
Chapter 7
Set up a DNS server?
Chapter 23
left Configure a sound card?
Chapter 7
Set up a firewall?
Chapter 14
left Configure my desktop settings?
Chapter 3
Set up a web server?
Chapter 15
left Connect to the Internet?
Chapter 5
Set up an FTP server?
Chapter 20
left Control a network interface?
Chapter 14
Set up Samba with SWAT?
Chapter 19
left Copy files or directories?
Chapters 13, 32
Set up wireless networking?
Chapter 14
left Create a boot disk to boot Fedora?
Chapter 1
Shut down Fedora?
Chapter 1
left Create a database?
Chapter 16
Use a spreadsheet?
Chapter 6
left Create a user?
Chapter 4
Use Instant Messaging?
Chapter 5
left Delete a file or directory?
Chapter 32
Watch television on my computer?
Chapter 7
left Get images from a digital camera?
Chapter 7
Edit a text file?
Chapter 4
left Install Fedora?
Chapter 1
Make Fedora more secure?
Chapter 14
left Log in to Fedora?
Chapter 1
Mount a CD-ROM or hard drive?
Chapter 35
Fedora™ Unleashed, 2008 edition — читать онлайн бесплатно полную книгу (весь текст) целиком
Ниже представлен текст книги, разбитый по страницам. Система сохранения места последней прочитанной страницы, позволяет с удобством читать онлайн бесплатно книгу «Fedora™ Unleashed, 2008 edition», без необходимости каждый раз заново искать на чём Вы остановились. Поставьте закладку, и сможете в любой момент перейти на страницу, на которой закончили чтение.
Интервал:
Закладка:
The network configuration process described in this section is for client hosts. You cannot perform server network configuration, such as Domain Name System (DNS) and DHCP during installation. (See Chapter 23, "Managing DNS," for more information on configuring DNS; see the "DHCP" section later in this chapter for more information on that item.)
Using Graphical Configuration Tools
If you are new to networking or still becoming proficient with the command line, the graphical configuration tool is your best method for configuring new hardware in Fedora. Like most graphical tools, system-config-networkenables you to fill in the blanks; press the proper buttons, and the tool modifies the required files and issues the proper commands. Remember, you must be root to run system-config-network.
You can access system-config-networkby going to the System, Administration menu and selecting Network. You will be asked for the root password because you are able to make systemwide changes using this tool.
After it is started, system-config-networkwill display the screen shown in Figure 14.1.
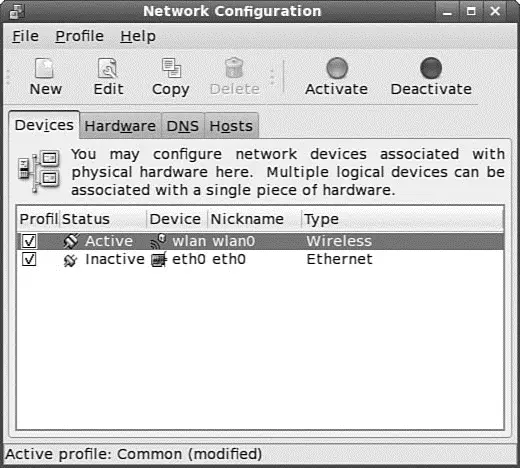
FIGURE 14.1 Use the initial system-config-networknetworking screen to begin configuring your network client host.
Click the DNS tab to configure your system's DNS settings, hostname, or DNS search path. Click the Hosts tab, and then click either the New or Edit button (after selecting a host) to create or edit an entry in your system's /etc/hostsfile — for example, to add the IP addresses, hostnames, and aliases of hosts on your network. See Figure 14.2 for an example of editing a host entry.
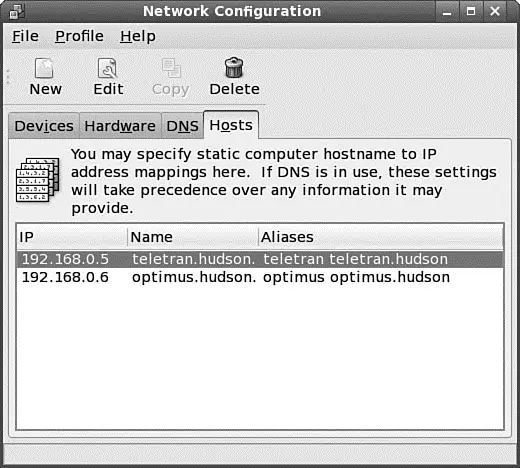
FIGURE 14.2 Highlight an existing entry, and then click the Edit button to change /etc/hostsentries in the Hosts tab of the Network Configuration screen.
Click the Devices tab, and then either click New or select an existing setting and click Edit to automatically or manually set up an ethernet device. Figure 14.3 shows the Ethernet Device dialog box with all necessary information in place for a static, or fixed, IP address assignment. Choose how your card will get its configuration: manually from Dynamic Host Control Protocol (DHCP) (see the next section) or from Bootp. Just fill in the blanks as needed.
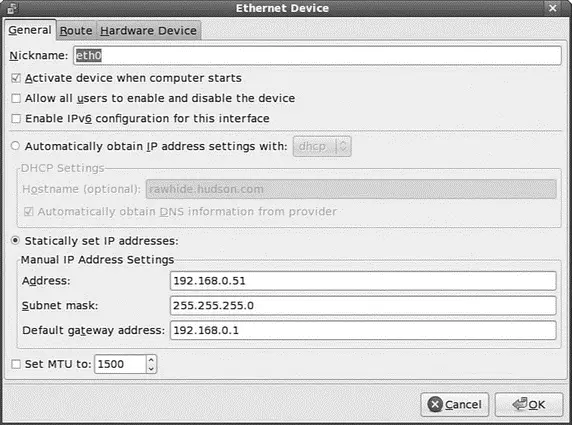
FIGURE 14.3 Configure an ethernet device to use a static IP address by double clicking the device.
Bootp is the initial protocol on which DHCP was built, and it has mostly been replaced by DHCP.
When you finish configuring your NIC or editing an IP address or assignment scheme for a NIC, save your changes, using the File menu's Save menu item. Note that you can also use the Profile menu (as shown previously in Figure 14.1) to create different network configurations and IP address assignments for your installed NICs. This is handy if you want to create, for example, a different network setup for home or work on a laptop running Fedora.
Command-Line Network Interface Configuration
You can configure a network interface from the command line, using the basic Linux networking utilities. You configure your network client hosts with the command line by using commands to change your current settings or by editing a number of system files. Two commands, ifconfigand route, are used for network configuration. The netstatcommand displays information about the network connections.
/sbin/ifconfigifconfigis used to configure your network interface. You can use it to
► Activate or deactivate your NIC or change your NIC's mode.
► Change your machine's IP address, netmask, or broadcast address.
► Create an IP alias to allow more than one IP address on your NIC.
► Set a destination address for a point-to-point connection.
You can change as many or as few of these options as you'd like with a single command. The basic structure for the command is as follows:
# ifconfig [ network device ] options
Table 14.1 shows a subset of ifconfigoptions and examples of their uses.
TABLE 14.1 ifconfig Options
| Use | Option | Example |
|---|---|---|
| Create alias | [ network device ] |
ifconfig eth0:0_:[number] |
| Change IP address | 10.10.10.10 |
ifconfig eth0 10.10.10.12 |
| Change the netmask | netmask [ netmask ] |
ifconfig eth0 netmask 255.255.255.0 |
| Change the broadcast | broadcast [ address ] |
ifconfig eth0 broadcast 10.10.10.255 |
| Take interface down | down |
ifconfig eth0 down |
| Bring interface up | up ( add IP address ) |
ifconfig eth0 up (ifconfig eth0 10.10.10.10) |
| Set NIC promiscuous | [-]promisc [ifconfig eth0 -promisc] |
ifconfig eth0 promisc mode on [off] |
| Set multicasting mode | [-]allmulti |
ifconfig eth0_on [off] allmulti [ifconfig eth0 - allmulti] |
| Enable [disable] [ address ] | [-]pointopoint eth0_pointopoint |
ifconfig_point-to-point address 10.10.10.20 [ifconfig eth0 pointopoint_10.10.10.20] |
The ifconfigman page shows other options that enable your machine to interface with a number of network types such as AppleTalk, Novell, IPv6, and others. Again, read the man page for details on these network types.
Promiscuous mode causes the NIC to receive all packets on the network. It is often used to sniff a network. Multicasting mode enables the NIC to receive all multicast traffic on the network.
If no argument is given, ifconfigdisplays the status of active interfaces. For example, the output of ifconfig,without arguments and one active and configured NIC, looks similar to this:
# ifconfig
eth0 Link encap:Ethernet HWaddr 00:30:1B:0B:07:0D
inet addr:192.168.0.7 Bcast:192.168.0.255 Mask:255.255.255.0
UP BROADCAST RUNNING MULTICAST MTU:1500 Metric:1
RX packets:127948 errors:0 dropped:0 overruns:0 frame:0
TX packets:172675 errors:0 dropped:0 overruns:0 carrier:0
collisions:7874 txqueuelen:100
RX bytes:19098389 (14.2 Mb) TX bytes:73768657 (70.3 Mb)
Interrupt:11 Base address:0x2000
lo Link encap:Local Loopback
inet addr:127.0.0.1 Mask:255.0.0.0
UP LOOPBACK RUNNING MTU:16436 Metric:1
RX packets:215214 errors:0 dropped:0 overruns:0 frame:0
TX packets:215214 errors:0 dropped:0 overruns:0 carrier:0
collisions:0 txqueuelen:0
RX bytes:68739080 (65.5 Mb) TX bytes:68739080 (65.5 Mb)
Интервал:
Закладка:
Похожие книги на «Fedora™ Unleashed, 2008 edition»
Представляем Вашему вниманию похожие книги на «Fedora™ Unleashed, 2008 edition» списком для выбора. Мы отобрали схожую по названию и смыслу литературу в надежде предоставить читателям больше вариантов отыскать новые, интересные, ещё непрочитанные произведения.


![Andrew Radford - Linguistics An Introduction [Second Edition]](/books/397851/andrew-radford-linguistics-an-introduction-second-thumb.webp)


Обсуждение, отзывы о книге «Fedora™ Unleashed, 2008 edition» и просто собственные мнения читателей. Оставьте ваши комментарии, напишите, что Вы думаете о произведении, его смысле или главных героях. Укажите что конкретно понравилось, а что нет, и почему Вы так считаете.