Andrew Hudson - Fedora™ Unleashed, 2008 edition
Здесь есть возможность читать онлайн «Andrew Hudson - Fedora™ Unleashed, 2008 edition» весь текст электронной книги совершенно бесплатно (целиком полную версию без сокращений). В некоторых случаях можно слушать аудио, скачать через торрент в формате fb2 и присутствует краткое содержание. Город: Indianapolis, Год выпуска: 2008, ISBN: 2008, Издательство: Sams Publishing, Жанр: ОС и Сети, на английском языке. Описание произведения, (предисловие) а так же отзывы посетителей доступны на портале библиотеки ЛибКат.

- Название:Fedora™ Unleashed, 2008 edition
- Автор:
- Издательство:Sams Publishing
- Жанр:
- Год:2008
- Город:Indianapolis
- ISBN:978-0-672-32977-7
- Рейтинг книги:5 / 5. Голосов: 1
-
Избранное:Добавить в избранное
- Отзывы:
-
Ваша оценка:
Fedora™ Unleashed, 2008 edition: краткое содержание, описание и аннотация
Предлагаем к чтению аннотацию, описание, краткое содержание или предисловие (зависит от того, что написал сам автор книги «Fedora™ Unleashed, 2008 edition»). Если вы не нашли необходимую информацию о книге — напишите в комментариях, мы постараемся отыскать её.
Finding information you need is not always easy. This short index provides a list of common tasks discussed inside this book. Browse the table of contents or index for detailed listings and consult the specified chapter for in-depth discussions about each subject.
left How Do I…?
See…
How Do I…?
See…
left Back up my system?
Chapter 13
Partition a hard drive?
Appendix B, Chapters 1, 35
left Build a new Linux kernel?
Chapter 36
Play MP3s and other music?
Chapter 7
left Burn a CD?
Chapter 7
Print a file?
Chapter 8
left Change a password?
Chapter 4
Read a text file?
Chapter 4
left Change the date and time?
Chapter 32
Read or send email?
Chapter 21
left Compress a file?
Chapter 13
Read or post to newsgroups?
Chapter 5
left Configure a modem?
Chapter 2
Reboot Fedora?
Chapter 1
left Configure a printer?
Chapter 8
Rescue my system?
Chapter 13
left Configure a scanner?
Chapter 7
Set up a DNS server?
Chapter 23
left Configure a sound card?
Chapter 7
Set up a firewall?
Chapter 14
left Configure my desktop settings?
Chapter 3
Set up a web server?
Chapter 15
left Connect to the Internet?
Chapter 5
Set up an FTP server?
Chapter 20
left Control a network interface?
Chapter 14
Set up Samba with SWAT?
Chapter 19
left Copy files or directories?
Chapters 13, 32
Set up wireless networking?
Chapter 14
left Create a boot disk to boot Fedora?
Chapter 1
Shut down Fedora?
Chapter 1
left Create a database?
Chapter 16
Use a spreadsheet?
Chapter 6
left Create a user?
Chapter 4
Use Instant Messaging?
Chapter 5
left Delete a file or directory?
Chapter 32
Watch television on my computer?
Chapter 7
left Get images from a digital camera?
Chapter 7
Edit a text file?
Chapter 4
left Install Fedora?
Chapter 1
Make Fedora more secure?
Chapter 14
left Log in to Fedora?
Chapter 1
Mount a CD-ROM or hard drive?
Chapter 35
Fedora™ Unleashed, 2008 edition — читать онлайн бесплатно полную книгу (весь текст) целиком
Ниже представлен текст книги, разбитый по страницам. Система сохранения места последней прочитанной страницы, позволяет с удобством читать онлайн бесплатно книгу «Fedora™ Unleashed, 2008 edition», без необходимости каждый раз заново искать на чём Вы остановились. Поставьте закладку, и сможете в любой момент перейти на страницу, на которой закончили чтение.
Интервал:
Закладка:
Because of the potential for making a catastrophic error as the super user (using the command rm -rf /*is the classic example, but do not ever try it!), always use your system as a regular user and become root only temporarily to do sysadmin duties. While you are on a multiuser system, consider this advice an absolute rule; if root were to delete the wrong file or kill the wrong process, the results could be disastrous for the business. On your home system, you can do as you please and running as root makes many things easier, but less safe. In any setting, however, the risks of running as root full time are significant. (In case you're wondering, the above command would completely wipe your entire file system, leaving you with nothing but a red face!)
The third type of user is the system user. The system user is not a person, but rather an administrative account that the system uses during day-to-day running of various services. For example, the system user named apacheowns the Apache Web Server and all the associated files. Only it and root can have access to these files — no one else can access or make changes to these files. System users do not have a home directory or password, nor do they permit access to the system through a login prompt.
You will find a list of all the users on a system in the /etc/passwdfile. Fedora refers to these users as the standard users because they are found on every Fedora computer as the default set of system (or logical) users provided during the initial installation. This "standard" set differs among Linux distributions.
Adding New Users
The command-line approach to adding any user is actually quite simple and can be accomplished on a single line. In the example shown here, the sysadmin uses the useraddcommand to add the new user bernice.The command adduser(a variant found on some UNIX systems) is a symbolic link to useradd,so both commands work the same. In this example, we use the -poption to set the password the user requested; we use the -soption to set his special shell, and the -uoption to specify his UID. (If we created a user with the default settings, we would not need to use these options.) All we want to do can be accomplished on one line:
# useradd bernice -p sTitcher -s /bin/bash -u 507
The sysadmin can also use the graphical interface that Fedora provides, as shown in Figure 10.1. It is accessed as the Users and Groups item from the System Settings menu item. Here, the sysadmin is adding a new user to the system where user berniceuses the bash command shell.
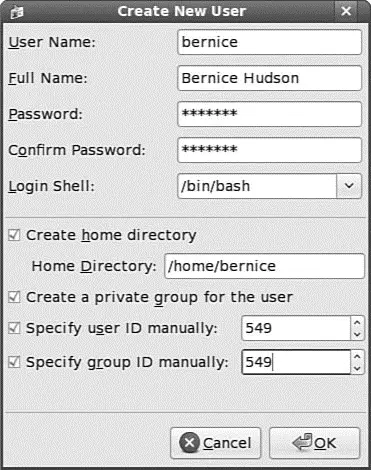
FIGURE 10.1 Adding a new user is simple. The GUI provides a more complete set of commands for user management than for group management.
These are the steps we used to add the same account as shown in the preceding command, but using the graphical User Manager graphical interface:
1. Launch the Fedora User Manager graphical interface by clicking the Users and Groups menu item found in the System, Administration.
2. Click the Add User button to bring up the Add User dialog window.
3. Fill in the form with the appropriate information, as described in the first paragraph in this section.
4. Click the drop-down Login Shell menu to select the bashshell.
5. Check the Specify User ID box to permit access to the UID dialog.
6. Using the arrows found in the UID dialog, increment the UID to 5413.
7. Click OK to save the settings.
Note that the user is being manually assigned the UID of 549because that is her UID on another system machine that will be connected to this machine. Because the system only knows her as 549and not as bernice,the two machines would not recognize berniceas the same user if two different UIDs were assigned.
A Linux username can be any alphanumeric combination that does not begin with a special character reserved for shell script use (see Chapter 11, "Automating Tasks," for disallowed characters, mostly punctuation characters). Usernames are typically the user's first name plus the first initial of her last name, something that is a common practice on larger systems with many users because it makes life simpler for the sysadmin, but is neither a rule nor a requirement.
User IDs and Group IDs
A computer is, by its very nature, a number-oriented machine. It identifies users and groups by numbers known as the user ID (UID) and group ID (GID) . The alphabetic names displayed on your screen are there exclusively for your ease of use.
As was already mentioned, the root user is UID 0. Numbers from 1through 499and 65,534are the system, or logical, users. Regular users have UIDs beginning with 500; Fedora assigns them sequentially beginning with this number.
With only a few exceptions, the GID is the same as the UID. Those exceptions are system users who need to act with root permissions: sync, shutdown, halt, and operator.
Fedora creates a private GID for every UID of 500 and greater. The system administrator can add other users to a GID or create a totally new group and add users to it. Unlike Windows NT and some UNIX variants, a group cannot be a member of another group in Linux.
If you intend to make use of NFS, it is extremely important that you use the same UID for the user on the host and guest machines; otherwise, you will not be able to connect!
As is the case in many professions, exaggerated characterizations (stereotypes or caricatures) have emerged for users and system administrators. Many stereotypes contain elements of truth mixed with generous amounts of hyperbole and humor and serve to assist us in understanding the characteristics of and differences in the stereotyped subjects. The stereotypes of the "luser" and the "BOFH" (users and administrators, respectively) also serve as cautionary tales describing what behavior is acceptable and unacceptable in the computing community.
Understanding these stereotypes allows you to better define the appropriate and inappropriate roles of system administrators, users, and others. The canonical reference to these terms is found in the alt.sysadmin.recovery FAQ found at http://www.ctrl-c.liu.se/~ingvar/asr/.
Managing Groups
Groups can make managing users a lot easier. Instead of having to assign individual permissions to every user, you can use groups to grant or revoke permissions to a large number of users quickly and easily. Setting group permissions allows you to set up work spaces for collaborative working and also to control what devices can be used, such as external drives or DVD writers. This approach also represents a secure method of limiting access to system resources to only those users who need them. As an example, the sysadmin could put the users andrew, paul, scott, derek, mark, and vanessain a new group named unleashed.Those users could each create files intended for their group work and chgrpthose files to unleashed.
Now, everyone in the unleashedgroup — but no one else except root — can work with those files. The sysadmin would probably create a directory owned by that group so its members could have an easily accessed place to store those files. The sysadmin could also add other users such as berniceand ildikoto the group and remove existing users when their part of the work is done. The sysadmin could make the user andrewthe group administrator so that andrewcould decide how group membership should be changed. You could also put restrictions on the DVD writer so that only andrewcould burn DVDs, thus protecting sensitive material from falling into the wrong hands.
Интервал:
Закладка:
Похожие книги на «Fedora™ Unleashed, 2008 edition»
Представляем Вашему вниманию похожие книги на «Fedora™ Unleashed, 2008 edition» списком для выбора. Мы отобрали схожую по названию и смыслу литературу в надежде предоставить читателям больше вариантов отыскать новые, интересные, ещё непрочитанные произведения.


![Andrew Radford - Linguistics An Introduction [Second Edition]](/books/397851/andrew-radford-linguistics-an-introduction-second-thumb.webp)


Обсуждение, отзывы о книге «Fedora™ Unleashed, 2008 edition» и просто собственные мнения читателей. Оставьте ваши комментарии, напишите, что Вы думаете о произведении, его смысле или главных героях. Укажите что конкретно понравилось, а что нет, и почему Вы так считаете.