/usr/share/fonts/default/ghostscript : /usr/share/fonts/default/Type1 :
/usr/share/fonts/default/amspsfnt/pfb :
/usr/share/fonts/default/cmpsfont/pfb : /usr/share/fonts/japanese :
/etc/ghostscript
Not all the devices are listed in this example.
Aladdin or GNU?
At least two versions of Ghostscript are available for Linux. One version is named AFPL Ghostscript, which formerly went by the name Aladdin Ghostscript. This version is licensed under the Aladdin Free Public License, which disallows commercial distribution. The other version is called GNU Ghostscript, which is distributed under the GNU General Public License. For details about the different versions or for answers to questions regarding licensing, see the Ghostscript home page at http://www.cs.wisc.edu/~ghost/.
Creating and Configuring Local Printers
Creating a local printer for your Fedora system can be accomplished in six easy steps. You must have root permission to use the system-config-printerclient. The cupsddaemon should also be running before you begin (start the daemon manually as shown earlier in this chapter, or use the ntsysv, chkconfig,or system-config-servicescommands to ensure that lpdis started at boot time).
To launch system-config-printer, go to System, Administration and choose the Printing menu option or use the command line of an X terminal window like this:
# system-config-printer &
The Fedora system-config-printertool walks you through a process to create a new print queue, which effectively defines a new printer on your system. To begin configuration of a local (attached) printer, click the New Printer toolbar button in system-config-printer's main window. The New Printer configuration dialog appears, as shown in Figure 8.1.
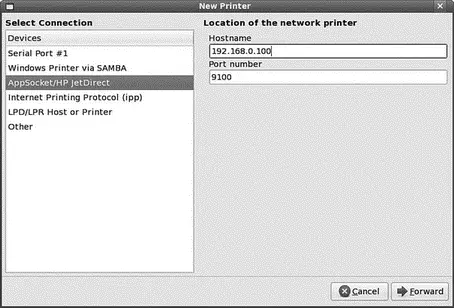
FIGURE 8.1 Select the appropriate connection method for your printer and enter the relevant details.
Select the connection type that is appropriate for you. You can select a number of different connection types, depending on your specific requirements. Normally you will use the LPT#1 option if your printer is connected by a standard Parallel (or what used to be called Centronics) cable. Alternatively, if you are connecting to a printer that has a JetDirect port (most HP network-capable printers fit in this category), then select the appropriate option and enter the network address for the printer.
Next up you need to select the make/manufacturer of the printer that you are setting up, shown in Figure 8.2.
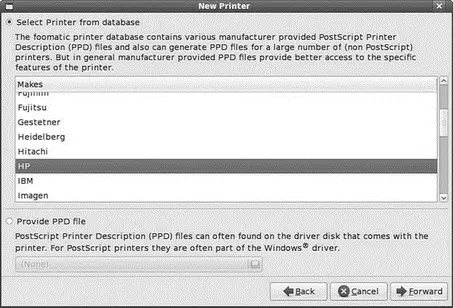
FIGURE 8.2 Select the make or manufacturer of your printer from this dialog box to help Fedora narrow down the driver options.
Note that you can configure a printer for Fedora even if it is not attached to your computer. After you select your printer's manufacturer, a list of printers from that manufacturer (such as HP, as shown in Figure 8.3) appears. Select your printer from the list, and then click the Forward button.
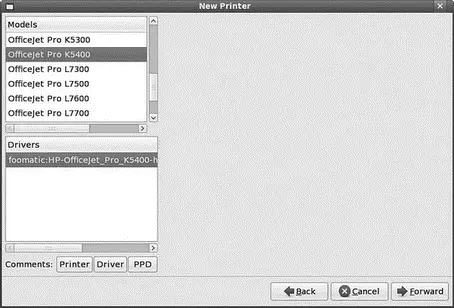
FIGURE 8.3 Select your printer from the list and click the Forward button to finish the configuration of a locally connected printer.
Do not worry if you do not see your printer listed in the selection; it is possible to select a related, although different, printer model and still be able to print to your printer. For example, many HP printers can be used by selecting the DeskJet 500 for monochrome or 500C model for color printing.
NOTE
You can also browse to http://www.linuxprinting.org/ to find out what drivers to use with your printer or to see a cross-referenced listing of printers supported by each driver. You might also find new and improved drivers for the latest printers on the market.
You can experiment to see which printer selection works best for your printer if its model is not listed. You might not be able to use all the features of your printer, but you will be able to set up printing service. Click Forward when you have made your choice.
The final screen allows you to name your printer and also provide more detailed information to help you identify and manage it (useful if you have a few dozen printers dotted around an office). This screen is shown in Figure 8.4.
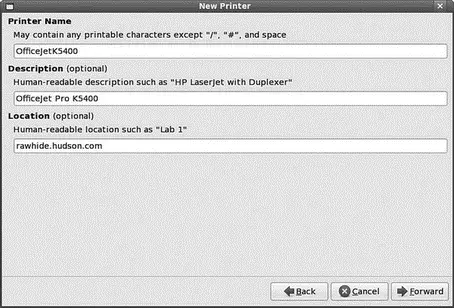
FIGURE 8.4 Help yourself by providing information that could be useful if you need to track down the printer for any reason.
The final screen (shown in Figure 8.5) summarizes what system-config-printeris about to do. If you are happy with the details, click the Apply button to commit your changes to the system.
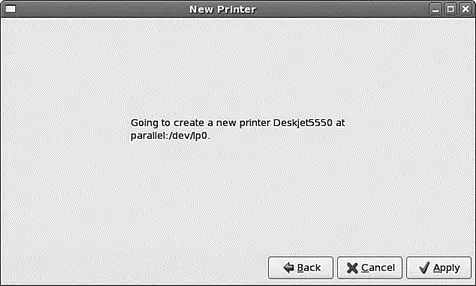
FIGURE 8.5 Double-check the details shown before you commit to creating a new printer entry in /etc/printcap; when you are happy, click Apply to create the new print queue.
When the print queue has been created, you are asked whether you would like to print a test page. Click Yes to save your new printer setup and to print a test page. If you click No, a test page is not printed, and you have to delete the new printer entry or save or cancel your changes before you quit system-config-printer.
You can see the new printer defined in the system-config-printermain window as shown in Figure 8.6.
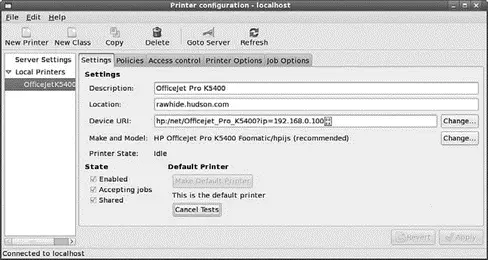
FIGURE 8.6 New printer entries created in /etc/printcapdisplayed in system-config-printer's main window.
TIP
You can also configure multiple print queues for the same printer. Use this technique to test printing using different print drivers with the same printer. Create a new queue, give it a specific name (such as testpcl3), and select a different printer. Finish the configuration and print a test page to compare the results against other entries to find the best output. You can also use this technique to define a monochrome or color printer entry for the same printer or to use different drivers for different types of media (such as regular or photo paper).
You also use the system-config-printertool to edit the newly defined printers. To edit the printer settings, highlight the printer's listing in the printer browser window. You can then select specific settings related to that printer by using the tabs that appear in the right side of the dialog box. The Printer Options dialog, part of the printer settings, is shown in Figure 8.7.
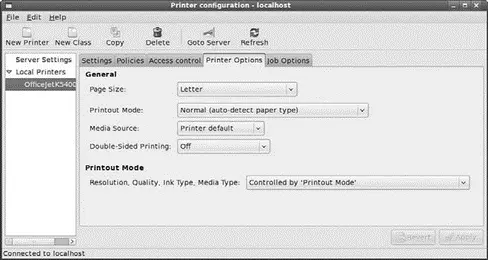
FIGURE 8.7 Edit a printer's settings by using tabs in system-config-printer.
The first tab in this dialog enables you to assign a new description for the printer. In this example, the printer has the description OfficeJet Pro K5400. Other tabs in this dialog enable you to change the queue type or queue options (such as whether to print a banner page or set the image area of a page), to select or update the driver, or to set print job options (shown in Figure 8.8).
Читать дальше


![Andrew Radford - Linguistics An Introduction [Second Edition]](/books/397851/andrew-radford-linguistics-an-introduction-second-thumb.webp)


