Andrew Hudson - Fedora™ Unleashed, 2008 edition
Здесь есть возможность читать онлайн «Andrew Hudson - Fedora™ Unleashed, 2008 edition» весь текст электронной книги совершенно бесплатно (целиком полную версию без сокращений). В некоторых случаях можно слушать аудио, скачать через торрент в формате fb2 и присутствует краткое содержание. Город: Indianapolis, Год выпуска: 2008, ISBN: 2008, Издательство: Sams Publishing, Жанр: ОС и Сети, на английском языке. Описание произведения, (предисловие) а так же отзывы посетителей доступны на портале библиотеки ЛибКат.

- Название:Fedora™ Unleashed, 2008 edition
- Автор:
- Издательство:Sams Publishing
- Жанр:
- Год:2008
- Город:Indianapolis
- ISBN:978-0-672-32977-7
- Рейтинг книги:5 / 5. Голосов: 1
-
Избранное:Добавить в избранное
- Отзывы:
-
Ваша оценка:
Fedora™ Unleashed, 2008 edition: краткое содержание, описание и аннотация
Предлагаем к чтению аннотацию, описание, краткое содержание или предисловие (зависит от того, что написал сам автор книги «Fedora™ Unleashed, 2008 edition»). Если вы не нашли необходимую информацию о книге — напишите в комментариях, мы постараемся отыскать её.
Finding information you need is not always easy. This short index provides a list of common tasks discussed inside this book. Browse the table of contents or index for detailed listings and consult the specified chapter for in-depth discussions about each subject.
left How Do I…?
See…
How Do I…?
See…
left Back up my system?
Chapter 13
Partition a hard drive?
Appendix B, Chapters 1, 35
left Build a new Linux kernel?
Chapter 36
Play MP3s and other music?
Chapter 7
left Burn a CD?
Chapter 7
Print a file?
Chapter 8
left Change a password?
Chapter 4
Read a text file?
Chapter 4
left Change the date and time?
Chapter 32
Read or send email?
Chapter 21
left Compress a file?
Chapter 13
Read or post to newsgroups?
Chapter 5
left Configure a modem?
Chapter 2
Reboot Fedora?
Chapter 1
left Configure a printer?
Chapter 8
Rescue my system?
Chapter 13
left Configure a scanner?
Chapter 7
Set up a DNS server?
Chapter 23
left Configure a sound card?
Chapter 7
Set up a firewall?
Chapter 14
left Configure my desktop settings?
Chapter 3
Set up a web server?
Chapter 15
left Connect to the Internet?
Chapter 5
Set up an FTP server?
Chapter 20
left Control a network interface?
Chapter 14
Set up Samba with SWAT?
Chapter 19
left Copy files or directories?
Chapters 13, 32
Set up wireless networking?
Chapter 14
left Create a boot disk to boot Fedora?
Chapter 1
Shut down Fedora?
Chapter 1
left Create a database?
Chapter 16
Use a spreadsheet?
Chapter 6
left Create a user?
Chapter 4
Use Instant Messaging?
Chapter 5
left Delete a file or directory?
Chapter 32
Watch television on my computer?
Chapter 7
left Get images from a digital camera?
Chapter 7
Edit a text file?
Chapter 4
left Install Fedora?
Chapter 1
Make Fedora more secure?
Chapter 14
left Log in to Fedora?
Chapter 1
Mount a CD-ROM or hard drive?
Chapter 35
Fedora™ Unleashed, 2008 edition — читать онлайн бесплатно полную книгу (весь текст) целиком
Ниже представлен текст книги, разбитый по страницам. Система сохранения места последней прочитанной страницы, позволяет с удобством читать онлайн бесплатно книгу «Fedora™ Unleashed, 2008 edition», без необходимости каждый раз заново искать на чём Вы остановились. Поставьте закладку, и сможете в любой момент перейти на страницу, на которой закончили чтение.
Интервал:
Закладка:
Installing and Configuring OpenOffice.org
Fedora provides an RPM package for OpenOffice.org. If you do not install the RPM package during your initial Fedora installation, you can install it later, using the Add/Remove Software tool or by using yum install openoffice.orgfrom the command line.
OpenOffice.org is constantly improving its productivity applications. You can check the OpenOffice.org website (http://www.openoffice.org/) for the latest version. The website provides a link to download the source or a precompiled version of the most current working installation files. A more current version might offer file format support that you need. Should you need a Windows-compatible version, you will also find it at the website.
The installation of OpenOffice.org is done on a systemwide basis, meaning that all users have access to it. However, users have to go into OpenOffice.org to configure it for their individual needs. This initial configuration happens transparently the first time you load any of the OpenOffice.org components, and might mean the application takes a little longer to load as a result. Be patient, and your desired application will appear.
Shown in Figure 6.1 is OpenOffice.org Writer, with a blank document ready for you to compose your masterpiece. OpenOffice.org shares common preferences across all its associated applications, meaning that you only have to define once some of your personal details or paths to save documents.

FIGURE 6.1 OpenOffice.org Writer, awaiting your input.
As is the case with many Linux applications, you might be somewhat overwhelmed by the sheer number of configuration options available to you in OpenOffice.org. Mercifully, a lot of thought has gone into organizing these options, which are available if you click the Tools menu and select Options. It does not matter which program you use to get to this dialog box; it appears the same if summoned from Writer, Impress, or Calc. It acts as a central configuration management tool for all OpenOffice.org applications. You can use it to set global options for all OpenOffice.org applications, or specific options for each individual component. For instance, in Figure 6.2, you can change the user details and information, and this is reflected across all OpenOffice.org applications.
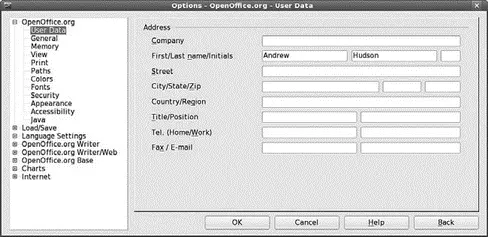
FIGURE 6.2 You can set user details for all OpenOffice.org applications from this dialog.
Two websites provide additional information on the functionality of OpenOffice.org:
► http://lingucomponent.openoffice.org/download_dictionary.html— This site provides instructions and files for installing spelling and hyphenation dictionaries, which are not included with OpenOffice.org.
► http://sourceforge.net/projects/ooextras/— This site provides templates, macros, and clip art, which are not provided with OpenOffice.org.
OpenOffice.org is a constant work in progress, but the current release is on par with the Sun version of StarOffice 8.0. You can browse to the OpenOffice.org website to get documentation and answers to frequently asked questions and to offer feedback.
Working with OpenOffice.org Writer
Out of all the applications that make up OpenOffice.org, the one that you are most likely to use on a regular basis is Writer, the OpenOffice.org word processor. With a visual style similar to Microsoft's Word, Writer has a number of strengths over its commercial and vastly more expensive rival. In this section, you learn how to get started with Writer and make use of some of its powerful formatting and layout tools.
You might be interested to know that Writer was the primary word processor chosen to write and edit this book.
You can access Writer either through its shortcut on the panel or by going to the Applications, Office menu and selecting Word Processor. After a few seconds, Writer opens with a blank document and a blinking cursor awaiting your command. It can be tempting to just dive in and start typing your document, but it can be worthwhile to do some initial configuration before, so you are properly prepared for work.
First of all, make sure that the options are set to your requirements. Click the Tools menu and select Options to bring up the Options dialog box, as shown in Figure 6.2. The initial screen enables you to personalize OpenOffice.org with your name, address, and contact details, but there are options to configure features that you might also want to alter. First of all, check that your default paths are correct by clicking the Paths option. You might want to alter the My Documents path, as shown in Figure 6.3, to something a little more specific than just your home directory.
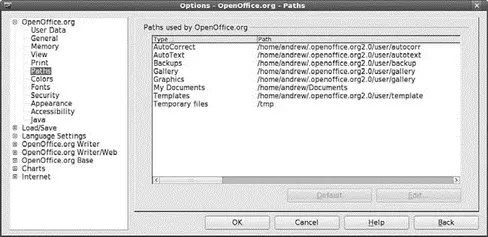
FIGURE 6.3 Click the Edit button to choose your default documents directory.
You might also want to change OpenOffice.org so that it saves in Microsoft Word format by default, should you so require. This can be done under the Load/Save General options shown in Figure 6.4, and it is a good idea if you value your work to change the Autorecovery settings so that it saves every couple of minutes.
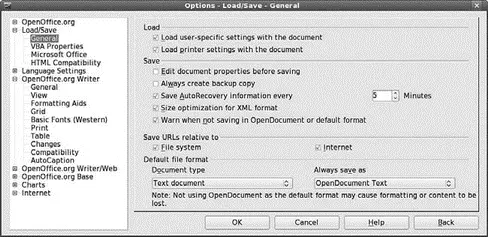
FIGURE 6.4 Make sure that you are working with most appropriate file formats for you.
Also shown in Figure 6.4 is a set of options that are specific to Writer. From top to bottom, they are
► General— Specify options that affect the general use of Writer.
► View— Specify what you want Writer to display.
► Formatting Aids— Specify whether you want to see nonprinting characters.
► Grid— Create a grid that you can use to snap frames and images in place.
► Basic Fonts— Select your default fonts for your document here.
► Print— Specify exactly what you want Writer to output when you print your document.
► Table— Set options for drawing tables within Writer.
► Changes— Define how Writer handles changes to documents.
► Compatibility— A set of rules that Writer uses to ensure close compatibility with earlier versions of Writer
► AutoCaption— Create automatic captions for images, charts, and other objects.
A little bit of time working through these options can give you a highly personalized and extremely productive environment.
One of the significant benefits of using Writer is the ability you have to easily apply formatting and styles to extremely complex documents. Depending on the types of documents you work with, you might want to consider creating your own styles beyond the 20 included by default. You can access styles through either the Style drop-down box in the toolbar or the Styles and Formatting window shown in Figure 6.5. If you cannot see the window, press the F11 key to display it.
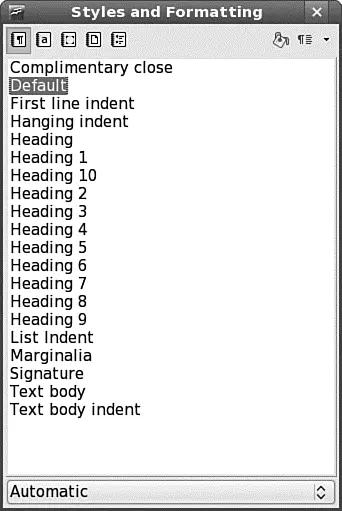
FIGURE 6.5 Writer's quick and easy-to-use Styles and Formatting tool.
Читать дальшеИнтервал:
Закладка:
Похожие книги на «Fedora™ Unleashed, 2008 edition»
Представляем Вашему вниманию похожие книги на «Fedora™ Unleashed, 2008 edition» списком для выбора. Мы отобрали схожую по названию и смыслу литературу в надежде предоставить читателям больше вариантов отыскать новые, интересные, ещё непрочитанные произведения.


![Andrew Radford - Linguistics An Introduction [Second Edition]](/books/397851/andrew-radford-linguistics-an-introduction-second-thumb.webp)


Обсуждение, отзывы о книге «Fedora™ Unleashed, 2008 edition» и просто собственные мнения читателей. Оставьте ваши комментарии, напишите, что Вы думаете о произведении, его смысле или главных героях. Укажите что конкретно понравилось, а что нет, и почему Вы так считаете.