William Stanek - Windows Server 2012 R2 Storage, Security, & Networking Pocket Consultant
Здесь есть возможность читать онлайн «William Stanek - Windows Server 2012 R2 Storage, Security, & Networking Pocket Consultant» весь текст электронной книги совершенно бесплатно (целиком полную версию без сокращений). В некоторых случаях можно слушать аудио, скачать через торрент в формате fb2 и присутствует краткое содержание. Жанр: ОС и Сети, на английском языке. Описание произведения, (предисловие) а так же отзывы посетителей доступны на портале библиотеки ЛибКат.
- Название:Windows Server 2012 R2 Storage, Security, & Networking Pocket Consultant
- Автор:
- Жанр:
- Год:неизвестен
- ISBN:нет данных
- Рейтинг книги:3 / 5. Голосов: 1
-
Избранное:Добавить в избранное
- Отзывы:
-
Ваша оценка:
Windows Server 2012 R2 Storage, Security, & Networking Pocket Consultant: краткое содержание, описание и аннотация
Предлагаем к чтению аннотацию, описание, краткое содержание или предисловие (зависит от того, что написал сам автор книги «Windows Server 2012 R2 Storage, Security, & Networking Pocket Consultant»). Если вы не нашли необходимую информацию о книге — напишите в комментариях, мы постараемся отыскать её.
Windows Server 2012 R2 Storage, Security, & Networking Pocket Consultant — читать онлайн бесплатно полную книгу (весь текст) целиком
Ниже представлен текст книги, разбитый по страницам. Система сохранения места последней прочитанной страницы, позволяет с удобством читать онлайн бесплатно книгу «Windows Server 2012 R2 Storage, Security, & Networking Pocket Consultant», без необходимости каждый раз заново искать на чём Вы остановились. Поставьте закладку, и сможете в любой момент перейти на страницу, на которой закончили чтение.
Интервал:
Закладка:
You use the A and AAAA records to map a host name to an IP address, and the PTR record creates a pointer to the host for reverse lookups. You can create address and pointer records at the same time or separately.
You create a new host entry with address and pointer records by following these steps:
1.In the DNS Manager console, expand the Forward Lookup Zones folder for the server with which you want to work.
2.Press and hold or right-click the domain you want to update, and then tap or click New Host (A Or AAAA). This opens the dialog box shown in Figure 9–6.

FIGURE 9–6Create address records and pointer records simultaneously with the New Host dialog box.
3.Enter the single-part computer name, such as servicespc85, and then the IP address, such as 192.168.10.58.
4.Select the Create Associated Pointer (PTR) Record check box.
NOTE You can create PTR records only if the corresponding reverse lookup zone is available. You can create this file by following the steps listed in “Configuring reverse lookups” earlier in this chapter. The Allow Any Authenticated User option is available only when a DNS server is configured on a domain controller.
5.Tap or click Add Host, and then tap or click OK. Repeat these steps as necessary to add other hosts.
6.Tap or click Done when you have finished.
If you need to add a PTR record later, you can do so by following these steps:
1.In the DNS Manager console, expand the Reverse Lookup Zones folder for the server with which you want to work.
2.Press and hold or right-click the subnet you want to update, and then tap or click New Pointer (PTR).
3.Type the host IP address, such as 192.168.1.95, and then enter the host name, such as servicespc54. Tap or click OK.
Adding DNS aliases with CNAME
You specify host aliases by using CNAME records. Aliases enable a single host computer to appear to be multiple host computers. For example, the host gamma.microsoft.com can be made to appear as www.microsoft.com and ftp.microsoft.com.
To create a CNAME record, follow these steps:
1.In the DNS Manager console, expand the Forward Lookup Zones folder for the server with which you want to work.
2.Press and hold or right-click the domain you want to update, and then tap or click New Alias (CNAME).
3.In the Alias Name text box, enter the alias. The alias is a single-part host name, such as www or ftp .
4.In the Fully Qualified Domain Name (FQDN) For Target Host text box, enter
the full host name of the computer for which the alias is to be used.
5.Tap or click OK.
Adding mail exchange servers
MX records identify mail exchange servers for the domain. These servers are responsible for processing or forwarding email within the domain. When you create an MX record, you must specify a preference number for the mail server. A preference number is a value from 0 to 65,535 that denotes the mail server’s priority within the domain. The mail server with the lowest preference number has the highest priority and is the first to receive mail. If mail delivery fails, the mail server with the next lowest preference number is tried.
You create an MX record by following these steps:
1.In the DNS Manager console, expand the Forward Lookup Zones folder for the server with which you want to work.
2.Press and hold or right-click the domain you want to update, and then tap or click New Mail Exchanger (MX).
3.You can now create a record for the mail server by filling in these text boxes:
■ Host Or Child DomainUsing a single-part name, enter the name of the subdomain for which the server specified in this record is responsible. In most cases, you will leave this box blank, which specifies that there is no subdomain and the server is responsible for the domain in which this record is created.
■ Fully Qualified Domain Name (FQDN)Enter the FQDN of the domain to which this mail exchange record should apply, such as cpandl.com.
■ Fully Qualified Domain Name (FQDN) Of Mail ServerEnter the FQDN of the mail server that should handle mail receipt and delivery, such as corpmail.cpandl.com. Email for the previously specified domain is routed to this mail server for delivery.
■ Mail Server PriorityEnter a preference number for the host from 0 to 65,535.
NOTE Assign preference numbers that leave room for growth. For example, use 10 for your highest priority mail server, 20 for the next, and 30 for the one after that.
REAL WORLD You can’t enter a multipart name in the host Or Child Domain text box. If you need to enter a multipart name, you are creating the MX record at the wrong level of the DNS hierarchy. Create or access the additional domain level, and then add an MX record at this level for the subdomain.
4.Tap or click OK.
Adding name servers
NS records specify the name servers for the domain. Each primary and secondary name server should be declared through this record. If you obtain secondary name services from an ISP, be sure to insert the appropriate NS records.
You create an NS record by following these steps:
1.In the DNS Manager console, expand the Forward Lookup Zones folder for the server with which you want to work.
2.Display the DNS records for the domain by selecting the domain folder in the tree view.
3.Press and hold or right-click an existing NS record in the view pane, and then tap or click Properties. This opens the Properties dialog box for the domain with the Name Servers tab selected, as shown in Figure 9–7.
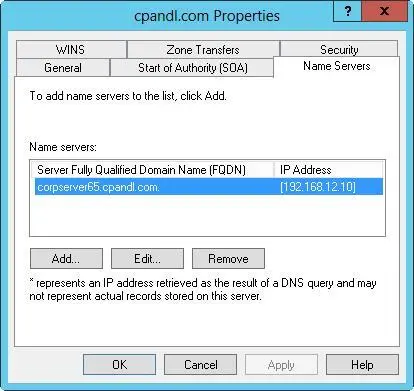
FIGURE 9–7Configure name servers for the domain through the domain’s Properties dialog box.
4.Tap or click Add. This displays the New Name Server Record dialog box.
5.In the Server Fully Qualified Domain Name text box, enter the name of a DNS server for the child domain, such as corpserver01.cpandl.comand then tap or click Resolve. The server then performs a lookup query and adds the resolved IP address to the IP Address list.
6.Repeat step 5 to specify additional name servers. The order of the entries determines which IP address is used first. Change the order as necessary by using the Up and Down buttons. When you are ready to continue, tap or click OK to close the New Name Server Record dialog box.
7.Tap or click OK to save your changes.
Viewing and updating DNS records
To view or update DNS records, follow these steps:
1.Double-tap or double-click the zone with which you want to work. Records for the zone should be displayed in the right pane.
2.Double-tap or double-click the DNS record you want to view or update. This opens the record’s Properties dialog box. Make the necessary changes, and then tap or click OK.
Читать дальшеИнтервал:
Закладка:
Похожие книги на «Windows Server 2012 R2 Storage, Security, & Networking Pocket Consultant»
Представляем Вашему вниманию похожие книги на «Windows Server 2012 R2 Storage, Security, & Networking Pocket Consultant» списком для выбора. Мы отобрали схожую по названию и смыслу литературу в надежде предоставить читателям больше вариантов отыскать новые, интересные, ещё непрочитанные произведения.


Обсуждение, отзывы о книге «Windows Server 2012 R2 Storage, Security, & Networking Pocket Consultant» и просто собственные мнения читателей. Оставьте ваши комментарии, напишите, что Вы думаете о произведении, его смысле или главных героях. Укажите что конкретно понравилось, а что нет, и почему Вы так считаете.