William Stanek - Windows Server 2012 R2 Storage, Security, & Networking Pocket Consultant
Здесь есть возможность читать онлайн «William Stanek - Windows Server 2012 R2 Storage, Security, & Networking Pocket Consultant» весь текст электронной книги совершенно бесплатно (целиком полную версию без сокращений). В некоторых случаях можно слушать аудио, скачать через торрент в формате fb2 и присутствует краткое содержание. Жанр: ОС и Сети, на английском языке. Описание произведения, (предисловие) а так же отзывы посетителей доступны на портале библиотеки ЛибКат.
- Название:Windows Server 2012 R2 Storage, Security, & Networking Pocket Consultant
- Автор:
- Жанр:
- Год:неизвестен
- ISBN:нет данных
- Рейтинг книги:3 / 5. Голосов: 1
-
Избранное:Добавить в избранное
- Отзывы:
-
Ваша оценка:
Windows Server 2012 R2 Storage, Security, & Networking Pocket Consultant: краткое содержание, описание и аннотация
Предлагаем к чтению аннотацию, описание, краткое содержание или предисловие (зависит от того, что написал сам автор книги «Windows Server 2012 R2 Storage, Security, & Networking Pocket Consultant»). Если вы не нашли необходимую информацию о книге — напишите в комментариях, мы постараемся отыскать её.
Windows Server 2012 R2 Storage, Security, & Networking Pocket Consultant — читать онлайн бесплатно полную книгу (весь текст) целиком
Ниже представлен текст книги, разбитый по страницам. Система сохранения места последней прочитанной страницы, позволяет с удобством читать онлайн бесплатно книгу «Windows Server 2012 R2 Storage, Security, & Networking Pocket Consultant», без необходимости каждый раз заново искать на чём Вы остановились. Поставьте закладку, и сможете в любой момент перейти на страницу, на которой закончили чтение.
Интервал:
Закладка:
2.On the Zone Transfers tab, tap or click Notify. This displays the Notify dialog box shown in Figure 9-10.
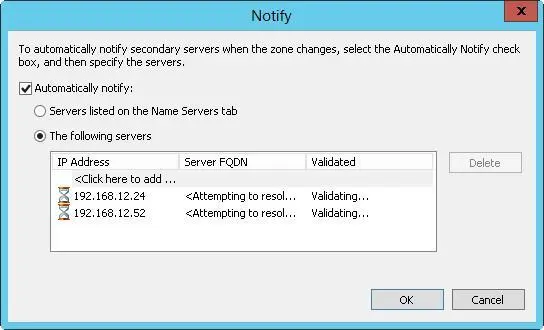
FIGURE 9-10In the Notify dialog box, notify all secondaries listed on the Name Servers tab of the Properties dialog box or specific servers that you designate.
3.To notify secondary servers listed on the Name Servers tab, select the Automatically Notify check box, and then choose Servers Listed On The Name Servers Tab.
4.If you want to designate specific servers to notify, select the Automatically Notify check box, and then choose The Following Servers. Tap or click in the IP Address list, enter the IP address of the secondary server for the zone, and then press Enter. Windows then attempts to validate the server. If an error occurs, make sure the server is connected to the network and that you entered the correct IP address. If you want to notify other servers, add IP addresses for those servers as well.
5.Tap or click OK twice.
Setting the zone type
When you create zones, they’re designated as having a specific zone type and an Active Directory integration mode. You can change the type and integration mode at any time by following these steps:
1.In the DNS Manager console, press and hold or right-click the domain or subnet you want to update, and then tap or click Properties.
2.Under Type on the General tab, tap or click Change. In the Change Zone Type dialog box, select the new type for the zone.
3.To integrate the zone with Active Directory, select the Store The Zone In Active Directory check box.
4.To remove the zone from Active Directory, clear the Store The Zone In Active Directory check box.
5.Tap or click OK twice.
Enabling and disabling dynamic updates
Dynamic updates enable DNS clients to register and maintain their own address and pointer records. This is useful for computers dynamically configured through DHCP. By enabling dynamic updates, you make it easier for dynamically configured computers to locate one another on the network. When a zone is integrated with Active Directory, you have the option of requiring secure updates. With secure updates, you use ACLs to control which computers and users can dynamically update DNS.
You can enable and disable dynamic updates by following these steps:
1.In the DNS Manager console, press and hold or right-click the domain or subnet you want to update, and then tap or click Properties.
2.Use the following options in the Dynamic Updates list on the General tab to enable or disable dynamic updates:
■ NoneDisable dynamic updates.
■ Nonsecure And SecureEnable nonsecure and secure dynamic updates.
■ Secure OnlyEnable dynamic updates with Active Directory security. This is available only with Active Directory integration.
3.Tap or click OK.
NOTE DNS integration settings must also be configured for DHCP. See “Integrating DHCP and DNS” in Chapter 8.
Managing DNS server configuration and security

You use the Server Properties dialog box to manage the general configuration of DNS servers. Through it, you can enable and disable IP addresses for the server and control access to DNS servers outside the organization. You can also configure monitoring, logging, and advanced options.
Enabling and disabling IP addresses for a DNS server
By default, multihomed DNS servers respond to DNS requests on all available network interfaces and the IP addresses they’re configured to use.
Through the DNS Manager console, you can specify that the server can answer requests only on specific IP addresses. Generally, you’ll want to ensure that a DNS server has at least one IPv4 interface and one IPv6 interface.
To specify which IP addresses are used for answering requests, follow these steps:
1.In the DNS Manager console, press and hold or right-click the server you want to configure, and then tap or click Properties.
2.On the Interfaces tab, select Only The Following IP Addresses. Select an IP address that should respond to DNS requests, or clear an IP address that should not respond to DNS requests. Only the selected IP addresses will be used for DNS. All other IP addresses on the server will be disabled for DNS.
3.Tap or click OK.
Controlling access to DNS servers outside the organization
Restricting access to zone information enables you to specify which internal and external servers can access the primary server. For external servers, this controls which servers can get in from the outside world. You can also control which DNS servers within your organization can access servers outside of your organization. To do this, you need to set up DNS forwarding within the domain.
With DNS forwarding, you configure DNS servers within the domain as one of the following:
■ NonforwardersServers that must pass DNS queries they can’t resolve to designated forwarding servers. These servers essentially act like DNS clients to their forwarding servers.
■ Forwarding-onlyServers that can only cache responses and pass requests to forwarders. These are also known as caching-only DNS servers.
■ ForwardersServers that receive requests from nonforwarders and forwarding-only servers. Forwarders use standard DNS communication methods to resolve queries and to send responses back to other DNS servers.
■ Conditional forwardersServers that forward requests based on the DNS domain. Conditional forwarding is useful if your organization has multiple internal domains.
NOTE You can’t configure the root server for a domain for forwarding (except for conditional forwarding used with internal name resolution). You can configure all other servers for forwarding.
To create a nonforwarding or forwarding-only DNS server, follow these steps:
1.In the DNS Manager console, press and hold or right-click the server you want to configure, and then tap or click Properties.
2.Tap or click the Advanced tab. To configure the server as a nonforwarder, ensure that the Disable Recursion check box is cleared, tap or click OK, and then skip the remaining steps. To configure the server as a forwarding-only server, be sure that the Disable Recursion check box is selected.
3.On the Forwarders tab, tap or click Edit. This displays the Edit Forwarders dialog box.
4.Tap or click in the IP Address list, type the IP address of a forwarder for the network, and then press Enter. Windows then attempts to validate the server. If an error occurs, make sure the server is connected to the network and that you’ve entered the correct IP address. Repeat this process to specify the IP addresses of other forwarders.
5.Set the Forward Queries Time Out interval. This value controls how long the nonforwarder tries to query the current forwarder if it gets no response. When the Forward Time Out interval passes, the nonforwarder tries the next forwarder on the list. The default is three seconds. Tap or click OK.
Читать дальшеИнтервал:
Закладка:
Похожие книги на «Windows Server 2012 R2 Storage, Security, & Networking Pocket Consultant»
Представляем Вашему вниманию похожие книги на «Windows Server 2012 R2 Storage, Security, & Networking Pocket Consultant» списком для выбора. Мы отобрали схожую по названию и смыслу литературу в надежде предоставить читателям больше вариантов отыскать новые, интересные, ещё непрочитанные произведения.


Обсуждение, отзывы о книге «Windows Server 2012 R2 Storage, Security, & Networking Pocket Consultant» и просто собственные мнения читателей. Оставьте ваши комментарии, напишите, что Вы думаете о произведении, его смысле или главных героях. Укажите что конкретно понравилось, а что нет, и почему Вы так считаете.