William Stanek - Windows Server 2012 R2 Storage, Security, & Networking Pocket Consultant
Здесь есть возможность читать онлайн «William Stanek - Windows Server 2012 R2 Storage, Security, & Networking Pocket Consultant» весь текст электронной книги совершенно бесплатно (целиком полную версию без сокращений). В некоторых случаях можно слушать аудио, скачать через торрент в формате fb2 и присутствует краткое содержание. Жанр: ОС и Сети, на английском языке. Описание произведения, (предисловие) а так же отзывы посетителей доступны на портале библиотеки ЛибКат.
- Название:Windows Server 2012 R2 Storage, Security, & Networking Pocket Consultant
- Автор:
- Жанр:
- Год:неизвестен
- ISBN:нет данных
- Рейтинг книги:3 / 5. Голосов: 1
-
Избранное:Добавить в избранное
- Отзывы:
-
Ваша оценка:
Windows Server 2012 R2 Storage, Security, & Networking Pocket Consultant: краткое содержание, описание и аннотация
Предлагаем к чтению аннотацию, описание, краткое содержание или предисловие (зависит от того, что написал сам автор книги «Windows Server 2012 R2 Storage, Security, & Networking Pocket Consultant»). Если вы не нашли необходимую информацию о книге — напишите в комментариях, мы постараемся отыскать её.
Windows Server 2012 R2 Storage, Security, & Networking Pocket Consultant — читать онлайн бесплатно полную книгу (весь текст) целиком
Ниже представлен текст книги, разбитый по страницам. Система сохранения места последней прочитанной страницы, позволяет с удобством читать онлайн бесплатно книгу «Windows Server 2012 R2 Storage, Security, & Networking Pocket Consultant», без необходимости каждый раз заново искать на чём Вы остановились. Поставьте закладку, и сможете в любой момент перейти на страницу, на которой закончили чтение.
Интервал:
Закладка:
2.On the shortcut menu, tap or click New Scope to start the New Scope Wizard. Tap or click Next.
3.Enter a name and description for the scope, and then tap or click Next.
4.The Start IP Address and End IP Address boxes define the valid IP address range for the scope. On the IP Address Range page, enter a start address and an end address in these boxes.
NOTE Generally, the scope doesn’t include the x.x.x.0 and x.x.x.255 addresses, which are usually reserved for network addresses and broadcast messages, respectively. Accordingly, you would use a range such as 192.168.10.1 to 192.168.10.254 rather than 192.168.10.0 to 192.168.10.255.
5.When you enter an IP address range, the bit length and subnet mask are filled in for you automatically (as shown in Figure 8–6). Unless you use subnets, you should use the default values.
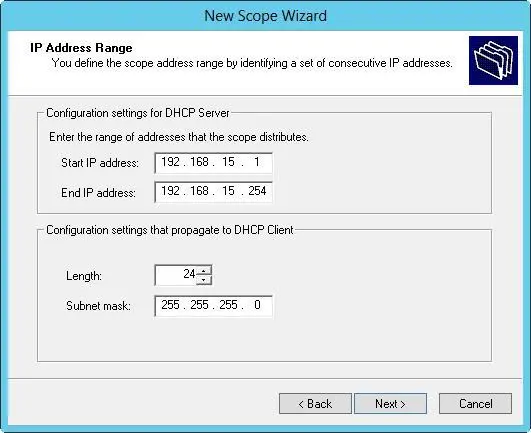
FIGURE 8–6In the New Scope Wizard, enter the IP address range for the scope.
6.Tap or click Next. If the IP address range you entered is on multiple networks, you’re given the opportunity to create a superscope that contains separate scopes for each network and, in this case, select the Yes option button to continue, and then move on to step 8. If you make a mistake, tap or click Back, and then modify the IP address range you entered.
7.Use the Start IP Address and End IP Address boxes on the Add Exclusions And Delay page to define IP address ranges that are to be excluded from the scope. You can exclude multiple address ranges as follows:
■To define an exclusion range, enter a start address and an end address in the Exclusion Range’s Start IP Address and End IP Address boxes, and then tap or click Add. To exclude a single IP address, use that address as both the start IP address and the end IP address.
■To track which address ranges are excluded, use the Excluded Address Range list.
■To delete an exclusion range, select the range in the Excluded Address Range list, and then tap or click Remove.
8.Tap or click Next. Specify the duration of leases for the scope by using the Day(s), Hour(s), and Minutes boxes. The default duration is eight days. Tap or click Next.
NOTE A lease duration that’s set too long can reduce the effectiveness of DhCP and might eventually cause you to run out of available IP addresses, especially on networks with mobile users or other types of computers that aren’t fixed members of the network. A good lease duration for most networks is from one to three days.
9.You have the opportunity to configure common DHCP options for DNS, WINS, gateways, and more. If you want to set these options now, select Yes, I Want To Configure These Options Now; otherwise, select No, I Will Configure These Options Later and skip steps 10–15.
10.Tap or click Next. The first option you can configure is the default gateway. In the IP Address box, enter the IP address of the primary default gateway, and then tap or click Add. Repeat this process for other default gateways.
11.The first gateway listed is the one clients try to use first. If the gateway isn’t available, clients try to use the next gateway, and so on. Use the Up and Down buttons to change the order of the gateways, as necessary.
12.Tap or click Next. As shown in Figure 8–7, configure default DNS settings for DHCP clients. Enter the name of the parent domain to use for DNS resolution of computer names that aren’t fully qualified.
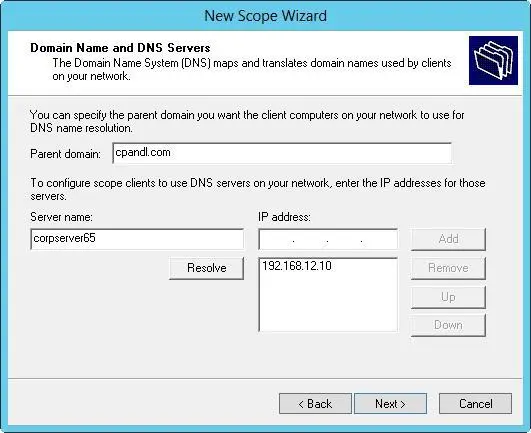
FIGURE 8–7Use the Domain Name And DNS Servers page to configure default DNS settings for DHCP clients.
13.In the IP Address box, enter the IP address of the primary DNS server, and then tap or click Add. Repeat this process to specify additional DNS servers. Again, the order of the entries determines which IP address is used first. Change the order as necessary by using the Up and Down buttons. Tap or click Next.
TIP If you know the name of a server instead of its IP address, enter the name in the Server Name box, and then tap or click Resolve. The IP address is then entered in the IP Address box, if possible. Add the server by tapping or clicking Add. Using this approach helps to ensure that you’ve entered the correct information.
14.Configure default WINS settings for the DHCP clients. The techniques you use are the same as those previously described. Tap or click Next.
15.If you want to activate the scope, select Yes, I Want To Activate This Scope Now, and then tap or click Next. Otherwise, select No, I Will Activate This Scope Later and then tap or click Next.
16.Tap or click Finish to complete the process.
You create normal scopes for IPv6 addresses by using the New Scope Wizard. When you are configuring DHCP for IPv6 addresses, you must enter the network ID and a preference value. Typically, the first 64 bits of an IPv6 address identify the network, and a 64-bit value is what the New Scope Wizard expects you to enter. The preference value sets the priority of the scope relative to other scopes. The scope with the lowest preference value will be used first. The scope with the second-lowest preference will be used second, and so on.
You can create a normal scope for IPv6 addresses by following these steps:
1.In the DHCP console, expand the node for the server with which you want to work and then expand the IPv6 node.
2.Press and hold or right-click IPv6. On the shortcut menu, tap or click New Scope to start the New Scope Wizard. Tap or click Next.
3.Enter a name and description for the scope, and then tap or click Next.
4.On the Scope Prefix page, shown in Figure 8–8, enter the 64-bit network prefix, and then set a preference value. Tap or click Next.
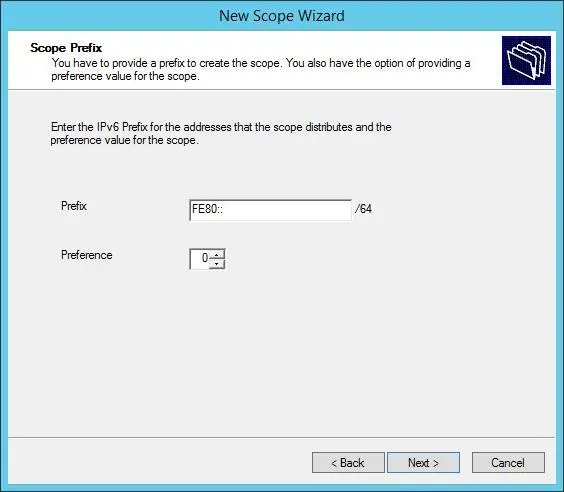
FIGURE 8–8In the New Scope Wizard, enter the network prefix and preference value.
5.Use the Start IPv6 Address and End IPv6 Address boxes on the Add Exclusions page to define IPv6 address ranges that are to be excluded from the scope. You can exclude multiple address ranges as follows:
■To define an exclusion range, enter a start address and an end address in the Exclusion Range’s Start IPv6 Address and End IPv6 Address boxes, and then tap or click Add. To exclude a single IPv6 address, use that address as the start IPv6 address, and then tap or click Add.
■To track which address ranges are excluded, use the Excluded Address Range list.
■To delete an exclusion range, select the range in the Excluded Address Range list, and then tap or click Remove.
6.Tap or click Next. Dynamic IPv6 addresses can be temporary or nontemporary. A nontemporary address is similar to a reservation. On the Scope Lease page, shown in Figure 8–9, specify the duration of leases for nontemporary addresses by using the Days, Hours, and Minutes boxes under Preferred Life Time and Valid Life Time. The preferred lifetime is the preferred amount of time the lease should be valid. The valid lifetime is the maximum amount of time the lease is valid. Tap or click Next.
Читать дальшеИнтервал:
Закладка:
Похожие книги на «Windows Server 2012 R2 Storage, Security, & Networking Pocket Consultant»
Представляем Вашему вниманию похожие книги на «Windows Server 2012 R2 Storage, Security, & Networking Pocket Consultant» списком для выбора. Мы отобрали схожую по названию и смыслу литературу в надежде предоставить читателям больше вариантов отыскать новые, интересные, ещё непрочитанные произведения.


Обсуждение, отзывы о книге «Windows Server 2012 R2 Storage, Security, & Networking Pocket Consultant» и просто собственные мнения читателей. Оставьте ваши комментарии, напишите, что Вы думаете о произведении, его смысле или главных героях. Укажите что конкретно понравилось, а что нет, и почему Вы так считаете.