William Stanek - Windows Server 2012 R2 Storage, Security, & Networking Pocket Consultant
Здесь есть возможность читать онлайн «William Stanek - Windows Server 2012 R2 Storage, Security, & Networking Pocket Consultant» весь текст электронной книги совершенно бесплатно (целиком полную версию без сокращений). В некоторых случаях можно слушать аудио, скачать через торрент в формате fb2 и присутствует краткое содержание. Жанр: ОС и Сети, на английском языке. Описание произведения, (предисловие) а так же отзывы посетителей доступны на портале библиотеки ЛибКат.
- Название:Windows Server 2012 R2 Storage, Security, & Networking Pocket Consultant
- Автор:
- Жанр:
- Год:неизвестен
- ISBN:нет данных
- Рейтинг книги:3 / 5. Голосов: 1
-
Избранное:Добавить в избранное
- Отзывы:
-
Ваша оценка:
Windows Server 2012 R2 Storage, Security, & Networking Pocket Consultant: краткое содержание, описание и аннотация
Предлагаем к чтению аннотацию, описание, краткое содержание или предисловие (зависит от того, что написал сам автор книги «Windows Server 2012 R2 Storage, Security, & Networking Pocket Consultant»). Если вы не нашли необходимую информацию о книге — напишите в комментариях, мы постараемся отыскать её.
Windows Server 2012 R2 Storage, Security, & Networking Pocket Consultant — читать онлайн бесплатно полную книгу (весь текст) целиком
Ниже представлен текст книги, разбитый по страницам. Система сохранения места последней прочитанной страницы, позволяет с удобством читать онлайн бесплатно книгу «Windows Server 2012 R2 Storage, Security, & Networking Pocket Consultant», без необходимости каждый раз заново искать на чём Вы остановились. Поставьте закладку, и сможете в любой момент перейти на страницу, на которой закончили чтение.
Интервал:
Закладка:
When you start the DHCP server or a new day arrives, a header message is written to the log file. This header provides a summary of DHCP events and their meanings. Stopping and starting the DHCP Server service doesn’t clear a log file. Log data is kept for a week. For example, the DHCP Server service clears and starts over Monday’s log the following Monday. You don’t have to monitor space usage by the DHCP Server service. The service is configured to monitor itself and restricts disk space usage by default.
You can enable or disable DHCP auditing by following these steps:
1.In the DHCP console, expand the node for the server with which you want to work, press and hold or right-click IPv4 or IPv6 as appropriate for the type of address with which you want to work, and then tap or click Properties.
2.On the General tab, select or clear the Enable DHCP Audit Logging check box, and then tap or click OK.
By default, DHCP logs are stored in %SystemRoot%\System32\DHCP. You can change the location of DHCP logs by following these steps:
1.In the DHCP console, expand the node for the server with which you want to work, press and hold or right-click IPv4 or IPv6 as appropriate for the type of address with which you want to work, and then tap or click Properties.
2.Tap or click the Advanced tab. Audit Log File Path shows the current folder location for log files. Enter a new folder location, or tap or click Browse to select a new location.
3.Tap or click OK. Windows Server 2012 R2 now needs to restart the DHCP Server service. When prompted to restart the service, tap or click Yes. The service will be stopped and then started again.
The DHCP server has a self-monitoring system that checks disk space usage. By default, the maximum size of all DHCP server logs is 70 megabytes (MB), with each individual log being limited to one-seventh of this space. If the server reaches the 70-MB limit or an individual log grows beyond the allocated space, logging of DHCP activity stops until log files are cleared or space is otherwise made available. Typically, this happens at the beginning of a new day when the server clears the previous week’s log file for that day.
Registry keys that control log usage and other DHCP settings are located under HKEY_LOCAL_MACHINE\SYSTEM\CurrentControlSet\Services\DHCPServer\Parameters.
The following keys control the logging:
■ DhcpLogFilesMaxSizeSets the maximum file size for all logs. The default is 70 MB.
■ DhcpLogDiskSpaceCleanupIntervalDetermines how often DHCP checks disk space usage and cleans up as necessary. The default interval is 60 minutes.
■ DhcpLogMinSpaceOnDiskSets the free space threshold for writing to the log. If the disk has less free space than the value specified, logging is temporarily disabled. The default value is 20 MB.
DhcpLogMinSpaceOnDisk is considered an optional key and is not created automatically. You need to create this key as necessary and set appropriate values for your network.
Integrating DHCP and DNS
DNS is used to resolve computer names in Active Directory domains and on the Internet. Thanks to the DNS dynamic update protocol, you don’t need to manually register DHCP clients in DNS. The protocol allows the client or the DHCP server to register the forward-lookup and reverse-lookup records in DNS as necessary. When configured by using the default setup for DHCP, current DHCP clients automatically update their own DNS records after receiving an IP address lease. You can modify this behavior globally for each DHCP server or on a per-scope basis.
Name protection is an additional feature in Windows Server 2012 R2. With name protection, the DHCP server registers records on behalf of the client only if no other client with this DNS information is already registered. You can configure name protection for IPv4 and IPv6 at the network adapter level or at the scope level. Name protection settings configured at the scope level take precedence over the settings at the IPv4 or IPv6 level.
Name protection is designed to prevent name squatting. Name squatting occurs when a computer not based on the Windows operating system registers a name in DNS that is already registered to a computer running a Windows operating system. By enabling name protection, you can prevent name squatting by computers not based on the Windows operating system. Although name squatting generally does not present a problem when you use Active Directory to reserve a name for a single user or computer, it usually is a good idea to enable name protection on all Windows networks.
Name protection is based on the Dynamic Host Configuration Identifier (DHCID) and support for the DHCID RR (resource record) in DNS. The DHCID is a resource record stored in DNS that maps names to prevent duplicate registration. DHCP uses the DHCID resource record to store an identifier for a computer along with related information for the name, such as the A and AAAA records of the computer. The DHCP server can request a DHCID record match and then refuse the registration of a computer with a different address attempting to register a name with an existing DHCID record.
You can view and change the global DNS integration settings by following these steps:
1.In the DHCP console, expand the node for the server with which you want to work, press and hold or right-click IPv4 or IPv6, and then tap or click Properties.
2.Tap or click the DNS tab. Figure 8–3 shows the default DNS integration settings for DHCP. Because these settings are configured by default, you usually don’t need to modify the configuration. However, if you only want host (A) records to be dynamically updated instead of both host (A) and pointer (PTR) records, select the Disable Dynamic Updates For DNS PTR Records check box.
IMPORTANT The default configuration, which registers and maintains both A and PTR records, assumes that you’ve configured reverse lookup zones for your organization. If you haven’t, attempts to register and update PTR records will fail. You can prevent repeated failed attempts to register and update PTR records by disabling dynamic updates for PTR records. If you disable this option in the IPv4 properties, you are disabling the option for all IPv4 scopes. Alternatively, you can use scope properties to disable the option on a per scope basis.
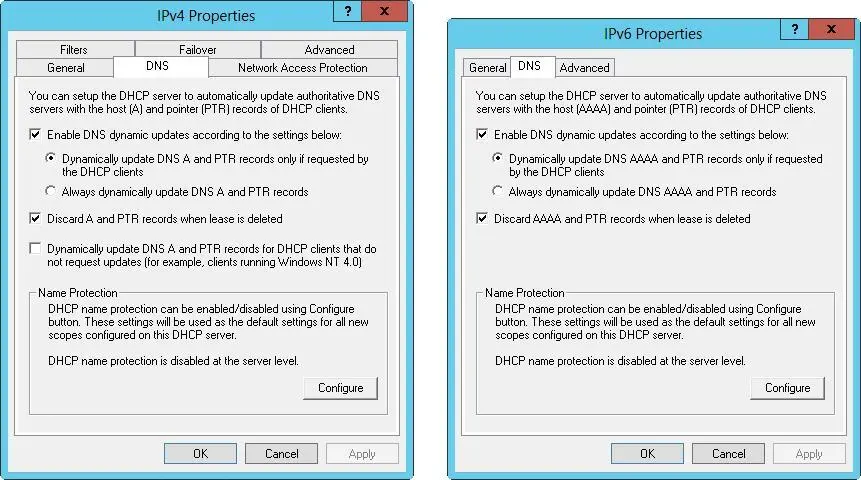
FIGURE 8–3The DNS tab shows the default settings for DNS integration with DHCP.
3.Optionally, you can enable or disable the name protection feature. With name protection, the DHCP server registers records on behalf of the client only if no other client with this DNS information is already registered. To enable or disable name protection, tap or click Configure. In the Name Protection dialog box, select or clear Enable Name Protection, and then tap or click OK.
You can view and change the per-scope DNS integration settings by following these steps:
1.In the DHCP console, expand the node for the server with which you want to work, and then expand IPv4 or IPv6.
2.Press and hold or right-click the scope with which you want to work, and then tap or click Properties.
3.Tap or click the DNS tab. The options available are the same as those shown in Figure 8–3. Because these settings are configured by default, you usually don’t need to modify the configuration.
4.Optionally, you can enable or disable the name-protection feature. Tap or click Configure. In the Name Protection dialog box, select or clear Enable Name Protection, and then tap or click OK.
Читать дальшеИнтервал:
Закладка:
Похожие книги на «Windows Server 2012 R2 Storage, Security, & Networking Pocket Consultant»
Представляем Вашему вниманию похожие книги на «Windows Server 2012 R2 Storage, Security, & Networking Pocket Consultant» списком для выбора. Мы отобрали схожую по названию и смыслу литературу в надежде предоставить читателям больше вариантов отыскать новые, интересные, ещё непрочитанные произведения.


Обсуждение, отзывы о книге «Windows Server 2012 R2 Storage, Security, & Networking Pocket Consultant» и просто собственные мнения читателей. Оставьте ваши комментарии, напишите, что Вы думаете о произведении, его смысле или главных героях. Укажите что конкретно понравилось, а что нет, и почему Вы так считаете.