William Stanek - Windows Server 2012 R2 Storage, Security, & Networking Pocket Consultant
Здесь есть возможность читать онлайн «William Stanek - Windows Server 2012 R2 Storage, Security, & Networking Pocket Consultant» весь текст электронной книги совершенно бесплатно (целиком полную версию без сокращений). В некоторых случаях можно слушать аудио, скачать через торрент в формате fb2 и присутствует краткое содержание. Жанр: ОС и Сети, на английском языке. Описание произведения, (предисловие) а так же отзывы посетителей доступны на портале библиотеки ЛибКат.
- Название:Windows Server 2012 R2 Storage, Security, & Networking Pocket Consultant
- Автор:
- Жанр:
- Год:неизвестен
- ISBN:нет данных
- Рейтинг книги:3 / 5. Голосов: 1
-
Избранное:Добавить в избранное
- Отзывы:
-
Ваша оценка:
Windows Server 2012 R2 Storage, Security, & Networking Pocket Consultant: краткое содержание, описание и аннотация
Предлагаем к чтению аннотацию, описание, краткое содержание или предисловие (зависит от того, что написал сам автор книги «Windows Server 2012 R2 Storage, Security, & Networking Pocket Consultant»). Если вы не нашли необходимую информацию о книге — напишите в комментариях, мы постараемся отыскать её.
Windows Server 2012 R2 Storage, Security, & Networking Pocket Consultant — читать онлайн бесплатно полную книгу (весь текст) целиком
Ниже представлен текст книги, разбитый по страницам. Система сохранения места последней прочитанной страницы, позволяет с удобством читать онлайн бесплатно книгу «Windows Server 2012 R2 Storage, Security, & Networking Pocket Consultant», без необходимости каждый раз заново искать на чём Вы остановились. Поставьте закладку, и сможете в любой момент перейти на страницу, на которой закончили чтение.
Интервал:
Закладка:
■A server icon with a green circle with a check mark indicates that the DHCP service is running and the server is active.
■A server icon with red circle with an X through it indicates that the console can’t connect to the server. The DHCP service has been stopped or the server is inaccessible.
■A red down arrow indicates that the DHCP server hasn’t been authorized.
■A blue warning icon indicates that the server’s state has changed or a warning has been issued.
For scopes, you might find the following icons:
■A red down arrow indicates that the scope hasn’t been activated.
■A blue warning icon indicates that the scope’s state has changed or a warning has been issued.
Connecting to remote DHCP servers
When you start the DHCP console, you are connected directly to a local DHCP server, but you won’t find entries for remote DHCP servers. You can connect to remote servers by following these steps:
1.Press and hold or right-click DHCP in the console tree, and then tap or click Add Server to open the dialog box shown in Figure 8–2.
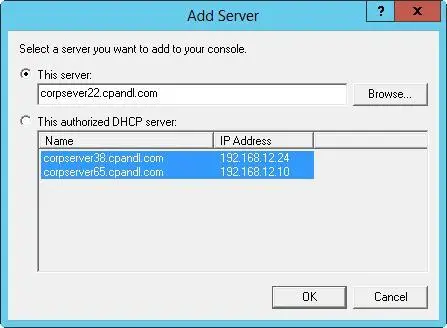
FIGURE 8–2If your DHCP server isn’t listed, you need to add it to the DHCP console by using the Add Server dialog box.
2.Select This Server, and then enter the IP address or computer name of the DHCP server you want to manage.
3.Tap or click OK. An entry for the DHCP server is added to the console tree.
TIP When you work with remote servers, you might find that you can’t select certain options. A simple refresh of the server information might resolve this problem. To refresh the server information press and hold or right-click the server node, and then select Refresh.
Starting and stopping a DHCP server
You manage DHCP servers through the DHCP Server service. As with any other service, you can start, stop, pause, and resume the DHCP Server service in the Services node of Computer Management or from the command line. You can also manage the DHCP Server service in the DHCP console. Press and hold or right-click the server you want to manage in the DHCP console, point to All Tasks, and then tap or click Start, Stop, Pause, Resume, or Restart, as appropriate.
NOTE You also can use Server Manager to start and stop a DHCP server. Tap or click DHCP in the left pane of Server Manager. Next, in the main pane, on the Servers panel, select the DHCP server. Finally, on the Services panel, press and hold or right-click the entry for the DHCP Server, and then tap or click Start Service, Stop Service, Pause Service, Resume Service, or Restart Service, as appropriate.
Authorizing a DHCP server in Active Directory
Before you can use a DHCP server in the domain, you must authorize it in Active Directory. By authorizing the server, you specify that the server is authorized to provide dynamic IP addressing in the domain. Windows Server 2012 R2 requires authorization to prevent unauthorized DHCP servers from serving domain clients. This in turn ensures that network operations can run smoothly.
Only Enterprise Admins can authorize DHCP servers. In the DHCP console, you authorize a DHCP server by pressing and holding or right-clicking the server entry in the tree view, and then selecting Authorize. To remove the authorization, press and hold or right-click the server, and then select Unauthorize.
At an elevated, administrator Windows PowerShell prompt, you can use AddDhcpServerInDC to authorize DHCP servers. Use the -DnsName parameter to specify the name of the server to authorize or the -IpAddress to specify the IP address ofthe server to authorize as shown in the following examples:
Add-DhcpServerInDC -DnsName CorpSvr03.cpandl.com
Add-DhcpServerInDC –IpAddress 192.168.1.1
Use Remove-DhcpServerInDC to remove the authorization. The basic syntax is the same.
Configuring DHCP servers

After you install a new DHCP server, you need to configure and optimize the server for the network environment. A separate set of options are provided for IPv4 and IPv6.
Configuring server bindings
A server with multiple NICs has multiple local area network connections and can provide DHCP services on any of these network connections. However, you might not want DHCP to be served over all available connections. For example, if the server has both a 100-megabits per second (Mbps) connection and a 1-gigabit per second (Gbps) connection, you might want all DHCP traffic to go over the 1-Gbps connection.
To bind DHCP to a specific network connection, follow these steps:
1.In the DHCP console, press and hold or right-click the server with which you want to work, and then tap or click Add/Remove Bindings.
2.Select the IPv4 or IPv6 tab as appropriate for the type of binding with which you want to work.
3.The Bindings dialog box displays a list of available network connections for the DHCP server. If you want the DHCP Server service to use a connection to service clients, select the check box for the connection. If you don’t want the service to use a connection, clear the related check box. If there are no network connections listed for the protocol with which you are working, ensure that the server has a static address for that protocol.
4.Tap or click OK when you have finished.
Updating DHCP statistics
The DHCP console provides statistics concerning IPv4 and IPv6 address availability and usage. In the DHCP console, you can view these statistics by expanding the node for the server with which you want to work, pressing and holding or right-clicking IPv4 or IPv6 as appropriate for the type of address with which you want to work, and then tapping or clicking Display Statistics.
By default, these statistics are updated only when you start the DHCP console or when you select the server and then tap or click the Refresh button on the toolbar. If you monitor DHCP routinely, you might want these statistics to be updated automatically, which you can do by following these steps:
1.In the DHCP console, expand the node for the server with which you want to work, press and hold or right-click IPv4 or IPv6 as appropriate for the type of address with which you want to work, and then tap or click Properties.
2.On the General tab, select Automatically Update Statistics Every and enter an update interval in hours and minutes. Tap or click OK.
Auditing and troubleshooting DHCP
Windows Server 2012 R2 is configured to audit DHCP processes by default. Auditing tracks DHCP processes and requests in log files.
You can use audit logs to help you troubleshoot problems with a DHCP server. Just as you enable and configure logging separately for IPv4 and IPv6, the two protocols use different log files. The default location for DHCP logs is %SystemRoot%\System32\DHCP. In this directory, you’ll find a different log file for each day of the week. The IPv4 log file for Monday is named DhcpSrvLog-Mon.log, the log file for Tuesday is named DhcpSrvLog-Tue.log, and so on. The IPv6 log file for Monday is named DhcpV6SrvLog-Mon.log, the log file for Tuesday is named DhcpV6SrvLogTue.log, and so on.
Читать дальшеИнтервал:
Закладка:
Похожие книги на «Windows Server 2012 R2 Storage, Security, & Networking Pocket Consultant»
Представляем Вашему вниманию похожие книги на «Windows Server 2012 R2 Storage, Security, & Networking Pocket Consultant» списком для выбора. Мы отобрали схожую по названию и смыслу литературу в надежде предоставить читателям больше вариантов отыскать новые, интересные, ещё непрочитанные произведения.


Обсуждение, отзывы о книге «Windows Server 2012 R2 Storage, Security, & Networking Pocket Consultant» и просто собственные мнения читателей. Оставьте ваши комментарии, напишите, что Вы думаете о произведении, его смысле или главных героях. Укажите что конкретно понравилось, а что нет, и почему Вы так считаете.