William Stanek - Windows Server 2012 R2 Storage, Security, & Networking Pocket Consultant
Здесь есть возможность читать онлайн «William Stanek - Windows Server 2012 R2 Storage, Security, & Networking Pocket Consultant» весь текст электронной книги совершенно бесплатно (целиком полную версию без сокращений). В некоторых случаях можно слушать аудио, скачать через торрент в формате fb2 и присутствует краткое содержание. Жанр: ОС и Сети, на английском языке. Описание произведения, (предисловие) а так же отзывы посетителей доступны на портале библиотеки ЛибКат.
- Название:Windows Server 2012 R2 Storage, Security, & Networking Pocket Consultant
- Автор:
- Жанр:
- Год:неизвестен
- ISBN:нет данных
- Рейтинг книги:3 / 5. Голосов: 1
-
Избранное:Добавить в избранное
- Отзывы:
-
Ваша оценка:
Windows Server 2012 R2 Storage, Security, & Networking Pocket Consultant: краткое содержание, описание и аннотация
Предлагаем к чтению аннотацию, описание, краткое содержание или предисловие (зависит от того, что написал сам автор книги «Windows Server 2012 R2 Storage, Security, & Networking Pocket Consultant»). Если вы не нашли необходимую информацию о книге — напишите в комментариях, мы постараемся отыскать её.
Windows Server 2012 R2 Storage, Security, & Networking Pocket Consultant — читать онлайн бесплатно полную книгу (весь текст) целиком
Ниже представлен текст книги, разбитый по страницам. Система сохранения места последней прочитанной страницы, позволяет с удобством читать онлайн бесплатно книгу «Windows Server 2012 R2 Storage, Security, & Networking Pocket Consultant», без необходимости каждый раз заново искать на чём Вы остановились. Поставьте закладку, и сможете в любой момент перейти на страницу, на которой закончили чтение.
Интервал:
Закладка:
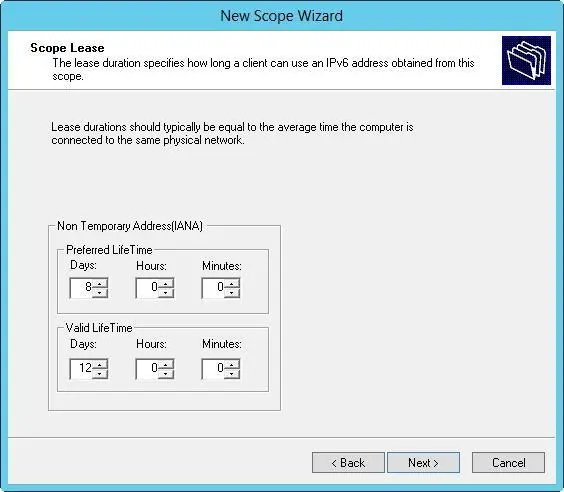
FIGURE 8–9Specify the duration of nontemporary leases.
NOTE A lease lifetime that’s set too long can reduce the effectiveness of DhCP. A good lease duration for nontemporary leases is from 8 to 30 days.
7.If you want to activate the scope, select Yes under Activate Scope Now, and then tap or click Finish. Otherwise, select No under Activate Scope Now, and then tap or click Finish.
To create a multicast scope, follow these steps:
1.In the DHCP console, expand the node for the server with which you want to work. Select and then press and hold or right-click IPv4. If you want to add the new scope to a superscope, select and then press and hold or right-click the superscope instead.
2.On the shortcut menu, tap or click New Multicast Scope to start the New Multicast Scope Wizard. Tap or click Next.
3.Enter a name and description for the scope, and then tap or click Next.
4.The Start IP Address and End IP Address boxes define the valid IP address range for the scope. Enter a start address and an end address in these boxes. You must define multicast scopes by using Class D IP addresses. This means the valid IP address range is 224.0.0.0 to 239.255.255.255.
5.Messages sent by computers using multicast IP addresses have a specific time-to-live (TTL) value. The TTL value specifies the maximum number of routers the message can go through. The default value is 32, which is sufficient on most networks. If you have a large network, you might need to increase this value to reflect the actual number of routers that might be used.
6.Tap or click Next. If you make a mistake, tap or click Back, and then modify the IP address range you entered.
7.Use the exclusion range to define IP address ranges that are to be excluded from the scope. You can exclude multiple address ranges as follows:
■To define an exclusion range, enter a start address and an end address in the Start IP Address and End IP Address boxes, and then tap or click Add.
■To track which address ranges are excluded, use the Excluded Addresses list.
■To delete an exclusion range, select the range in the Excluded Addresses list, and then tap or click Remove.
8.Tap or click Next. Specify the duration of leases for the scope by using the Day(s), Hour(s), and Minutes boxes. The default duration is 30 days. Tap or click Next.
TIP If you haven’t worked a lot with multicast, you shouldn’t change the default value. Multicast leases aren’t used in the same way as normal leases. Multiple computers can use a multicast IP address, and all of these computers can have a lease on the IP address. A good multicast lease duration for most networks is from 30 to 60 days.
9.If you want to activate the scope, select Yes, and then tap or click Next. Otherwise, select No, and then tap or click Next.
10.Tap or click Finish to complete the process.
Scope options enable you to precisely control a scope’s functioning and to set default TCP/IP settings for clients that use the scope. For example, you can use scope options to enable clients to automatically find DNS servers on the network. You can also define settings for default gateways, WINS, and more. Scope options apply only to normal scopes, not to multicast scopes.
You can set scope options in any of the following ways:
■Globally for all scopes by setting default server options
■On a per-scope basis by setting scope options
■On a per-client basis by setting reservation options
■On a client-class basis by configuring user-specific or vendor-specific classes
IPv4 and IPv6 have different scope options. Scope options use a hierarchy to determine when certain options apply. The previous list shows the hierarchy. Basically, this means the following:
■Per-scope options override global options
■Per-client options override per-scope and global options
■Client-class options override all other options
Server options are applied to all scopes configured on a particular DHCP server. You can view and assign server options by following these steps:
1.In the DHCP console, double-tap or double-click the server with which you want to work, and then expand its IPv4 and IPv6 folders in the tree view.
2.To view current settings, select the Server Options node under IPv4 or IPv6, depending on the type of address with which you want to work. Currently configured options are displayed in the right pane.
3.To assign new settings, press and hold or right-click Server Options, and then tap or click Configure Options to open the Server Options dialog box. Under Available Options, select the check box for the first option you want to configure. Then, with the option selected, enter any required information in the Data Entry panel. Repeat this step to configure other options.
4.Tap or click OK to save your changes.
Scope options are specific to an individual scope and override the default server options. You can view and assign scope options by following these steps:
1.In the DHCP console, expand the entry for the scope with which you want to work.
2.To view current settings, select Scope Options. Currently configured options are displayed in the right pane.
3.To assign new settings, press and hold or right-click Scope Options, and then tap or click Configure Options. This opens the Scope Options dialog box. Under Available Options, select the check box for the first option you want to configure. Then, with the option selected, enter any required information in the Data Entry panel, as shown in Figure 8-10. Repeat this step to configure other options.
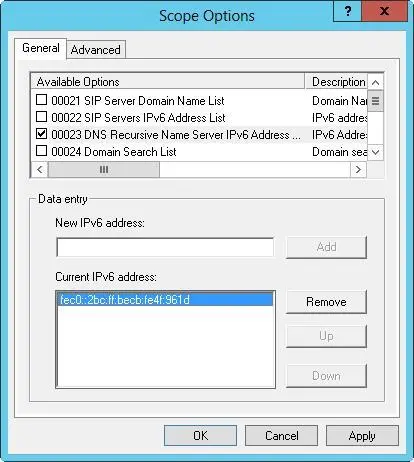
FIGURE 8-10Select the option you want to configure in the Scope Options dialog box, and then enter the required information on the Data Entry panel.
4.Tap or click OK.
You can assign reservation options to a client that has a reserved IPv4 or IPv6 address. These options are specific to an individual client and override server-specific and scope-specific options. To view and assign reservation options, follow these steps:
1.In the DHCP console, expand the entry for the scope with which you want to work.
2.Double-tap or double-click the Reservations folder for the scope.
3.To view current settings, tap or click the reservation you want to examine. Currently configured options are displayed in the right pane.
4.To assign new settings, press and hold or right-click the reservation, and then tap or click Configure Options to open the Reservation Options dialog box. Under Available Options, select the check box for the first option you want to configure. Then, with the option selected, enter any required information in the Data Entry panel. Repeat this step to configure other options.
Читать дальшеИнтервал:
Закладка:
Похожие книги на «Windows Server 2012 R2 Storage, Security, & Networking Pocket Consultant»
Представляем Вашему вниманию похожие книги на «Windows Server 2012 R2 Storage, Security, & Networking Pocket Consultant» списком для выбора. Мы отобрали схожую по названию и смыслу литературу в надежде предоставить читателям больше вариантов отыскать новые, интересные, ещё непрочитанные произведения.


Обсуждение, отзывы о книге «Windows Server 2012 R2 Storage, Security, & Networking Pocket Consultant» и просто собственные мнения читателей. Оставьте ваши комментарии, напишите, что Вы думаете о произведении, его смысле или главных героях. Укажите что конкретно понравилось, а что нет, и почему Вы так считаете.