William Stanek - Windows Server 2012 R2 Storage, Security, & Networking Pocket Consultant
Здесь есть возможность читать онлайн «William Stanek - Windows Server 2012 R2 Storage, Security, & Networking Pocket Consultant» весь текст электронной книги совершенно бесплатно (целиком полную версию без сокращений). В некоторых случаях можно слушать аудио, скачать через торрент в формате fb2 и присутствует краткое содержание. Жанр: ОС и Сети, на английском языке. Описание произведения, (предисловие) а так же отзывы посетителей доступны на портале библиотеки ЛибКат.
- Название:Windows Server 2012 R2 Storage, Security, & Networking Pocket Consultant
- Автор:
- Жанр:
- Год:неизвестен
- ISBN:нет данных
- Рейтинг книги:3 / 5. Голосов: 1
-
Избранное:Добавить в избранное
- Отзывы:
-
Ваша оценка:
Windows Server 2012 R2 Storage, Security, & Networking Pocket Consultant: краткое содержание, описание и аннотация
Предлагаем к чтению аннотацию, описание, краткое содержание или предисловие (зависит от того, что написал сам автор книги «Windows Server 2012 R2 Storage, Security, & Networking Pocket Consultant»). Если вы не нашли необходимую информацию о книге — напишите в комментариях, мы постараемся отыскать её.
Windows Server 2012 R2 Storage, Security, & Networking Pocket Consultant — читать онлайн бесплатно полную книгу (весь текст) целиком
Ниже представлен текст книги, разбитый по страницам. Система сохранения места последней прочитанной страницы, позволяет с удобством читать онлайн бесплатно книгу «Windows Server 2012 R2 Storage, Security, & Networking Pocket Consultant», без необходимости каждый раз заново искать на чём Вы остановились. Поставьте закладку, и сможете в любой момент перейти на страницу, на которой закончили чтение.
Интервал:
Закладка:
4.On the Create A New Failover Relationship page, shown in Figure 8-11, use the Mode list to set the failover mode as Load Balance or Hot Standby.
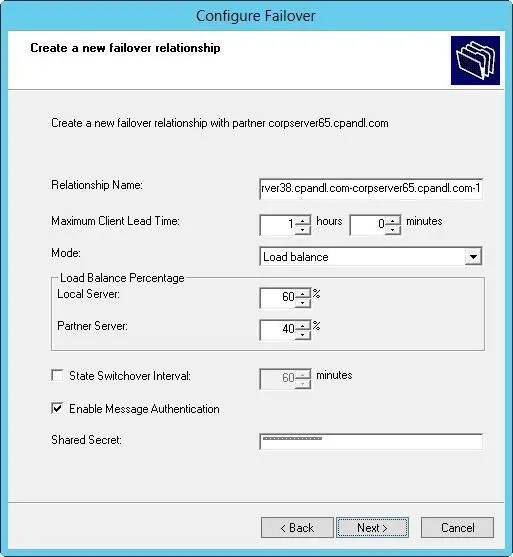
FIGURE 8-11Specify the load balance percentage for the local server and the partner server.
5.If you set the failover mode for Load Balance, use the Load Balance Percentage combo boxes to specify the relative percentage for how to allocate the IP addresses to each of the servers. Here are configuration examples:
■An 80/20 split works best when you want one server to handle most of the workload and want another server to be available as needed.
■An 60/40 split works best when you want one server to handle a little more of the workload than the other, but you want both servers to have regular workloads.
■A 50/50 split works best when you want to evenly balance the load between two servers.
6.If you set the failover mode to Hot Standby, set the role of the partner as either Active or Standby and then specify the relative percentage of IP addresses to reserve. By default, 5 percent of the IP addresses are reserved for the standby server.
7.Enter a shared secret for the partners. The shared secret is a password that the partners use when synchronizing the DHCP database and performing other tasks related to maintaining the DHCP failover partnership. When you are ready to continue, tap or click Next.
8.Tap or click Finish. Review the summary of the failover scope configuration. If any errors were encountered, you might need to take corrective action. Tap or click Close.
Failover scopes are not identified as such in the DHCP console. You can identify a failover scope by its network ID and IP address pool. Generally, you’ll find a scope with the same network ID on two DHCP servers, and the scope properties will include information about the failover partnership. To view this information, press and hold or right-click the scope, and then select Properties. In the Properties dialog box, select the Failover tab.
You can manage the partnership in several ways:
■If you suspect the configuration details related to the partnership are out of sync, press and hold or right-click the scope, and then select Replicate Partnership.
■If you suspect the DHCP database that the partners share is out of sync, press and hold or right-click the scope, and then select Replicate Scope.
■If you no longer want the scope to fail over, you can deconfigure failover by pressing and holding or right-clicking the scope, and then selecting Deconfigure Failover.
You can’t modify the failover settings after the partnership is established; however, you can deconfigure failover and then reconfigure failover.
Managing the address pool, leases, and reservations

Scopes have separate folders for address pools, leases, and reservations. By accessing these folders, you can view current statistics for the related data and manage existing entries.
Viewing scope statistics
Scope statistics provide summary information about the address pool for the current scope or superscope. To view statistics, press and hold or right-click the scope or superscope, and then select Display Statistics.
The primary columns in the Scope Statistics dialog box are used as follows:
■ Total ScopesShows the number of scopes in a superscope.
■ Total AddressesShows the total number of IP addresses assigned to the scope.
■ In UseShows the total number (as a numerical value and as a percentage of the total available addresses) of addresses being used. If the total reaches 85 percent or more, you might want to consider assigning additional addresses or freeing up addresses for use.
■ AvailableShows the total number (as a numerical value and as a percentage of the total available addresses) of addresses available for use.
Enabling and configuring MAC address filtering
MAC address filtering (aka link-layer filtering ) is a feature for IPv4 addresses that enables you to include or exclude computers and devices based on their MAC address. When you configure MAC address filtering, you can specify the hardware types that are exempted from filtering. By default, all hardware types defined in RFC 1700 are exempted from filtering. To modify hardware type exemptions, follow these steps:
1.In the DHCP console, press and hold or right-click the IPv4 node, and then tap or click Properties.
2.On the Filters tab, tap or click Advanced. In the Advanced Filter Properties dialog box, select the check box for hardware types to exempt from filtering. Clear the check box for hardware types to filter.
3.Tap or click OK to save your changes.
Before you can configure MAC address filtering, you must do one of the following:
■Enable and define an explicit allow list. The DHCP server provides DHCP services only to clients whose MAC addresses are in the allow list. Any client that previously received IP addresses is denied address renewal if its MAC address isn’t on the allow list.
■Enable and define an explicit deny list. The DHCP server denies DHCP services only to clients whose MAC addresses are in the deny list. Any client that previously received IP addresses is denied address renewal if its MAC address is on the deny list.
■Enable and define an allow list and a block list. The block list has precedence over the allow list. This means that the DHCP server provides DHCP services only to clients whose MAC addresses are in the allow list, if no corresponding matches are in the deny list. If a MAC address has been denied, the address is always blocked even if the address is on the allow list.
To enable an allow list, deny list, or both, follow these steps:
1.In the DHCP console, press and hold or right-click the IPv4 node, and then tap or click Properties.
2.On the Filters tab, you’ll find the current filter configuration details. To use an allow list, select Enable Allow List. To use a deny list, select Enable Deny List.
3.Tap or click OK to save your changes.
NOTE As an alternative, you can press and hold or right-click the Allow or Deny node, under the Filters node, and then select enable to enable allow or deny lists. If you press and hold or right-click the Allow or Deny node and then select Disable, you disable allow or deny lists.
After you enable filtering, you define your filters by using the MAC address for the client computer or device’s network adapter. On a client computer, you can obtain the MAC address by entering the command ipconfig /allat the command prompt. The Physical Address entry shows the client’s MAC address. You must enter this value exactly for the address filter to work.
A MAC address is defined by eight pairings of two-digit hexadecimal numbers separated by a hyphen, as shown here:
FE-01-56-23-18-94-EB-F2
When you define a filter, you can specify the MAC address with or without the hyphens. This means that you could enter FE-01-56-23-18-94-EB-F2 or FE0156231894EBF2.
Читать дальшеИнтервал:
Закладка:
Похожие книги на «Windows Server 2012 R2 Storage, Security, & Networking Pocket Consultant»
Представляем Вашему вниманию похожие книги на «Windows Server 2012 R2 Storage, Security, & Networking Pocket Consultant» списком для выбора. Мы отобрали схожую по названию и смыслу литературу в надежде предоставить читателям больше вариантов отыскать новые, интересные, ещё непрочитанные произведения.


Обсуждение, отзывы о книге «Windows Server 2012 R2 Storage, Security, & Networking Pocket Consultant» и просто собственные мнения читателей. Оставьте ваши комментарии, напишите, что Вы думаете о произведении, его смысле или главных героях. Укажите что конкретно понравилось, а что нет, и почему Вы так считаете.