William Stanek - Windows Server 2012 R2 Storage, Security, & Networking Pocket Consultant
Здесь есть возможность читать онлайн «William Stanek - Windows Server 2012 R2 Storage, Security, & Networking Pocket Consultant» весь текст электронной книги совершенно бесплатно (целиком полную версию без сокращений). В некоторых случаях можно слушать аудио, скачать через торрент в формате fb2 и присутствует краткое содержание. Жанр: ОС и Сети, на английском языке. Описание произведения, (предисловие) а так же отзывы посетителей доступны на портале библиотеки ЛибКат.
- Название:Windows Server 2012 R2 Storage, Security, & Networking Pocket Consultant
- Автор:
- Жанр:
- Год:неизвестен
- ISBN:нет данных
- Рейтинг книги:3 / 5. Голосов: 1
-
Избранное:Добавить в избранное
- Отзывы:
-
Ваша оценка:
Windows Server 2012 R2 Storage, Security, & Networking Pocket Consultant: краткое содержание, описание и аннотация
Предлагаем к чтению аннотацию, описание, краткое содержание или предисловие (зависит от того, что написал сам автор книги «Windows Server 2012 R2 Storage, Security, & Networking Pocket Consultant»). Если вы не нашли необходимую информацию о книге — напишите в комментариях, мы постараемся отыскать её.
Windows Server 2012 R2 Storage, Security, & Networking Pocket Consultant — читать онлайн бесплатно полную книгу (весь текст) целиком
Ниже представлен текст книги, разбитый по страницам. Система сохранения места последней прочитанной страницы, позволяет с удобством читать онлайн бесплатно книгу «Windows Server 2012 R2 Storage, Security, & Networking Pocket Consultant», без необходимости каждый раз заново искать на чём Вы остановились. Поставьте закладку, и сможете в любой момент перейти на страницу, на которой закончили чтение.
Интервал:
Закладка:
2.In the Properties dialog box, shown in Figure 3–6, you have several options panels that can be accessed by using controls in the left pane. You can expand the panels one by one or tap or click Show All to expand all the panels at the same time.

FIGURE 3–6Modify share settings by using the options provided.
3.Use the options provided to modify the settings as necessary, and then tap or click OK. The options available are the same whether you use the basic, advanced, or applications profile to create the shared folder.
TIP If you’re creating a share for general use and general access, you can publish the shared resource in Active Directory. Publishing the resource in Active Directory makes finding the share easier for users; however, this option is not available in Server Manager. To publish a share in Active Directory, press and hold or right-click the share in Computer Management, and then tap or click Properties. On the Publish tab, select the Publish This Share In Active Directory check box, add an optional description and owner information, and then tap or click OK.
Managing share permissions

Share permissions set the maximum allowable actions available within a shared folder. By default, when you create a share, everyone with access to the network has Read access to the share’s contents. This is an important security change-in previous editions of Windows Server, the default permission was Full Control.
With NTFS and ReFS volumes, you can use file and folder permissions and ownership, in addition to share permissions, to further constrain actions within the share. With FAT volumes, share permissions control only access.
Understanding the various share permissions
From the most restrictive to the least restrictive, the share permissions available are as follows:
■ No AccessNo permissions are granted for the share.
■ ReadUsers can do the following:
• View file and subfolder names
• Access the subfolders in the share
• Read file data and attributes
• Run program files
■ ChangeUsers have Read permission and the ability to do the following:
• Create files and subfolders
• Modify files
• Change attributes on files and subfolders
• Delete files and subfolders
■ Full ControlUsers have Read and Change permissions, in addition to the following capabilities on NTFS volumes:
• Change file and folder permissions
• Take ownership of files and folders
You can assign share permissions to users and groups. You can even assign permissions to implicit groups. For details on implicit groups, see Chapter 9, “Creating user and group accounts” In Windows Server 2012 R2 Pocket Consultant: Essentials & Configuration.
Viewing and configuring share permissions
You can view and configure share permissions in Computer Management or Server Manager. To view and configure share permissions in Computer Management, follow these steps:
1.In Computer Management, connect to the computer on which the share is created. In the console tree, expand System Tools, expand Shared Folders, and then select Shares.
2.Press and hold or right-click the share with which you want to work, and then tap or click Properties.
3.In the Properties dialog box, tap or click the Share Permissions tab, shown in Figure 3–7. You can now view the users and groups that have access to the share and the type of access they have.
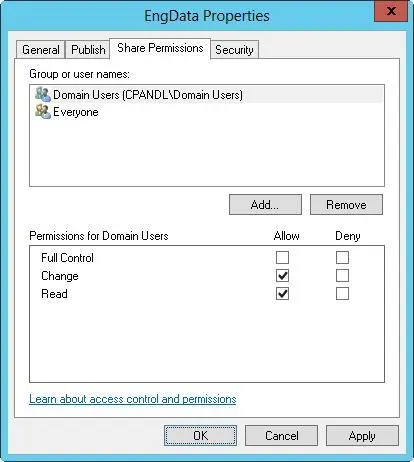
FIGURE 3–7The Share Permissions tab shows which users and groups have access to the share and what type of access they have.
4.Users or groups that already have access to the share are listed in the Group Or User Names list. You can remove permissions for these users and groups by selecting the user or group you want to remove, and then tapping or clicking Remove. You can change permissions for these users and groups by doing the following:
a.Select the user or group you want to change.
b.Allow or deny access permissions in the Permissions list box.
5.To add permissions for another user or group, tap or click Add. This opens the Select Users, Computers, Service Accounts, Or Groups dialog box, shown in Figure 3–8.
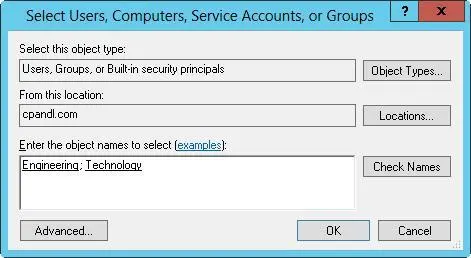
FIGURE 3–8Add users and groups to the share.
6.Enter the name of a user, computer, or group in the current domain, and then tap or click Check Names. This produces one of the following results:
■If a single match is found, the dialog box is automatically updated and the entry is underlined.
■If no matches are found, you either entered an incorrect name part or you’re working with an incorrect location. Modify the name and try again, or tap or click Locations to select a new location.
■If multiple matches are found, select the name or names you want to use, and then tap or click OK. To assign permissions to other users, computers, or groups, enter a semicolon (;) and then repeat this step.
NOTE The Locations button enables you to access account names in other domains. Tap or click Locations to find a list of the current domains, trusted domains, and other resources you can access. Because of the transitive trusts in Windows Server, you can usually access all the domains in the domain tree or forest.
7.Tap or click OK. The users and groups are added to the Group Or User Names list for the share.
8.Configure access permissions for each user, computer, and group by selecting an account name and then allowing or denying access permissions. Keep in mind that you’re setting the maximum allowable permissions for a particular account.
9.Tap or click OK. To assign additional security permissions for NTFS, see “File and folder permissions” in Chapter 4.
IMPORTANT Keep in mind that you can select the opposite permission to override an inherited permission. Note also that Deny typically overrides Allow, so if you explicitly deny permission to a user or group for a child folder or file, this permission should be denied to that user or group of users.
To view and configure share permissions in Server Manager, follow these steps:
1.The Shares subnode of the File And Storage Services node shows existing shares for file servers that have been added for management.
2.Press and hold or right-click the share with which you want to work, and then tap or click Properties.
3.In the Properties dialog box, tap or click the Permissions in the left pane. You can now view the users and groups that have access to the share and the type of access they have.
4.To change share, folder, or both permissions, tap or click Customize Permissions. Next, select the Share tab in the Advanced Security Settings dialog box, as shown in Figure 3–9.
Читать дальшеИнтервал:
Закладка:
Похожие книги на «Windows Server 2012 R2 Storage, Security, & Networking Pocket Consultant»
Представляем Вашему вниманию похожие книги на «Windows Server 2012 R2 Storage, Security, & Networking Pocket Consultant» списком для выбора. Мы отобрали схожую по названию и смыслу литературу в надежде предоставить читателям больше вариантов отыскать новые, интересные, ещё непрочитанные произведения.


Обсуждение, отзывы о книге «Windows Server 2012 R2 Storage, Security, & Networking Pocket Consultant» и просто собственные мнения читателей. Оставьте ваши комментарии, напишите, что Вы думаете о произведении, его смысле или главных героях. Укажите что конкретно понравилось, а что нет, и почему Вы так считаете.