William Stanek - Windows Server 2012 R2 Storage, Security, & Networking Pocket Consultant
Здесь есть возможность читать онлайн «William Stanek - Windows Server 2012 R2 Storage, Security, & Networking Pocket Consultant» весь текст электронной книги совершенно бесплатно (целиком полную версию без сокращений). В некоторых случаях можно слушать аудио, скачать через торрент в формате fb2 и присутствует краткое содержание. Жанр: ОС и Сети, на английском языке. Описание произведения, (предисловие) а так же отзывы посетителей доступны на портале библиотеки ЛибКат.
- Название:Windows Server 2012 R2 Storage, Security, & Networking Pocket Consultant
- Автор:
- Жанр:
- Год:неизвестен
- ISBN:нет данных
- Рейтинг книги:3 / 5. Голосов: 1
-
Избранное:Добавить в избранное
- Отзывы:
-
Ваша оценка:
Windows Server 2012 R2 Storage, Security, & Networking Pocket Consultant: краткое содержание, описание и аннотация
Предлагаем к чтению аннотацию, описание, краткое содержание или предисловие (зависит от того, что написал сам автор книги «Windows Server 2012 R2 Storage, Security, & Networking Pocket Consultant»). Если вы не нашли необходимую информацию о книге — напишите в комментариях, мы постараемся отыскать её.
Windows Server 2012 R2 Storage, Security, & Networking Pocket Consultant — читать онлайн бесплатно полную книгу (весь текст) целиком
Ниже представлен текст книги, разбитый по страницам. Система сохранения места последней прочитанной страницы, позволяет с удобством читать онлайн бесплатно книгу «Windows Server 2012 R2 Storage, Security, & Networking Pocket Consultant», без необходимости каждый раз заново искать на чём Вы остановились. Поставьте закладку, и сможете в любой момент перейти на страницу, на которой закончили чтение.
Интервал:
Закладка:
1.In Control Panel, tap or click View Network Status And Tasks under the Network And Internet heading to open Network And Sharing Center.
2.In Network And Sharing Center, tap or click Change Advanced Sharing Settings in the left pane. Select the network profile for the network on which you want to enable file and printer sharing. Typically, this will be the Domain profile.
3.Standard file and printer sharing controls network access to shared resources. To configure standard file sharing, do one of the following:
Select Turn On File And Printer Sharing to enable file sharing.
Select Turn Off File And Printer Sharing to disable file sharing.
4.Public folder sharing controls access to a computer’s Public folder. To configure public folder sharing, expand the All Networks panel by tapping or clicking the related expand button. On the Public Folder Sharing panel, choose one of the following options:
■ Turn On Sharing So Anyone With Network Access Can Read And Write Files In The Public FoldersEnables public folder sharing by granting access to the Public folder and all public data to anyone who can access the computer over the network. Windows Firewall settings might prevent external access.
■ Turn Off Public Folder SharingDisables public folder sharing, preventing local network access to the Public folder. Anyone who logs on locally to your computer can still access the Public folder and its files.
5.Tap or click Save Changes.
Configuring standard file sharing

You use shares to control access for remote users. Permissions on shared folders have no effect on users who log on locally to a server or to a workstation that has shared folders.
Understanding SMB changes
SMB is the primary file sharing protocol used by Windows operating systems. As Windows itself has changed over the years, so has SMB. To allow for version and feature changes, SMB was designed to enable clients and servers to negotiate and then use the highest version supported by both the client attempting to connect an SMB share and the server hosting the share.
The current version of SMB is version 3.02, which is supported by Windows 8.1 and Windows Server 2012 R2. Thus, when a Windows 8.1 computer connects to an SMB share hosted on a server running Windows Server 2012 R2, SMB 3.02 is the version used for the SMB session.
The earliest implementation of SMB was called CIFS, which was introduced with Windows NT 4.0, followed by SMB 1.0, which was used by all versions of Windows from Windows 2000 to Windows Server 2003 R2. Beginning with Windows 8.1 and Windows Server 2012 R2, support for CIFS and SMB 1.0 is an optional feature that must be enabled. Because CIFS and SMB 1.0 are outdated, perform poorly, and are less secure than their predecessors, SMB 1.0/CIFS File Sharing Support should not be enabled unless required. That said, if a computer running Windows 8.1 needs to connect to a server running a legacy Windows operating system, the computer must have the SMB 1.0/CIFS File Sharing Support feature enabled. In addition, if a computer running a legacy Windows operating system needs to connect to a server running Windows Server 2012 R2, the server must have the SMB 1.0/CIFS File Sharing Support feature enabled.
Table 3–1 provides a summary of the current versions of SMB, the associated versions of Windows, and the major features introduced. You can enter Get-SmbConnectionat an elevated, administrator Windows PowerShell prompt to determine the version of SMB a client has negotiated with a file server. In the command output, the version is listed in the Dialect column, as shown in the following sample output:
| ServerName | ShareName | UserName | Credential | Dialect | NumOpens |
|---|---|---|---|---|---|
| Server36 | IPC$ | CPANDL\williams | CPANDL\williams | 3.02 | 0 |
| Server36 | PrimaryData | CPANDL\williams | CPANDL\williams | 3.02 | 14 |
TABLE 3.1Overview of current SMB versions
| SMB VERSION | WINDOWS VERSION | FEATURES |
|---|---|---|
| SMB 2.0 | Windows Vista SP1, Windows Server 2008 | Increasing scalability and security, asynchronous operations, larger reads/writes, request compounding |
| SMB 2.1 | Windows 7, Windows Server 2008 R2 | Large MTU support, BranchCache support |
| SMB 3.0 | Windows 8, Windows Server 2012 | Enhancements for server clusters, BranchCache v2 support, SMB over RDMA, improved security |
| SMB 3.02 | Windows 8.1, Windows Server 2012 R2 | Improved performance for SMB over RDMA, additional scale-out options, Hyper-V live migration support |
IMPORTANT SMB 3.0 and SMB 3.02 brought many enhancements for performance, especially when you use clustered file servers. A key enhancement that doesn’t rely on a special configuration is end-to-end encryption of SMB data, which eliminates the need to use Internet Protocol security (IPsec), specialized hardware, or wide area network (WAN) accelerators to protect data from eavesdropping. SMB encryption can be enabled on a per-share basis.
Viewing existing shares
You can use both Computer Management and Server Manager to work with shares. You also can view current shares on a computer by entering net shareat a command prompt or by entering get-smbshareat a Windows PowerShell prompt.
TIP The get-smbshare cmdlet is only one of many cmdlets associated with the smbshare module. To get a list of other cmdlets available for working with SMB shares, enter get-command -module smbshare at a Windows PowerShell prompt.
NOTE Computer Management, net share, and get-smbshare display information about SMB-based shares, including standard SMB folder shares, hidden SMB folder shares (those ending with the $ suffix), and SMB folders shared by using Distributed File System (DFS). Server Manager displays information about standard SMB folder shares, SMB folders shared by using DFS, and folders shared by using Network File System (NFS). Server Manager does not display information about hidden SMB folder shares.
In Computer Management, you can view the shared folders on a local or remote computer by following these steps:
1.You’re connected to the local computer by default. If you want to connect to a remote computer, press and hold or right-click the Computer Management node and then tap or click Connect To Another Computer. Choose Another Computer, type the name or IP address of the computer you want to connect to, and then tap or click OK.
2.In the console tree, expand System Tools, expand Shared Folders, and then select Shares. The current shares on the system are displayed, as shown in Figure 3–2.
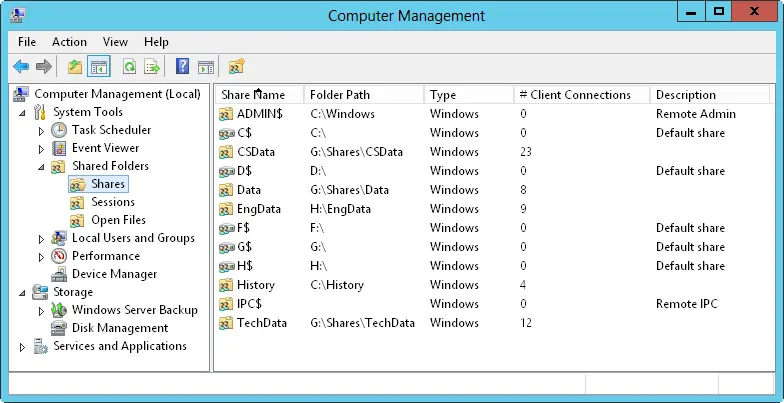
FIGURE 3–2Available shares are listed in the Shared Folders node.
3.The columns for the Shares node provide the following information:
■ Share NameName of the shared folder.
■ Folder PathComplete path to the folder on the local system.
Читать дальшеИнтервал:
Закладка:
Похожие книги на «Windows Server 2012 R2 Storage, Security, & Networking Pocket Consultant»
Представляем Вашему вниманию похожие книги на «Windows Server 2012 R2 Storage, Security, & Networking Pocket Consultant» списком для выбора. Мы отобрали схожую по названию и смыслу литературу в надежде предоставить читателям больше вариантов отыскать новые, интересные, ещё непрочитанные произведения.


Обсуждение, отзывы о книге «Windows Server 2012 R2 Storage, Security, & Networking Pocket Consultant» и просто собственные мнения читателей. Оставьте ваши комментарии, напишите, что Вы думаете о произведении, его смысле или главных героях. Укажите что конкретно понравилось, а что нет, и почему Вы так считаете.