William Stanek - Windows Server 2012 R2 Storage, Security, & Networking Pocket Consultant
Здесь есть возможность читать онлайн «William Stanek - Windows Server 2012 R2 Storage, Security, & Networking Pocket Consultant» весь текст электронной книги совершенно бесплатно (целиком полную версию без сокращений). В некоторых случаях можно слушать аудио, скачать через торрент в формате fb2 и присутствует краткое содержание. Жанр: ОС и Сети, на английском языке. Описание произведения, (предисловие) а так же отзывы посетителей доступны на портале библиотеки ЛибКат.
- Название:Windows Server 2012 R2 Storage, Security, & Networking Pocket Consultant
- Автор:
- Жанр:
- Год:неизвестен
- ISBN:нет данных
- Рейтинг книги:3 / 5. Голосов: 1
-
Избранное:Добавить в избранное
- Отзывы:
-
Ваша оценка:
Windows Server 2012 R2 Storage, Security, & Networking Pocket Consultant: краткое содержание, описание и аннотация
Предлагаем к чтению аннотацию, описание, краткое содержание или предисловие (зависит от того, что написал сам автор книги «Windows Server 2012 R2 Storage, Security, & Networking Pocket Consultant»). Если вы не нашли необходимую информацию о книге — напишите в комментариях, мы постараемся отыскать её.
Windows Server 2012 R2 Storage, Security, & Networking Pocket Consultant — читать онлайн бесплатно полную книгу (весь текст) целиком
Ниже представлен текст книги, разбитый по страницам. Система сохранения места последней прочитанной страницы, позволяет с удобством читать онлайн бесплатно книгу «Windows Server 2012 R2 Storage, Security, & Networking Pocket Consultant», без необходимости каждый раз заново искать на чём Вы остановились. Поставьте закладку, и сможете в любой момент перейти на страницу, на которой закончили чтение.
Интервал:
Закладка:
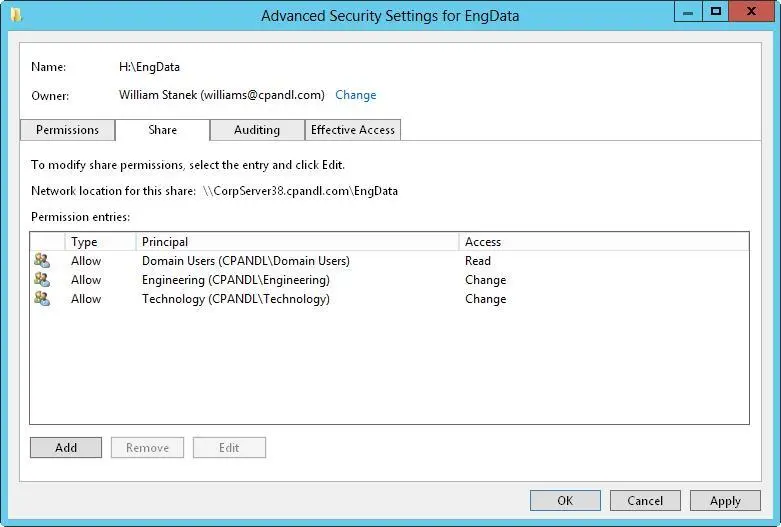
FIGURE 3–9The Share tab shows which users and groups have access to the share and what type of access they have.
5.Users or groups that already have access to the share are listed in the Permission Entries list. You can remove permissions for these users and groups by selecting the user or group you want to remove, and then tapping or clicking Remove. You can change permissions for these users and groups by doing the following:
a.Select the user or group you want to change, and then select Edit.
b.Allow or deny access permissions in the Permission Entries list, and then tap or click OK.
6.To add permissions for another user or group, tap or click Add. This opens the Permission Entry dialog box, shown in Figure 3-10.

FIGURE 3-10Add permission entries for a particular user or group.
7.Tap or click Select A Principal to display the Select User, Computer, Service Account Or Group dialog box. Enter the name of a user or a group account. Be sure to reference the user account name rather than the user’s full name. Only one name can be entered at a time.
8.Tap or click Check Names. If a single match is found for each entry, the dialog box is automatically updated, and the entry is underlined. Otherwise, you’ll get an additional dialog box. If no matches are found, you either entered the name incorrectly or you’re working with an incorrect location. Modify the name in the Name Not Found dialog box and try again, or tap or click Locations to select a new location. When multiple matches are found, in the Multiple Names Found dialog box, select the name you want to use, and then tap or click OK.
9.Tap or click OK. The user and group is added as the Principal, and the Permission Entry dialog box is updated to show this.
10.Use the Type list to specify whether you are configuring allowed or denied permissions, and then select the permissions you want to allow or deny.
11.Tap or click OK to return to the Advanced Security Settings dialog box. To assign additional security permissions for NTFS, see “File and folder permissions” in Chapter 4.
Managing existing shares

As an administrator, you often have to manage shared folders. This section covers the common administrative tasks of managing shares.
Understanding special shares
When you install Windows Server, the operating system creates special shares automatically. These shares are known as administrative shares and hidden shares , and they are designed to help make system administration easier. You can’t set access permissions on automatically created special shares; Windows Server assigns access permissions. You can create your own hidden shares by adding the $ symbol as the last character of the share name.
You can delete special shares temporarily if you’re certain the shares aren’t needed; however, the shares are re-created automatically the next time the operating system starts. To permanently disable the administrative shares, change the following registry values to 0 (zero):
HKEY_LOCAL_MACHINE\SYSTEM\CurrentControlSet\Services\lanmanserver\parameters\AutoShareServer
HKEY_LOCAL_MACHINE\SYSTEM\CurrentControlSet\Services\lanmanserver\parameters\AutoShareWks
Which special shares are available depends on your system configuration. Table 3–2 lists special shares you might find and how they’re used.
TABLE 3–2Special shares used by Windows Server 2012 R2
| SHARE NAME | DESCRIPTION | USAGE |
|---|---|---|
| ADMIN$ | A share used during remote administration of a system. It provides access to the operating system %SystemRoot%. | On workstations and servers, administrators and backup operators can access these shares. On domain controllers, server operators also have access. |
| FAX$ | Supports network faxes. | Used by fax clients when sending faxes. |
| IPC$ | Supports named pipes during remote interprocess communications (IPC) access. | Used by programs when performing remote administration and when viewing shared resources. |
| NETLOGON | Supports the Net Logon service. | Used by the Net Logon service when processing domain logon requests. Everyone has Read access. |
| PRINT$ | Supports shared printer resources by providing access to printer drivers. | Used by shared printers. Everyone has Read access. Administrators, server operators, and printer operators have Full Control. |
| SYSVOL | Supports Active Directory. | Used to store data and objects for Active Directory. |
| Driveletter$ | A share that allows administrators to connect to a drive’s root folder. These shares are shown as C$, D$, E$, and so on. | On workstations and servers, administrators and backup operators can access these shares. On domain controllers, server operators also have access. |
Connecting to special shares
Most special shares end with the $ symbol. Although these shares aren’t displayed in File Explorer, administrators and certain operators can connect to them (except for NETLOGON and SYSVOL). If your current logon account has appropriate permissions, you can connect directly to a special share or any standard share by typing the UNC path for the share in File Explorer’s address box. The basic syntax is:
\\ServerName\ShareName
ServerName is the DNS name or IP address of the server and ShareName is the name of the share. In the following example, you connect to the D$ share on CorpServer25:
\\CorpServer25\D$
If you always want the drive to be listed as a network location in This PC or need to specify credentials, you can connect to a special share by following these steps:
1.When you open File Explorer, the This PC node should be opened by default. If you have an open Explorer window and This PC is not the selected node, select the leftmost option button in the address list, and then select This PC.
2.Next, tap or click the Map Network Drive button on the Computer panel, and then tap or click Map Network Drive. This displays the Map Network Drive dialog box, shown in Figure 3-11.
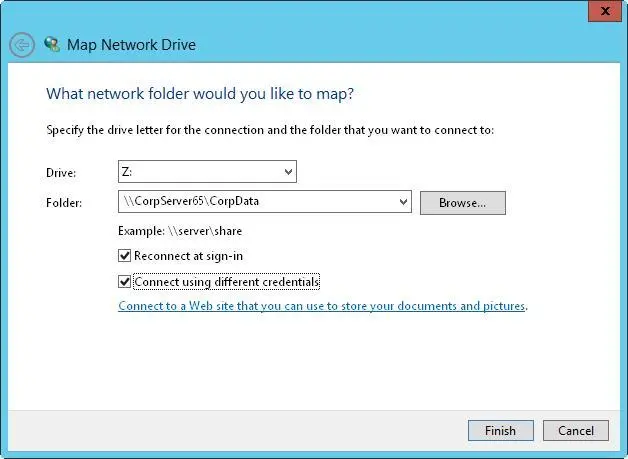
FIGURE 3-11Connect to special shares by mapping them with the Map Network Drive dialog box.
3.In the Drive list, select a free drive letter. This drive letter is used to access the special share.
4.In the Folder text box, enter the Universal Naming Convention (UNC) path to the share. For example, to access the C$ share on a server called Twiddle, you would use the path \\TWIDDLE\C$.
5.The Reconnect At Sign-In check box is selected automatically to ensure that the network drive is connected each time you log on. If you need to access the share only during the current logon session, clear this check box.
Читать дальшеИнтервал:
Закладка:
Похожие книги на «Windows Server 2012 R2 Storage, Security, & Networking Pocket Consultant»
Представляем Вашему вниманию похожие книги на «Windows Server 2012 R2 Storage, Security, & Networking Pocket Consultant» списком для выбора. Мы отобрали схожую по названию и смыслу литературу в надежде предоставить читателям больше вариантов отыскать новые, интересные, ещё непрочитанные произведения.


Обсуждение, отзывы о книге «Windows Server 2012 R2 Storage, Security, & Networking Pocket Consultant» и просто собственные мнения читателей. Оставьте ваши комментарии, напишите, что Вы думаете о произведении, его смысле или главных героях. Укажите что конкретно понравилось, а что нет, и почему Вы так считаете.