William Stanek - Windows Server 2012 R2 Storage, Security, & Networking Pocket Consultant
Здесь есть возможность читать онлайн «William Stanek - Windows Server 2012 R2 Storage, Security, & Networking Pocket Consultant» весь текст электронной книги совершенно бесплатно (целиком полную версию без сокращений). В некоторых случаях можно слушать аудио, скачать через торрент в формате fb2 и присутствует краткое содержание. Жанр: ОС и Сети, на английском языке. Описание произведения, (предисловие) а так же отзывы посетителей доступны на портале библиотеки ЛибКат.
- Название:Windows Server 2012 R2 Storage, Security, & Networking Pocket Consultant
- Автор:
- Жанр:
- Год:неизвестен
- ISBN:нет данных
- Рейтинг книги:3 / 5. Голосов: 1
-
Избранное:Добавить в избранное
- Отзывы:
-
Ваша оценка:
Windows Server 2012 R2 Storage, Security, & Networking Pocket Consultant: краткое содержание, описание и аннотация
Предлагаем к чтению аннотацию, описание, краткое содержание или предисловие (зависит от того, что написал сам автор книги «Windows Server 2012 R2 Storage, Security, & Networking Pocket Consultant»). Если вы не нашли необходимую информацию о книге — напишите в комментариях, мы постараемся отыскать её.
Windows Server 2012 R2 Storage, Security, & Networking Pocket Consultant — читать онлайн бесплатно полную книгу (весь текст) целиком
Ниже представлен текст книги, разбитый по страницам. Система сохранения места последней прочитанной страницы, позволяет с удобством читать онлайн бесплатно книгу «Windows Server 2012 R2 Storage, Security, & Networking Pocket Consultant», без необходимости каждый раз заново искать на чём Вы остановились. Поставьте закладку, и сможете в любой момент перейти на страницу, на которой закончили чтение.
Интервал:
Закладка:
| FileId | SessionId | Path | ShareRelativePath | ClientComputerName | ClientUserName |
|---|---|---|---|---|---|
| 601295424973 | 601295421497 | C: \PrimaryData\ | 10.0.0.60 | CPANDL\williams | |
| 601295425045 | 601295421577 | C: \Windows\SYSVOL | cpan… | 10.0.0.60 | CPANDL\CORPPC29$ |
To close an open file on a computer’s shares, follow these steps:
1.In Computer Management, connect to the computer with which you want to work.
2.In the console tree, expand System Tools, expand Shared Folders, and then select Open Files.
3.Press and hold or right-click the open file you want to close, and then tap or click Close Open File.
4.Tap or click Yes to confirm the action.
You also can use Close-SMBOpenFile to close open files. When you close a file, you use the -FileID parameter to specify the identifier for the file to close, such as:
Close-SMBOpenFile -FileID 601295424973
Add the -Force parameter to force close the file if needed. However, if the file has been modified by a user, any changes to the file could be lost.
To close all open files on a computer’s shares, follow these steps:
1.In Computer Management, connect to the computer on which the share is created.
2.In the console tree, expand System Tools, expand Shared Folders, and then press and hold or right-click Open Files.
3.Tap or click Disconnect All Open Files, and then tap or click Yes to confirm the action.
You also can use Windows PowerShell to close all open files on a computer’s share. The key here is to ensure that you only close the files you want to close. Consider the following example:
ForEach-Object ($Session in (Get-SMBOpenFile)) {Close-SMBOpenFile -force}
This example uses a ForEach loop to get all open SMB files, and then close each SMB file in turn. Thus, if you enter this example at an elevated Windows PowerShell prompt, you will close all open files for all shared resources.
To close open files on a specific share, you must create a ForEach loop that only examines the open files for that share, such as:
ForEach-Object ($Session in (Get-SMBShare CorpData | Get-SMBOpenFile)) {Close-SMBOpenFile -force}
This example uses a ForEach loop to get all open SMB files for the CorpData share and then close each of those files in turn. Thus, if you enter this example at an elevated Windows PowerShell prompt, you only close open files for the CorpData share.
Stopping file and folder sharing
To stop sharing a folder, follow these steps:
1.Do one of the following:
■In Server Manager, select the share you want to manage on the Shares subnode of the File And Storage Services node.
■In Computer Management, connect to the computer on which you created the share, and then access the Shares node.
2.Press and hold or right-click the share you want to remove, tap or click Stop Sharing, and then tap or click Yes to confirm the action.
CAUTION You should never delete a folder containing shares without first stopping the shares. If you fail to stop the shares, Windows Server 2012 R2 attempts to reestablish the shares the next time the computer is started, and the resulting error is logged in the system event log.
Configuring NFS sharing

As discussed in Chapter 1, “Managing file systems and drives,” you can install Server For NFS as a role service on a file server. Server For NFS provides a file sharing solution for enterprises with mixed Windows, OS X, and UNIX environments, allowing users to transfer files between Windows Server 2012 R2, OS X, and UNIX operating systems by using the NFS protocol.
You can configure NFS sharing for local folders on NTFS volumes by using File Explorer. You can also configure NFS sharing of local and remote folders on NTFS volumes by using Server Manager. In File Explorer, follow these steps to enable and configure NFS sharing:
1.Press and hold or right-click the share you want to manage, and then tap or click Properties to display a Properties dialog box for the share.
2.On the NFS Sharing tab, tap or click Manage NFS Sharing.
3.In the NFS Advanced Sharing dialog box, select the Share This Folder check box, as shown in Figure 3-12.
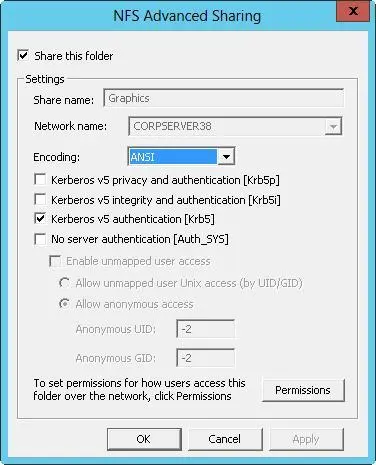
FIGURE 3-12You can use NFS sharing to share resources between Windows and UNIX computers.
4.In the Share Name text box, enter a name for the share. This is the name of the folder to which UNIX users will connect. NFS share names must be unique for each system and can be the same as those used for standard file sharing.
5.ANSI is the default encoding for text associated with directory listings and file names. If your UNIX computers use a different default encoding, you can choose that encoding in the Encoding list.
6.UNIX computers use Kerberos v5 authentication by default. Typically, you want to allow Kerberos integrity and authentication in addition to standard Kerberos authentication. Select the check boxes for the authentication mechanisms you want to use. Clear the check boxes for those you don’t want to use.
7.The share can be configured so that no server authentication is required. If you want to require server authentication, select the No Server Authentication check box, and then choose additional options as appropriate. Unmapped user access can be allowed and enabled. If you want to allow anonymous access to the NFS share, select the Allow Anonymous Access option, and then enter the anonymous user UID and anonymous group GID.
8.For UNIX computers, you configure access primarily based on the computer names (also referred to as host names ). By default, no UNIX computers have access to the NFS share. If you want to grant read-only or read/write permissions, tap or click Permissions, set the permissions you want to use in the NFS Share Permissions dialog box, and then tap or click OK. You can configure no access, read-only access, or read/write access by client computer name and client computer groups.
9.Tap or click OK twice to close the open dialog boxes and save your settings.
In File Explorer, you can disable NFS sharing by following these steps:
1 .Press and hold or right-click the share you want to manage, and then tap or click Properties. This displays a Properties dialog box for the share.
2 .On the NFS Sharing tab, tap or click Manage NFS Sharing.
3 .In the NFS Advanced Sharing dialog box, clear the Share This Folder check box, and then tap or click OK twice.
With Server Manager, you can configure NFS permissions as part of the initial share configuration when you are provisioning a share. On the Shares subnode of the File And Storage Services node, you can create an NFS share by following these steps:
1.In the Shares pane, tap or click Tasks, and then tap or click New Share to start the New Share Wizard. Choose NFS Share-Quick or NFS Share-Advanced as the share profile, and then tap or click Next.
Читать дальшеИнтервал:
Закладка:
Похожие книги на «Windows Server 2012 R2 Storage, Security, & Networking Pocket Consultant»
Представляем Вашему вниманию похожие книги на «Windows Server 2012 R2 Storage, Security, & Networking Pocket Consultant» списком для выбора. Мы отобрали схожую по названию и смыслу литературу в надежде предоставить читателям больше вариантов отыскать новые, интересные, ещё непрочитанные произведения.


Обсуждение, отзывы о книге «Windows Server 2012 R2 Storage, Security, & Networking Pocket Consultant» и просто собственные мнения читателей. Оставьте ваши комментарии, напишите, что Вы думаете о произведении, его смысле или главных героях. Укажите что конкретно понравилось, а что нет, и почему Вы так считаете.