William Stanek - Windows Server 2012 R2 Storage, Security, & Networking Pocket Consultant
Здесь есть возможность читать онлайн «William Stanek - Windows Server 2012 R2 Storage, Security, & Networking Pocket Consultant» весь текст электронной книги совершенно бесплатно (целиком полную версию без сокращений). В некоторых случаях можно слушать аудио, скачать через торрент в формате fb2 и присутствует краткое содержание. Жанр: ОС и Сети, на английском языке. Описание произведения, (предисловие) а так же отзывы посетителей доступны на портале библиотеки ЛибКат.
- Название:Windows Server 2012 R2 Storage, Security, & Networking Pocket Consultant
- Автор:
- Жанр:
- Год:неизвестен
- ISBN:нет данных
- Рейтинг книги:3 / 5. Голосов: 1
-
Избранное:Добавить в избранное
- Отзывы:
-
Ваша оценка:
Windows Server 2012 R2 Storage, Security, & Networking Pocket Consultant: краткое содержание, описание и аннотация
Предлагаем к чтению аннотацию, описание, краткое содержание или предисловие (зависит от того, что написал сам автор книги «Windows Server 2012 R2 Storage, Security, & Networking Pocket Consultant»). Если вы не нашли необходимую информацию о книге — напишите в комментариях, мы постараемся отыскать её.
Windows Server 2012 R2 Storage, Security, & Networking Pocket Consultant — читать онлайн бесплатно полную книгу (весь текст) целиком
Ниже представлен текст книги, разбитый по страницам. Система сохранения места последней прочитанной страницы, позволяет с удобством читать онлайн бесплатно книгу «Windows Server 2012 R2 Storage, Security, & Networking Pocket Consultant», без необходимости каждый раз заново искать на чём Вы остановились. Поставьте закладку, и сможете в любой момент перейти на страницу, на которой закончили чтение.
Интервал:
Закладка:
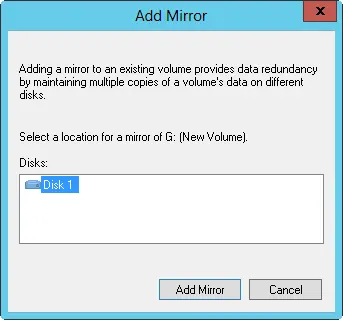
FIGURE 2–4Select the location for the mirror.
Implementing RAID-5: disk striping with parity
RAID level 5 is disk striping with parity. With this technique, you need a minimum of three hard disk drives to set up fault tolerance. Disk Management sizes the volumes on these drives identically.
RAID-5 distributes data and parity data sequentially across the disks in the array. Fault tolerance ensures that the failure of a single drive won’t bring down the entire drive set. Instead, the set continues to function with disk operations directed at the remaining volumes in the set.
To allow for fault tolerance, RAID-5 writes parity checksums with the blocks of data. If any of the drives in the striped set fails, you can use the parity information to recover the data. (This process, called regenerating the striped set , is covered in “Managing RAID and recovering from failures” later in the chapter.) If two disks fail, however, the parity information isn’t sufficient to recover the data, and you need to rebuild the striped set from backup.
In Disk Management, you can create a striped set with parity by following these steps:
1.In Disk Management’s Graphical View, press and hold or right-click an area marked Unallocated on a dynamic disk, and then tap or click New RAID-5 Volume. This starts the New RAID-5 Volume Wizard. Read the Welcome page, and then tap or click Next.
2.Create the volume as described previously in “Creating volumes and volume sets.” The key difference when creating a striped set with parity is that you must select free space on three separate dynamic drives.
After you create a striped set with parity (RAID-5), users can use the set just like they would a normal drive. Keep in mind that you can’t extend a striped set with parity after you create it; therefore, you should carefully consider the setup before you implement it.
Managing RAID and recovering from failures

Managing mirrored drives and striped sets is somewhat different from managing other drive volumes, especially when it comes to recovering from failure. The techniques you use to manage RAID arrays and to recover from failure are covered in this section.
Breaking a mirrored set
You might want to break a mirror for two reasons:
■If one of the mirrored drives in a set fails, disk operations can continue. When users read and write data, these operations use the remaining disk. At some point, however, you need to fix the mirror, and to do this you must first break the mirror, replace the failed drive, and then reestablish the mirror.
■If you no longer want to mirror your drives, you might also want to break a mirror. This allows you to use the disk space for other purposes.
BEST PRACTICES Although breaking a mirror doesn’t delete the data in the set, you should always back up the data before you perform this procedure to ensure that if you have problems, you can recover your data.
In Disk Management, you can break a mirrored set by following these steps:
1.Press and hold or right-click one of the volumes in the mirrored set, and then tap or click Break Mirrored Volume.
2.Confirm that you want to break the mirror by tapping or clicking Yes. If the volume is in use, you’ll get another warning dialog box. Confirm that it’s okay to continue by tapping or clicking Yes.
Windows Server 2012 R2 breaks the mirror, creating two independent volumes.
Resynchronizing and repairing a mirrored set
Windows Server 2012 R2 automatically synchronizes mirrored volumes on dynamic drives; however, data on mirrored drives can become out of sync. For example, if one of the drives goes offline, data is written only to the drive that’s online.
You can resynchronize and repair mirrored sets, but you must rebuild the set by using disks with the same partition style-either master boot record (MBR) or GUID partition table (GPT). You need to get both drives in the mirrored set online. The mirrored set’s status should read Failed Redundancy. The corrective action you take depends on the failed volume’s status:
■If the status is Missing or Offline, be sure that the drive has power and is connected properly. Then start Disk Management, press and hold or right-click the failed volume, and tap or click Reactivate Volume. The drive status should change to Regenerating and then to Healthy. If the volume doesn’t return to the Healthy status, press and hold or right-click the volume, and then tap or click Resynchronize Mirror.
■If the status is Online (Errors), press and hold or right-click the failed volume, and then tap or click Reactivate Volume. The drive status should change to Regenerating and then to Healthy. If the volume doesn’t return to the Healthy status, press and hold or right-click the volume, and then tap or click Resynchronize Mirror.
■If one of the drives shows a status of Unreadable, you might need to rescan the drives on the system by choosing Rescan Disks from Disk Management’s Action menu. If the drive status doesn’t change, you might need to reboot the computer.
■If one of the drives still won’t come back online, press and hold or right-click the failed volume, and then tap or click Remove Mirror. Next, press and hold or right-click the remaining volume in the original mirror, and then tap or click Add Mirror. You now need to mirror the volume on an unallocated area of free space. If you don’t have free space, you need to create space by deleting other volumes or replacing the failed drive.
Repairing a mirrored system volume to enable boot
The failure of a mirrored drive might prevent your system from booting. Typically, this happens when you’re mirroring the system or boot volume, or both, and the primary mirror drive has failed. In previous versions of the Windows operating system, you often had to go through several procedures to get the system back up and running. With Windows Server 2012 R2, the failure of a primary mirror is usually much easier to resolve.
When you mirror a system volume, the operating system should add an entry to the system’s boot manager that allows you to boot to the secondary mirror. Resolving a primary mirror failure is much easier with this entry in the boot manager file than without it because all you need to do is select the entry to boot to the secondary mirror. If you mirror the boot volume and a secondary mirror entry is not created for you, you can modify the boot entries in the boot manager to create one by using the BCD Editor (Bcdedit.exe).
If a system fails to boot to the primary system volume, restart the system and select the Windows Server 2012 R2-Secondary Plex option for the operating system you want to start. The system should start up normally. After you successfully boot the system to the secondary drive, you can schedule the maintenance necessary to rebuild the mirror as described in the following steps:
1.Shut down the system, and replace the failed volume or add a hard disk drive. Then restart the system.
2.Break the mirror set, and then re-create the mirror on the drive you replaced, which is usually drive 0. Press and hold or right-click the remaining volume that was part of the original mirror, and then tap or click Add Mirror. Next, follow the technique in “Mirroring an existing volume” earlier in the chapter.
Читать дальшеИнтервал:
Закладка:
Похожие книги на «Windows Server 2012 R2 Storage, Security, & Networking Pocket Consultant»
Представляем Вашему вниманию похожие книги на «Windows Server 2012 R2 Storage, Security, & Networking Pocket Consultant» списком для выбора. Мы отобрали схожую по названию и смыслу литературу в надежде предоставить читателям больше вариантов отыскать новые, интересные, ещё непрочитанные произведения.


Обсуждение, отзывы о книге «Windows Server 2012 R2 Storage, Security, & Networking Pocket Consultant» и просто собственные мнения читателей. Оставьте ваши комментарии, напишите, что Вы думаете о произведении, его смысле или главных героях. Укажите что конкретно понравилось, а что нет, и почему Вы так считаете.