William Stanek - Windows Server 2012 R2 Storage, Security, & Networking Pocket Consultant
Здесь есть возможность читать онлайн «William Stanek - Windows Server 2012 R2 Storage, Security, & Networking Pocket Consultant» весь текст электронной книги совершенно бесплатно (целиком полную версию без сокращений). В некоторых случаях можно слушать аудио, скачать через торрент в формате fb2 и присутствует краткое содержание. Жанр: ОС и Сети, на английском языке. Описание произведения, (предисловие) а так же отзывы посетителей доступны на портале библиотеки ЛибКат.
- Название:Windows Server 2012 R2 Storage, Security, & Networking Pocket Consultant
- Автор:
- Жанр:
- Год:неизвестен
- ISBN:нет данных
- Рейтинг книги:3 / 5. Голосов: 1
-
Избранное:Добавить в избранное
- Отзывы:
-
Ваша оценка:
Windows Server 2012 R2 Storage, Security, & Networking Pocket Consultant: краткое содержание, описание и аннотация
Предлагаем к чтению аннотацию, описание, краткое содержание или предисловие (зависит от того, что написал сам автор книги «Windows Server 2012 R2 Storage, Security, & Networking Pocket Consultant»). Если вы не нашли необходимую информацию о книге — напишите в комментариях, мы постараемся отыскать её.
Windows Server 2012 R2 Storage, Security, & Networking Pocket Consultant — читать онлайн бесплатно полную книгу (весь текст) целиком
Ниже представлен текст книги, разбитый по страницам. Система сохранения места последней прочитанной страницы, позволяет с удобством читать онлайн бесплатно книгу «Windows Server 2012 R2 Storage, Security, & Networking Pocket Consultant», без необходимости каждый раз заново искать на чём Вы остановились. Поставьте закладку, и сможете в любой момент перейти на страницу, на которой закончили чтение.
Интервал:
Закладка:
Implementing RAID on Windows Server 2012 R2

Windows Server 2012 R2 supports disk mirroring, disk striping, and disk striping with parity. Implementing these RAID techniques is discussed in the sections that follow.
CAUTION Some operating systems, such as MS-DOS, don’t support RAID. If you dual boot your system to one of these noncompliant operating systems, your RAID-configured drives will be unavailable.
Implementing RAID-0: disk striping
RAID level 0 is disk striping. With disk striping, two or more volumes-each on a separate drive-are configured as a striped set. Data written to the striped set is broken into blocks called stripes . These stripes are written sequentially to all drives in the striped set. You can place volumes for a striped set on up to 32 drives, but in most circumstances sets with 2 to 5 volumes offer the best performance improvements. Beyond this, the performance improvement decreases significantly.
The major advantage of disk striping is speed. Data can be accessed on multiple disks by using multiple drive heads, which improves performance considerably.
However, this performance boost comes with a price tag. As with volume sets, if any hard disk drive in the striped set fails, the striped set can no longer be used, which essentially means that all data in the striped set is lost. You need to re-create the striped set and restore the data from backups. Data backup and recovery is discussed in Chapter 11, “Data backup and recovery.”
CAUTION The boot and system volumes shouldn’t be part of a striped set. Don’t use disk striping with these volumes.
When you create striped sets, you should use volumes that are approximately the same size. Disk Management bases the overall size of the striped set on the smallest volume size. Specifically, the maximum size of the striped set is a multiple of the smallest volume size. For example, if you want to create a three-volume striped set but the smallest volume is 20 GB, the maximum size for the striped set is 60 GB, even if the other two values are 2 terabytes (TB) each.
You can maximize performance of the striped set in a couple of ways:
■Use disks that are on separate disk controllers. This allows the system to simultaneously access the drives.
■Don’t use the disks containing the striped set for other purposes. This allows the disk to dedicate its time to the striped set.
You can create a striped set by following these steps:
1.In Disk Management’s Graphical View, press and hold or right-click an area marked Unallocated on a dynamic disk, and then tap or click New Striped Volume. This starts the New Striped Volume Wizard. Read the Welcome page, and then tap or click Next.
2.Create the volume as described in “Creating volumes and volume sets” earlier in this chapter. The key difference is that you need at least two dynamic disks to create a striped volume.
After you create a striped volume, you can use the volume as you would any other volume. You can’t extend a striped set after it’s created; therefore, you should carefully consider the setup before you implement it.
Implementing RAID-1: disk mirroring
RAID level 1 is disk mirroring. With disk mirroring, you use identically sized volumes on two different drives to create a redundant data set. The drives are written with identical sets of information, and if one of the drives fails, you can still obtain the data from the other drive.
Disk mirroring offers about the same fault tolerance as disk striping with parity. Because mirrored disks don’t need to write parity information, they can offer better write performance in most circumstances. However, disk striping with parity usually offers better read performance because read operations are spread over multiple drives.
The major drawback to disk mirroring is that it effectively cuts the amount of storage space in half. For example, to mirror a 500-GB drive, you need another 500-GB drive. That means you use 1000 GB of space to store 500 GB of information.
TIP If possible, you should mirror boot and system volumes. Mirroring these volumes ensures that you are able to boot the server in case of a single drive failure.
As with disk striping, you’ll often want the mirrored disks to be on separate disk controllers to provide increased protection against failure of the disk controller. If one of the disk controllers fails, the disk on the other controller is still available. Technically, when you use two separate disk controllers to duplicate data, you’re using a technique known as disk duplexing . Figure 2–3 shows the difference between the two techniques. Where disk mirroring typically uses a single drive controller, disk duplexing uses two drive controllers; otherwise, the two techniques are essentially the same.
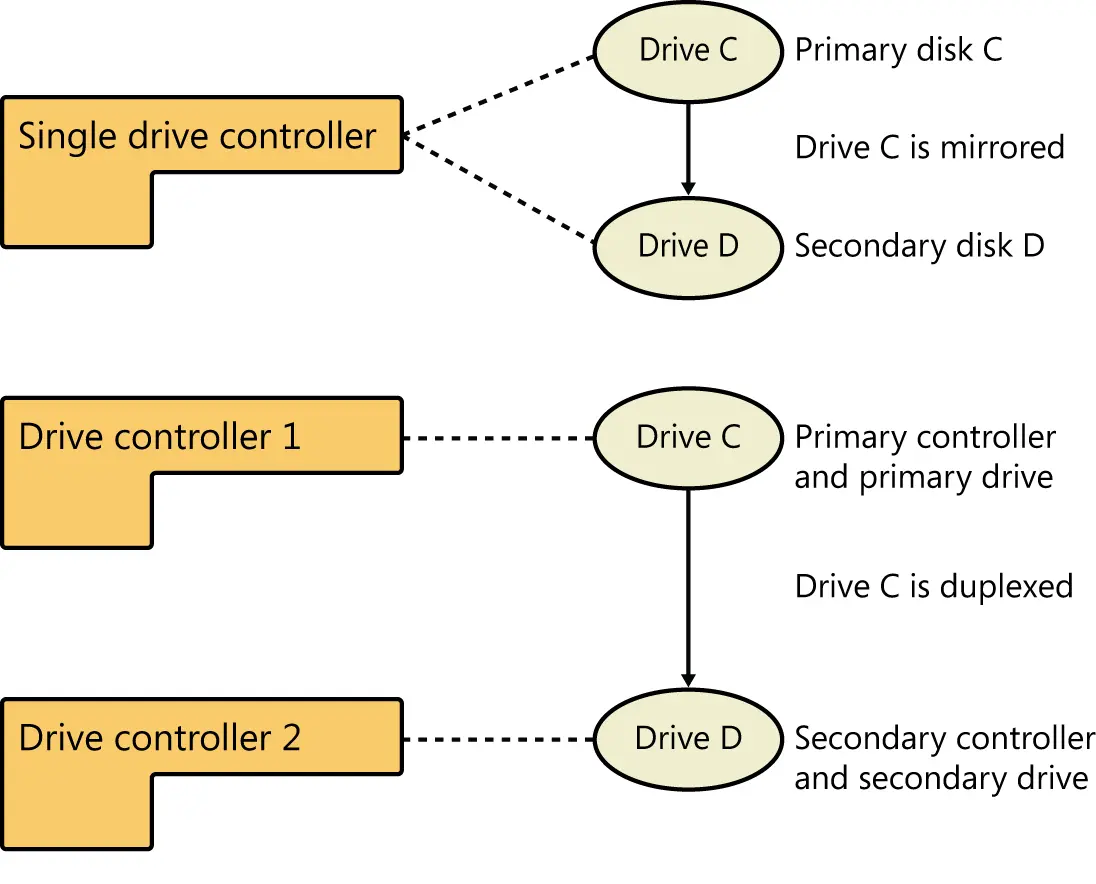
FIGURE 2–3Although disk mirroring typically uses a single drive controller to create a redundant data set, disk duplexing uses two drive controllers.
If one of the mirrored drives in a set fails, disk operations can continue. Here, when users read and write data, the data is written to the remaining disk. You need to break the mirror before you can fix it. To learn how, see “Managing RAID and recovering from failures” later in this chapter.
You create a mirror set by following these steps:
1.In the Disk Management Graphical View, press and hold or right-click an area marked Unallocated on a dynamic disk, and then tap or click New Mirrored Volume. This starts the New Mirrored Volume Wizard. Read the Welcome page, and then tap or click Next.
2.Create the volume as described in “Creating volumes and volume sets” earlier in this chapter. The key difference when creating the mirror set is that you must create two identically sized volumes, and these volumes must be on separate dynamic drives. You won’t be able to continue past the Select Disks window until you select the two disks with which you want to work.
Like other RAID techniques, mirroring is transparent to users. Users experience the mirrored set as a single drive they can access and use like any other drive.
NOTE The status of a normal mirror is healthy. During the creation of a mirror, you’ll get a status of Resynching, which tells you that Disk Management is creating the mirror.
Rather than create a new mirrored volume, you can use an existing volume to create a mirrored set. To do this, the volume you want to mirror must be a simple volume, and you must have an area of unallocated space on a second drive of equal or larger size than the existing volume.
In Disk Management, you mirror an existing volume by following these steps:
1.Press and hold or right-click the simple volume you want to mirror, and then tap or click Add Mirror. This displays the Add Mirror dialog box.
2.In the Disks list, shown in Figure 2–4, select a location for the mirror, and then tap or click Add Mirror. Windows Server 2012 R2 begins the mirror creation process. In Disk Management, you’ll get a status of Resynching on both volumes. The disk on which the mirrored volume is being created has a warning icon.
Читать дальшеИнтервал:
Закладка:
Похожие книги на «Windows Server 2012 R2 Storage, Security, & Networking Pocket Consultant»
Представляем Вашему вниманию похожие книги на «Windows Server 2012 R2 Storage, Security, & Networking Pocket Consultant» списком для выбора. Мы отобрали схожую по названию и смыслу литературу в надежде предоставить читателям больше вариантов отыскать новые, интересные, ещё непрочитанные произведения.


Обсуждение, отзывы о книге «Windows Server 2012 R2 Storage, Security, & Networking Pocket Consultant» и просто собственные мнения читателей. Оставьте ваши комментарии, напишите, что Вы думаете о произведении, его смысле или главных героях. Укажите что конкретно понравилось, а что нет, и почему Вы так считаете.