Rockridge Press - The Preppers Cookbook
Здесь есть возможность читать онлайн «Rockridge Press - The Preppers Cookbook» весь текст электронной книги совершенно бесплатно (целиком полную версию без сокращений). В некоторых случаях можно слушать аудио, скачать через торрент в формате fb2 и присутствует краткое содержание. Город: Berkeley, Год выпуска: 2013, ISBN: 2013, Издательство: Rockridge Press, Жанр: Кулинария, на английском языке. Описание произведения, (предисловие) а так же отзывы посетителей доступны на портале библиотеки ЛибКат.
- Название:The Preppers Cookbook
- Автор:
- Издательство:Rockridge Press
- Жанр:
- Год:2013
- Город:Berkeley
- ISBN:978-1-62315-197-3
- Рейтинг книги:3 / 5. Голосов: 1
-
Избранное:Добавить в избранное
- Отзывы:
-
Ваша оценка:
The Preppers Cookbook: краткое содержание, описание и аннотация
Предлагаем к чтению аннотацию, описание, краткое содержание или предисловие (зависит от того, что написал сам автор книги «The Preppers Cookbook»). Если вы не нашли необходимую информацию о книге — напишите в комментариях, мы постараемся отыскать её.
.
Prepping your own food—choosing the right ingredients, in the right quantities, with the right methods—is the best way to ensure that you and your family will be ready for any disaster. This is the ultimate preppers cookbook for preparing in a safe and smart way.
With the help of
you’ll be able to:
• Get started with handy checklists and instructions to begin preparing immediately
• Use
to quickly learn and start using different food-preservation methods such as canning, pickling, and dehydrating
• Choose from delicious recipes from the
for every meal and situation, including breakfast, dessert, and snacks
• Keep track of your calories, water supply, and macronutrients using proper guidelines
• Easily organize your disaster response with helpful tips and suggestions from Regardless of what reality TV would have you believe, most preppers are real-world people just like you, who simply want to be prepared to survive any emergency that may arise. Advance preparation will be crucial to making it through a disaster, even if it’s for only a few days. With dozens of useful recipes, and with tutorials on crucial topics such as alternate food sources, reliable cooking methods, and water purification,
will help get your family prepared for any situation.
The Preppers Cookbook — читать онлайн бесплатно полную книгу (весь текст) целиком
Ниже представлен текст книги, разбитый по страницам. Система сохранения места последней прочитанной страницы, позволяет с удобством читать онлайн бесплатно книгу «The Preppers Cookbook», без необходимости каждый раз заново искать на чём Вы остановились. Поставьте закладку, и сможете в любой момент перейти на страницу, на которой закончили чтение.
Интервал:
Закладка:
If you are harvesting the herbs from your own garden, here are some tips:
• Pick them before flowering occurs (if you pick them often, flowering won’t occur).
• Picking is best done in the morning after the dew has dried, but before the sun wilts the herbs.
• Cut hydrated, healthy-looking branches from your herb plants. Remove any dry or possibly diseased leaves.
• Shake to remove any bugs.
• If necessary, rinse with cold water and dry with paper towels. Make sure to dry them well because wet herbs will mold and rot.
• Remove the lower leaves along the very bottom of the branch. Group four to six branches together and tie them with a rubber band. The groups will shrink as they dry, so they need to be tightened throughout the drying process or you will end up with a mess on the floor. Small groups are best for herbs with high moisture content.
• Punch or cut several holes in a paper bag, and label the bag with the name of the herb you are drying. Put the correct herb group upside down into the bag.
• Wrap the ends of the bag around the bundle, and tie it closed. Make sure the herbs are not too cramped inside the bag.
• Hang the bag upside down in a warm, well-circulated room.
Check in after about two weeks to see how things are progressing, but do not forget to tighten the bands every so often. After the initial check-in, keep checking weekly until the herbs are dry and ready to store.
Here are some tips on storing the dried herbs:
• Use small jars (baby food jars work great)
• Freeze them in a resealable bag or freezer jar with an airtight seal.
• Leaves are best left whole; crush when you are ready to use (for better flavor preservation).
• Keep a close eye, and discard any moldy leaves.
• Store the herbs in a dry, dark place away from sunlight.
• Use within a year for best results.
• A teaspoon of dried herbs is equal to a tablespoon of fresh herbs.
Although it’s outside the scope of this particular book, many different herbs can be used for healing and preventive medicine. Some are easy to grow and dry and may make the difference between life and death in a survival situation.
Even though you’ll need to collect a stockpile of any life-sustaining medications that you or a family member needs, there’s never a guarantee that something catastrophic won’t happen to eliminate your ability to obtain more. In preparation for that, you may want to learn about alternative natural treatments for any conditions that you may have. Maybe that sounds alarmist, but it never hurts to be prepared.
You can find many interesting and easy-to-read books on medicinal herbs on the Internet or at your local bookstore, and it’s recommended that you pick one of these up in paperback so that you have it in your bug-out bag or emergency kit.
Drying Meats
Three factors have caused a sharp increase in home-drying meat in recent years. First and foremost, more and more people have become conscious of what’s in commercially prepared foods. They’re typically high in sodium, dyes, and chemical preservatives, making them nonviable as a healthy protein source. Rising grocery costs are another factor, and finally, people are beginning to worry about storing food for emergency situations.
Dehydrating meat is a wonderful way to preserve a nutritious, delicious, and portable source of quality protein. There are some guidelines that you need to follow, however, to dehydrate your meat safely:
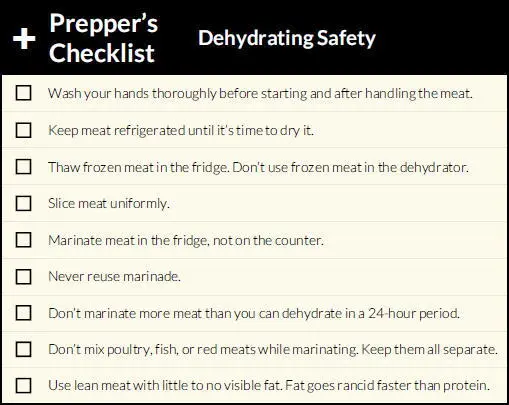
As with any food product, there are pathogens present in meat that can be harmful or even lethal if consumed. The big ones you have to worry about in meat products include Escherichia coli , Listeria monocytogenes , Salmonella , and Staphylococcus aureus . If you’ve ever suffered from food poisoning, you know that even a mild dose of these pathogens is extremely unpleasant, to say the least. At worst, it can kill you, so make sure that you follow safety guidelines above carefully when drying meat.
Basically, use your head. Many of these tips are simple common sense, and you can greatly increase the safety of drying your meat just by observing standard food handling safety practices.
This is the important part: if you don’t dry your meat at the proper temperature for the right amount of time, it’s not going to be properly preserved. As already discussed, you run the risk of foodborne pathogens, but it may also simply mold if you don’t dry it long enough, or become tasteless and brittle if you dry it for too long. Here are some tips:
• Use a dehydrator with a temperature setting, and dry your meat at 140 degrees F for the recommended time.
• To visually test for doneness, bend the meat. If you can see moisture glistening inside it, it isn’t done.
• Dry the meat to an internal temperature of 160 degrees F. To test a batch, create one piece of “test” meat that’s a little thicker than the rest. Once that piece reaches that temperature, then the others will have as well.
Dried-Meat Recipes
Beef Jerky
Although called “beef” jerky, it’s great with any type of lean red meat that you’d like to use. Venison is a great substitute because it’s lean and extremely nutritious.
• 16 ounces soy sauce
• 16 ounces Worcestershire sauce
• 2 teaspoons garlic powder
• 2 teaspoons onion powder
• 1 teaspoon freshly ground black pepper
• 1 teaspoon cayenne pepper (optional)
• 1 teaspoon red pepper flakes (optional)
• 4 pounds lean beef, thinly sliced with the grain
1. Mix the sauces and spices together in a large bowl, and add the meat, mixing so that each piece is coated.
2. Refrigerate for 12 to 24 hours, stirring every couple of hours.
3. Dry for 10 to 12 hours or according to your dehydrator’s instructions. The meat is dry when it bends with no visible moisture.
Yields about 1 pound of jerky.
Chicken Jerky
Be extremely careful working with raw chicken, because poultry is notoriously dangerous when it comes to pathogens. You can use turkey breast for this if you prefer.
• 16 ounces soy sauce
• 3 teaspoons lemon juice
• 2 teaspoons cracked black pepper
• 2 teaspoons powdered garlic
• 1 teaspoon ground ginger
• 1 teaspoon onion powder
• 4 pounds boneless, skinless chicken breast, trimmed and sliced with the grain ¼-inch thick
1. Mix all the ingredients except the chicken in a large bowl, and add the meat, mixing so that each piece is coated.
2. Marinate the chicken for 12 to 24 hours, stirring occasionally.
3. Dry in a single layer per tray at 145 degrees F for 6 to 8 hours, depending upon your dehydrator and how thick your strips are.
Yields about 1 pound of jerky.
Packaging and Storing Dehydrated Meat
The best way to preserve your meat for long-term storage is to dry-can it or vacuum-pack it. Otherwise, it’s good for only a couple of weeks after dehydration. Before you do either though, there’s a moisture test that you need to conduct to make sure that the meat is dry enough. Place a few strips in a jar or in a sealed bag, and let them sit for a few hours, up to 24 hours. If there is condensation in the bag, the meat isn’t dry enough and you need to put it back in the dehydrator.
Читать дальшеИнтервал:
Закладка:
Похожие книги на «The Preppers Cookbook»
Представляем Вашему вниманию похожие книги на «The Preppers Cookbook» списком для выбора. Мы отобрали схожую по названию и смыслу литературу в надежде предоставить читателям больше вариантов отыскать новые, интересные, ещё непрочитанные произведения.


Обсуждение, отзывы о книге «The Preppers Cookbook» и просто собственные мнения читателей. Оставьте ваши комментарии, напишите, что Вы думаете о произведении, его смысле или главных героях. Укажите что конкретно понравилось, а что нет, и почему Вы так считаете.