Rosie Garthwaite - How to Avoid Being Killed in a War Zone
Здесь есть возможность читать онлайн «Rosie Garthwaite - How to Avoid Being Killed in a War Zone» весь текст электронной книги совершенно бесплатно (целиком полную версию без сокращений). В некоторых случаях можно слушать аудио, скачать через торрент в формате fb2 и присутствует краткое содержание. Город: London, Год выпуска: 2011, ISBN: 2011, Издательство: Bloomsbury Publishing, Жанр: Справочники, Путешествия и география, на английском языке. Описание произведения, (предисловие) а так же отзывы посетителей доступны на портале библиотеки ЛибКат.
- Название:How to Avoid Being Killed in a War Zone
- Автор:
- Издательство:Bloomsbury Publishing
- Жанр:
- Год:2011
- Город:London
- ISBN:978-1-4088-1815-2
- Рейтинг книги:5 / 5. Голосов: 1
-
Избранное:Добавить в избранное
- Отзывы:
-
Ваша оценка:
How to Avoid Being Killed in a War Zone: краткое содержание, описание и аннотация
Предлагаем к чтению аннотацию, описание, краткое содержание или предисловие (зависит от того, что написал сам автор книги «How to Avoid Being Killed in a War Zone»). Если вы не нашли необходимую информацию о книге — напишите в комментариях, мы постараемся отыскать её.
Medical information has been vetted by Médecins Sans Frontières, one of the world’s leading medical charities which specializes in warzones and other trouble spots.
http://www.youtube.com/watch?v=8oCZI48eHsY
How to Avoid Being Killed in a War Zone — читать онлайн бесплатно полную книгу (весь текст) целиком
Ниже представлен текст книги, разбитый по страницам. Система сохранения места последней прочитанной страницы, позволяет с удобством читать онлайн бесплатно книгу «How to Avoid Being Killed in a War Zone», без необходимости каждый раз заново искать на чём Вы остановились. Поставьте закладку, и сможете в любой момент перейти на страницу, на которой закончили чтение.
Интервал:
Закладка:
/HOW TO PREPARE ANIMALS AND BIRDS FOR EATING
Before you do anything else, check the animal for signs of disease, such as a misshapen or discoloured head. If you see anything odd, do not eat it. Also, be careful not to expose any of your own open wounds to the animal’s body fluids, whether it is diseased or healthy.
The next step is to bleed the animal. Hang it up by its feet, cut the main arteries running through the throat and leave to hang until the bleeding stops. This applies to animals large and small, and to birds.
• Remove the testicles and scent glands. These are around the bum on cats and dogs and most small wild animals. Deer have them on their rear legs.
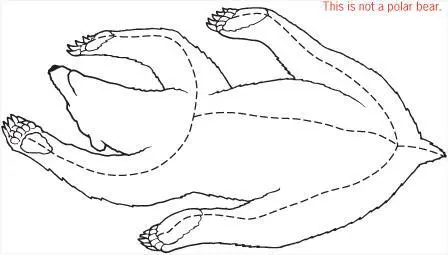
• With the animal on its back, cut along the lines illustrated in the picture below, being careful not to cut into the gut. You’ll need to be extra careful if working on a small animal.
• Insert your knife under the central cut between the fur and the skin, then use your fingers to pull the skin away, lifting outwards from the stomach. Do the same along the legs.
• Turn the animal onto its stomach and cut around the tail and throat. Push your hand up from the tail along the spine and pull away the hide as a whole. Cut through any areas that are stuck.
Note:There is no need to skin a pig. Gut it first (see below), then burn the hairs off and wash with warm water. Check that you have removed all ticks and parasites attached to the skin before cooking.
While it’s possible to skin a bird, they will keep for longer if simply plucked, and you will not lose the calorie value of the skin. Chop off the head and feet. Start plucking at the stomach and move outwards.
• Suspend the animal by its front feet. Pinch and lift some skin away from the stomach near the ribs and make an incision about 5 cm long. (You pinch it to ensure you don’t pierce the organs by mistake and cause a spill.)
• Cut carefully down towards the rear of the animal and up to the breastbone. The guts will spill out. Cut out the kidneys and liver. If any of the guts or organs look discoloured or mottled, do not keep them.
• Cut through the membrane over the chest cavity to get to the heart and lungs, then pull them out too. Ensure the bum is clear by pushing through the hole, then wash it with water.
/FIRE
It’s hard to think where we’d be without fire. It is a mark of civilization. A sign of warmth and often welcome. It makes your water safe and your food more interesting and edible. So let me tell you about fire.
It needs a spark and some highly flammable fuel and oxygen to keep going. If you want a big fire, you need to give it lots of oxygen and lots of fuel. If you want a small fire, don’t fan the flames and you will have a sort of barbecue effect that requires less fuel. Smouldering is good, smoking is bad. Smoking means you are wasting fuel. Chemistry lesson over, let’s move on to how you actually get that spark.
Take a box of matches or a lighter… now wouldn’t that be nice? For this exercise you are going to make your own spark, so you will need lots of dry fuel in various sizes:
Tinder – such as wood shavings, pages ripped from books (I have left you a couple spare at the end of this one), newspaper, pine needles, feathers or cotton.
Kindling – dry sticks and small logs.
Your main fuel – whether it be wood and coal, or a mix of sand with oil or petrol in a deep hole, dried animal droppings, or peat logs dried out over a fire.
Pick a spot.It needs to be on dry ground, or on a raised area made of rocks or wood above wet ground if that is all you can find. Clear away all the leaves and general muck around the area where you want the fire. You will need ventilation, or at least a chimney, but not too much wind. If it is very windy, dig a little hole for the fire.
Put dry rocks around the fire.This will stop it from spreading if it is very windy. The rocks can also be used as stands for pots, and later can be wrapped in clothing and used to warm your sleeping bag.
Warning:Do not use wet or flaky rocks as the change in temperature and pressure could lead them to explode.
There are many ways to produce a spark. I will start with the easiest method and head back to cave-man times.
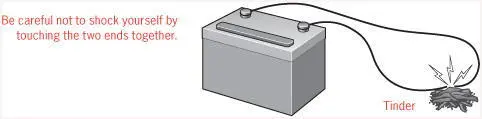
Battery method:Take a car battery or a large torch battery and attach two wires or jump-leads to the positive and negative outlets. Be very careful not to let them touch while you do this. Bring the opposite ends almost together close to your tinder and a spark will fly across. Catch it on your tinder, blow the flame and you have the beginnings of a fire.
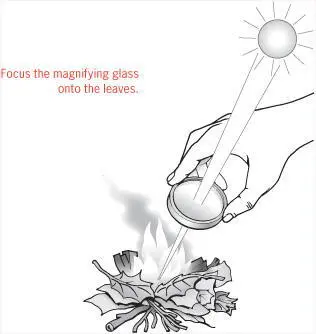
Lens method:Take a strong pair of glasses or a magnifying glass, or use a broken light bulb or the end of a bottle – many things work, so experiment. Fiddle with the angle from the sun till you create a laser of light and direct it at your tinder. Blow gently as the spark takes and you have the makings of a fire.
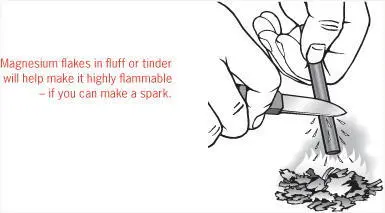
Flint method:Flint is a stone found everywhere around the world. If you strike it with a steel knife (most pocket knives are made of stainless steel), it will spark very effectively.
Magnesium method:If you are very efficient, you might have a tinderbox complete with fluff, steel and flint. It may even have a block of magnesium as part of the kit. This is to be shaved off onto your tinder before you begin trying to make the spark.
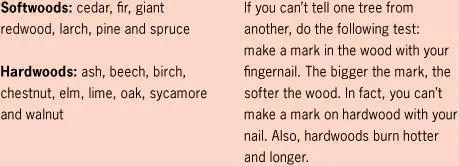
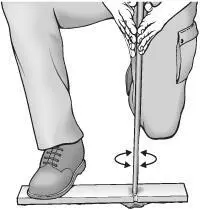
Wooden drill method:Otherwise known as the hard-work method, this is used only by those caught totally unprepared. For this you need to add muscle and perseverance to the standard ingredients above – tinder, kindling, oxygen, fuel – plus a piece of flattish softwood and a hardwood stick.
Cut the hardwood stick into a point at one end.
Cut a v-shaped chunk out of one side of your softwood. Put your tinder in that nook or cranny and gouge a hole next to it with your knife.
Stand the stick in the hole and start turning it vigorously, rolling it between your hands, until the heat produced lights the hole and you can blow that gently onto the tinder.
Bow and wooden drill method:This makes the previous process faster, but you must have some string handy. Put a rock on top of your hardwood stick and you can add pressure to make the whole thing work better (see below).
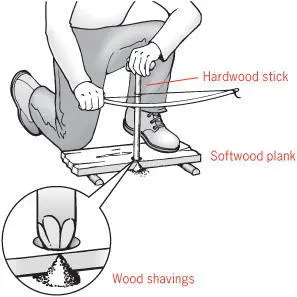
Plough method:This uses the same implements as the drill method. Create a furrow in your softwood base (as shown below) and keep ‘ploughing’ the furrow with your hardwood stick until the smoking pieces of softwood fall down into a tiny fire and you can work it up to something larger.
Читать дальшеИнтервал:
Закладка:
Похожие книги на «How to Avoid Being Killed in a War Zone»
Представляем Вашему вниманию похожие книги на «How to Avoid Being Killed in a War Zone» списком для выбора. Мы отобрали схожую по названию и смыслу литературу в надежде предоставить читателям больше вариантов отыскать новые, интересные, ещё непрочитанные произведения.


![Джонатан Димблби - Barbarossa - How Hitler Lost the War [calibre]](/books/385421/dzhonatan-dimblbi-barbarossa-how-hitler-lost-the-w-thumb.webp)


Обсуждение, отзывы о книге «How to Avoid Being Killed in a War Zone» и просто собственные мнения читателей. Оставьте ваши комментарии, напишите, что Вы думаете о произведении, его смысле или главных героях. Укажите что конкретно понравилось, а что нет, и почему Вы так считаете.