Nicolas Besson - Microsoft Windows Embedded CE 6.0 Exam Preparation Kit
Здесь есть возможность читать онлайн «Nicolas Besson - Microsoft Windows Embedded CE 6.0 Exam Preparation Kit» весь текст электронной книги совершенно бесплатно (целиком полную версию без сокращений). В некоторых случаях можно слушать аудио, скачать через торрент в формате fb2 и присутствует краткое содержание. Город: Redmond, Год выпуска: 2008, Издательство: Microsoft, Жанр: Руководства, ОС и Сети, Программы, на английском языке. Описание произведения, (предисловие) а так же отзывы посетителей доступны на портале библиотеки ЛибКат.

- Название:Microsoft Windows Embedded CE 6.0 Exam Preparation Kit
- Автор:
- Издательство:Microsoft
- Жанр:
- Год:2008
- Город:Redmond
- ISBN:нет данных
- Рейтинг книги:5 / 5. Голосов: 1
-
Избранное:Добавить в избранное
- Отзывы:
-
Ваша оценка:
Microsoft Windows Embedded CE 6.0 Exam Preparation Kit: краткое содержание, описание и аннотация
Предлагаем к чтению аннотацию, описание, краткое содержание или предисловие (зависит от того, что написал сам автор книги «Microsoft Windows Embedded CE 6.0 Exam Preparation Kit»). Если вы не нашли необходимую информацию о книге — напишите в комментариях, мы постараемся отыскать её.
Microsoft Windows Embedded CE 6.0 Exam Preparation Kit — читать онлайн бесплатно полную книгу (весь текст) целиком
Ниже представлен текст книги, разбитый по страницам. Система сохранения места последней прочитанной страницы, позволяет с удобством читать онлайн бесплатно книгу «Microsoft Windows Embedded CE 6.0 Exam Preparation Kit», без необходимости каждый раз заново искать на чём Вы остановились. Поставьте закладку, и сможете в любой момент перейти на страницу, на которой закончили чтение.
Интервал:
Закладка:
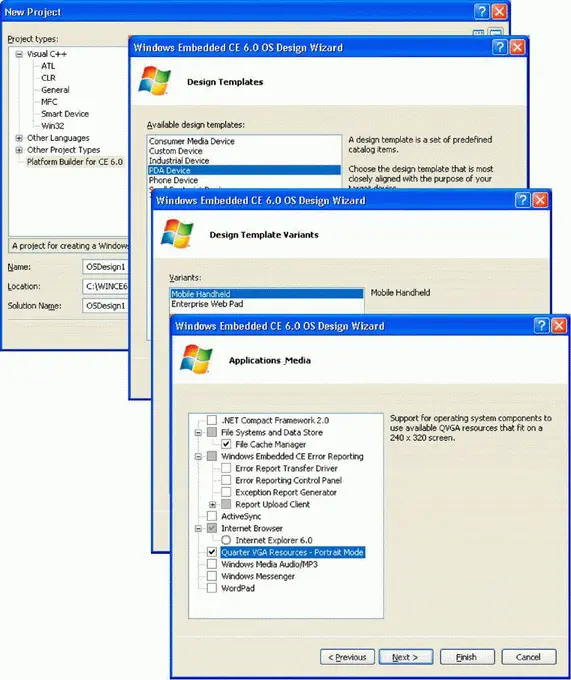
Figure 1-8Creating an OS design for a PDA device
The OS Design Wizard creates the initial configuration for your OS design. You can make further changes to the OS design after completing the wizard.
►Inspect the OS Catalog
1. In Visual Studio, locate Solution Explorer and click the Catalog Items View tab.
2. Expand the individual container nodes to analyze the selected check boxes and icons in the catalog. Check boxes with a green check mark indicate items specifically added as a part of the OS design. Check boxes with a green square indicate items that are part of the OS design due to dependencies. Selection boxes that are not marked indicate items that are not included in the OS design but are available to be added.
3. Locate a catalog item with a green square in its check box.
4. Right-click this catalog item and choose Reasons For Inclusion Of Item. The Remove Dependent Catalog Item dialog box displays the catalog items that caused Platform Builder to include the selected catalog item in the OS design, as illustrated in Figure 1-9.
5. Expand the Core OS | CEBASE | Applications -End User | ActiveSync node in the catalog.
6. Right-click either of the ActiveSync system cpl items and select Display In Solution View. The view changes to the Solution Explorer tab to display the subproject containing the ActiveSync component. This is a great way to navigate through the source code that comes with Windows Embedded CE 6.0.
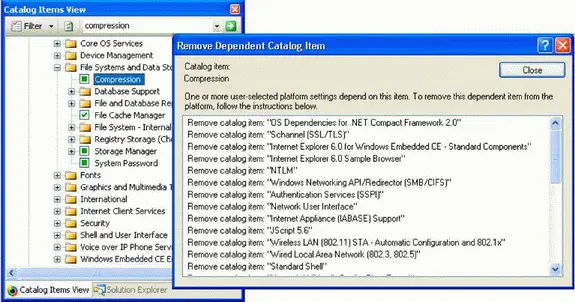
Figure 1-9Reason for including a catalog item as a dependency
►Add Support for the Internet Explorer 6.0 Sample Browser Catalog Item
1. Select the Catalog Items View tab to display the OS design catalog. Verify that the filtering option is set to All Catalog Items In Catalog.
2. In the Search text box to the right of the Catalog Items View Filter button, type Internet Explorer 6.0 Sampleand press Enter or click the green arrow.
3. Verify that the search locates the Internet Explorer 6.0 Sample Browser catalog item. Select the corresponding check box to include this catalog item in the OS design, as illustrated in Figure 1-10.
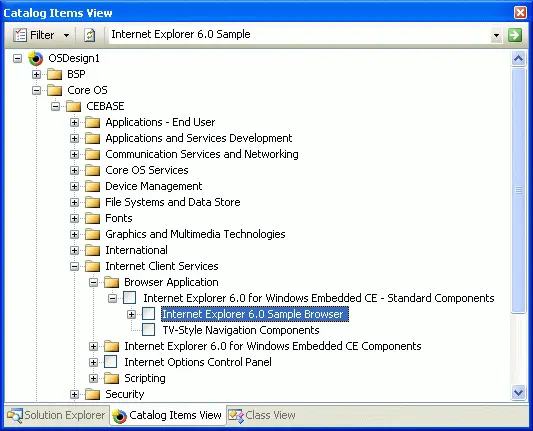
Figure 1-10Including the Internet Explorer 6.0 Sample Browser catalog item in an OS design
►Add Support for Managed Code Development to Your OS Design
1. In the Search text box, type ipconfigand press Enter.
2. Verify that the search locates the Network Utilities (IpConfig, Ping, Route) catalog item.
3. Add the Network Utilities (IpConfig, Ping, Route) catalog item to your OS design by selecting the corresponding check box.
4. In the Search text box, type wceloadand press Enter.
5. Verify that the search locates the CAB File Installer/Uninstaller catalog item. The search can find this catalog item because the value of its SYSGEN variable is wceload.
6. Add the Cab File Installer/Uninstaller catalog item to your OS design.
7. Use the search feature in a similar way to locate the OS Dependencies for .NET Compact Framework 2.0 container. Verify that the OS Dependencies for .NET Compact Framework 2.0 catalog item is included in your OS design, as illustrated in Figure 1-11.
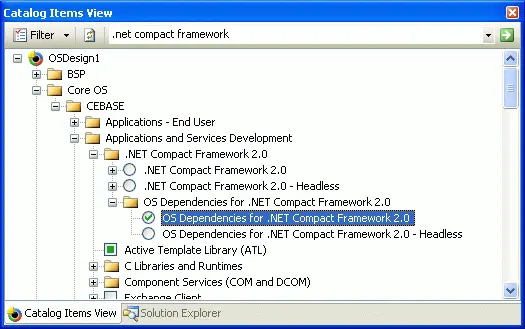
Figure 1-11Adding the OS Dependencies for .NET Compact Framework 2.0 catalog item to an OS design
There are two separate components in this category. Be sure you select the one that does not have the -Headless modifier in its description, because the headless version is intended for devices with no display.
Chapter Review
In order to deploy Microsoft Windows Embedded CE 6.0 R2 on a target device, you must create an OS design that includes the necessary operating system (OS) components, features, drivers, and configuration settings. You can then use Platform Builder to build the corresponding run-time image for deployment. The most important tasks you must accomplish to create a customized OS design that suits your requirements include:
■ Creating an OS design project in Visual Studio by using the OS Design Wizard.
■ Adding and removing components from the OS manually and through dependencies.
■ Setting environment and SYSGEN variables through the Catalog Editor.
■ Configuring regional settings for localization of the OS design.
■ Cloning components from the catalog either automatically by clicking Clone Catalog Item or manually by using the Sysgen Capture tool.
■ Exporting a custom SDK for your OS design to facilitate application development for your target device.
Key Terms
Do you know what these key terms mean? You can check your answers by looking up the terms in the glossary at the end of the book.
■ OS design
■ Component
■ SYSGEN variable
■ Environment Variable
■ Software Development Kit
Suggested Practice
To help you successfully master the exam objectives presented in this chapter, complete the following tasks:
Create a Custom OS Design
By using the OS Design Wizard, create an OS design based on the Device Emulator: ARMV4I BSP and the Custom Device design template. Perform the following tasks after OS design creation:
■ Add the .NET Compact Framework 2.0Add this catalog item by using the search feature in the Catalog Items View.
■ Localize your run-time imageDisplay the OS Design property pages and localize the OS design for the French language.
Generate and Test an SDK
Based on the OS design generated during Lab 1, perform the following tasks:
■ Build and generate the binary imageBuild and generate the binary image for the OS design generated in the Release build configuration.
■ Create and install the SDKVerify that the build process completes successfully, and then create a new SDK, build it, and install it on an application development computer.
■ Use the SDKUse another instance of Visual Studio and create a Win32 Smart Device application. Use your custom SDK as the reference SDK for the project and build the application.
Chapter 2
Building and Deploying a Run-Time Image
The Microsoft® Windows® Embedded CE 6.0 R2 build process is very complex. This process includes several phases and relies on a variety of tools to initialize the Windows Embedded CE build environment, compile the source code, copy modules and files to a common release directory, and create the run-time image. Batch files and build tools, such as the Sysgen tool (Sysgen.bat) and the Make Binary Image tool (Makeimg.exe), automate this process. You can run these tools directly at the command prompt or start the build process in Microsoft Platform Builder for Windows Embedded CE 6.0 R2. The Platform Builder integrated development environment (IDE) relies on the same processes and tools. In either case, a thorough understanding of the build process and the steps required to deploy the resulting runtime image is essential if you want to create run-time images efficiently, troubleshoot build errors, or deploy Board Support Packages (BSPs) and subprojects as part of a run-time image on a target device.
Читать дальшеИнтервал:
Закладка:
Похожие книги на «Microsoft Windows Embedded CE 6.0 Exam Preparation Kit»
Представляем Вашему вниманию похожие книги на «Microsoft Windows Embedded CE 6.0 Exam Preparation Kit» списком для выбора. Мы отобрали схожую по названию и смыслу литературу в надежде предоставить читателям больше вариантов отыскать новые, интересные, ещё непрочитанные произведения.


Обсуждение, отзывы о книге «Microsoft Windows Embedded CE 6.0 Exam Preparation Kit» и просто собственные мнения читателей. Оставьте ваши комментарии, напишите, что Вы думаете о произведении, его смысле или главных героях. Укажите что конкретно понравилось, а что нет, и почему Вы так считаете.