Department of the Army - U.S. Army Combat Pistol Training Handbook
Здесь есть возможность читать онлайн «Department of the Army - U.S. Army Combat Pistol Training Handbook» весь текст электронной книги совершенно бесплатно (целиком полную версию без сокращений). В некоторых случаях можно слушать аудио, скачать через торрент в формате fb2 и присутствует краткое содержание. Город: New York, Год выпуска: 2012, ISBN: 2012, Издательство: Skyhorse Publishing, Жанр: Руководства, prose_military, на английском языке. Описание произведения, (предисловие) а так же отзывы посетителей доступны на портале библиотеки ЛибКат.
- Название:U.S. Army Combat Pistol Training Handbook
- Автор:
- Издательство:Skyhorse Publishing
- Жанр:
- Год:2012
- Город:New York
- ISBN:978-1-62087-737-1
- Рейтинг книги:3 / 5. Голосов: 1
-
Избранное:Добавить в избранное
- Отзывы:
-
Ваша оценка:
U.S. Army Combat Pistol Training Handbook: краткое содержание, описание и аннотация
Предлагаем к чтению аннотацию, описание, краткое содержание или предисловие (зависит от того, что написал сам автор книги «U.S. Army Combat Pistol Training Handbook»). Если вы не нашли необходимую информацию о книге — напишите в комментариях, мы постараемся отыскать её.
(FM 3-23.35) reflects current Army standards in weapons qualification and can be a guide for the instructor to develop training programs, plans, and lessons that meet the objectives of the U.S. Army Marksmanship program for developing combat effective marksmen.
The first part focuses on the components and functions of the pistols, where readers will learn about components, ammunition, maintenance and assembly, clearing procedures, preventive maintenance, operation, loading, unloading and clearing, troubleshooting, and much more. The second part is where things get fun and where readers will find instructions on topics such as basic marksmanship, grip and aiming, breath control, trigger squeeze, techniques of firing, target engagement, combat reloading techniques, coaching, and safety, among others. Finally, the appendixes include a thorough explanation of the U.S. Army qualification courses and training schedules.
This compact guide will tell you everything you need to know about training with an M9 or M11 pistol. Loaded with illustrations and charts, this handbook shows as well as tells how to be the best pistol shooter in the Army.
U.S. Army Combat Pistol Training Handbook — читать онлайн бесплатно полную книгу (весь текст) целиком
Ниже представлен текст книги, разбитый по страницам. Система сохранения места последней прочитанной страницы, позволяет с удобством читать онлайн бесплатно книгу «U.S. Army Combat Pistol Training Handbook», без необходимости каждый раз заново искать на чём Вы остановились. Поставьте закладку, и сможете в любой момент перейти на страницу, на которой закончили чтение.
Интервал:
Закладка:
c. Follow-through is the continued effort of the firer to maintain sight alignment before, during, and after the round has fired. The firer must continue the rearward movement of the finger even after the round has been fired. Releasing the trigger too soon after the round has been fired results in an uncontrolled shot, causing a missed target.
(1) The firer who is a good shot holds the sights of the weapon as nearly on the target center as possible and continues to squeeze the trigger with increasing pressure until the weapon fires.
(2) The soldier who is a bad shot tries to “catch his target” as his sight alignment moves past the target and fires the weapon at that instant. This is called ambushing, which causes trigger jerk.
NOTE:The trigger squeeze of the pistol, when fired in the single-action mode, is 5.50 pounds; when fired in double-action mode, it is 12.33 pounds. The firer must be aware of the mode in which he is firing. He must also practice squeezing the trigger in each mode to develop expertise in both single-action and double- action target engagements.
2-5. Target Engagement
To engage a single target, the firer applies the method discussed in paragraph 2-4. When engaging multiple targets in combat, he engages the closest and most dangerous multiple target first and fires at it with two rounds. This is called controlled pairs. The firer then traverses and acquires the next target, aligns the sights in the center of mass, focuses on the front sight, applies trigger squeeze, and fires. He ensures his firing arm elbow and wrist are locked during all engagements. If he has missed the first target and has fired upon the second target, he shifts back to the first and engages it. Some problems in target engagement are as follows:
a. Recoil Anticipation. When a soldier first learns to shoot, he may begin to anticipate recoil. This reaction may cause him to tighten his muscles during or just before the hammer falls. He may fight the recoil by pushing the weapon downward in anticipating or reacting to its firing. In either case, the rounds will not hit the point of aim. A good method to show the firer that he is anticipating the recoil is the ball-and-dummy method (see paragraph 2-14).
b. Trigger Jerk. Trigger jerk occurs when the soldier sees that he has acquired a good sight picture at center mass and “snaps” off a round before the good sight picture is lost. This may become a problem, especially when the soldier is learning to use a flash sight picture (see paragraph 2-7b).
c. Heeling. Heeling is caused by a firer tightening the large muscle in the heel of the hand to keep from jerking the trigger. A firer who has had problems with jerking the trigger tries to correct the fault by tightening the bottom of the hand, which results in a heeled shot. Heeling causes the strike of the bullet to hit high on the firing hand side of the target. The firer can correct shooting errors by knowing and applying correct trigger squeeze.
2-6. Positions
The qualification course is fired from a standing, kneeling, or crouch position. During qualification and combat firing, soldiers must practice all of the firing positions described below so they become natural movements. Though these positions seem natural, practice sessions must be conducted to ensure the habitual attainment of correct firing positions. Practice in assuming correct firing positions ensures that soldiers can quickly assume these positions without a conscious effort. Pistol marksmanship requires a soldier to rapidly apply all the fundamentals at dangerously close targets while under stress. Assuming a proper position to allow for a steady aim is critical to survival.
NOTE:During combat, there may not be time for a soldier to assume a position that will allow him to establish his natural point of aim. Firing from a covered position may require the soldier to adapt his shooting stance to available cover.
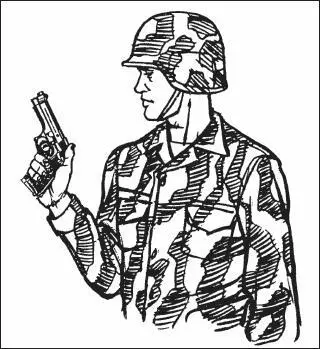
a. Pistol-Ready Position. In the pistol-ready position, hold the weapon in the one-hand grip. Hold the upper arm close to the body and the forearm at about a 45-degree angle. Point the weapon toward target center as you move forward (Figure 2-8).
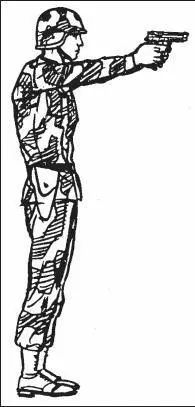
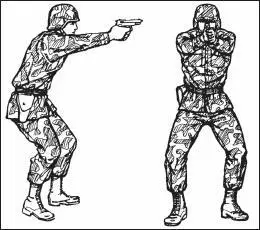
b. Standing Position without Support. Face the target (Figure 2-9). Place feet a comfortable distance apart, about shoulder width. Extend the firing arm and attain a two-hand grip. The wrist and elbow of the firing arm are locked and pointed toward target center. Keep the body straight with the shoulders slightly forward of the buttocks.
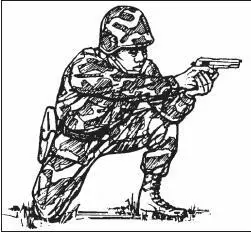
c. Kneeling Position. In the kneeling position, ground only your firing-side knee as the main support (Figure 2-10). Vertically place your firing-side foot, used as the main support, under your buttocks. Rest your body weight on the heel and toes. Rest your nonfiring arm just above the elbow on the knee not used as the main body support. Use the two-handed grip for firing. Extend the firing arm, and lock the firing-arm elbow and wrist to ensure solid arm control.
d. Crouch Position. Use the crouch position when surprise targets are engaged at close range (Figure 2-11). Place the body in a forward crouch (boxer’s stance) with the knees bent slightly and trunk bent forward from the hips to give faster recovery from recoil. Place the feet naturally in a position that allows another step toward the target. Extend the weapon straight toward the target, and lock the wrist and elbow of the firing arm. It is important to consistently train with this position, since the body will automatically crouch under conditions of stress such as combat. It is also a faster position from which to change direction of fire.
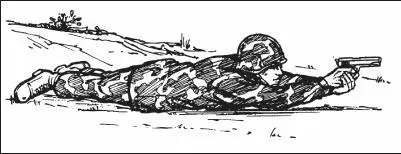
e. Prone Position. Lie flat on the ground, facing the target (Figure 2-12). Extend your arms in front with the firing arm locked. (Your arms may have to be slightly unlocked for firing at high targets.) Rest the butt of the weapon on the ground for single, well-aimed shots. Wrap the fingers of the nonfiring hand around the fingers of the firing hand. Face forward. Keep your head down between your arms and behind the weapon as much as possible.
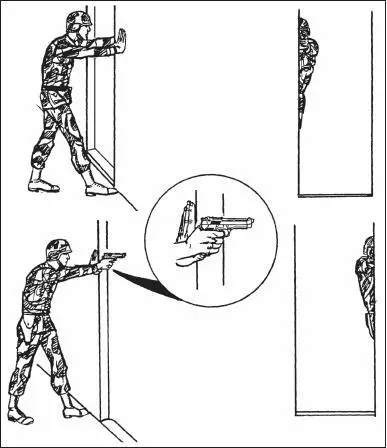
f. Standing Position with Support. Use available cover for support–for example, a tree or wall to stand behind (Figure 2-13). Stand behind a barricade with the firing side on line with the edge of the barricade. Place the knuckles of the nonfiring fist at eye level against the edge of the barricade. Lock the elbow and wrist of the firing arm. Move the foot on the nonfiring side forward until the toe of the boot touches the bottom of the barricade.
g. Kneeling Supported Position. Use available cover for support–for example, use a low wall, rocks, or vehicle (Figure 2-14). Place your firing-side knee on the ground. Bend the other knee and place the foot (nonfiring side) flat on the ground, pointing toward the target. Extend arms alongside and brace them against available cover. Lock the wrist and elbow of your firing arm. Place the nonfiring hand around the fist to support the firing arm. Rest the nonfiring arm just above the elbow on the nonfiring-side knee.
Читать дальшеИнтервал:
Закладка:
Похожие книги на «U.S. Army Combat Pistol Training Handbook»
Представляем Вашему вниманию похожие книги на «U.S. Army Combat Pistol Training Handbook» списком для выбора. Мы отобрали схожую по названию и смыслу литературу в надежде предоставить читателям больше вариантов отыскать новые, интересные, ещё непрочитанные произведения.


Обсуждение, отзывы о книге «U.S. Army Combat Pistol Training Handbook» и просто собственные мнения читателей. Оставьте ваши комментарии, напишите, что Вы думаете о произведении, его смысле или главных героях. Укажите что конкретно понравилось, а что нет, и почему Вы так считаете.