Department of the Army - U.S. Army Combat Pistol Training Handbook
Здесь есть возможность читать онлайн «Department of the Army - U.S. Army Combat Pistol Training Handbook» весь текст электронной книги совершенно бесплатно (целиком полную версию без сокращений). В некоторых случаях можно слушать аудио, скачать через торрент в формате fb2 и присутствует краткое содержание. Город: New York, Год выпуска: 2012, ISBN: 2012, Издательство: Skyhorse Publishing, Жанр: Руководства, prose_military, на английском языке. Описание произведения, (предисловие) а так же отзывы посетителей доступны на портале библиотеки ЛибКат.
- Название:U.S. Army Combat Pistol Training Handbook
- Автор:
- Издательство:Skyhorse Publishing
- Жанр:
- Год:2012
- Город:New York
- ISBN:978-1-62087-737-1
- Рейтинг книги:3 / 5. Голосов: 1
-
Избранное:Добавить в избранное
- Отзывы:
-
Ваша оценка:
U.S. Army Combat Pistol Training Handbook: краткое содержание, описание и аннотация
Предлагаем к чтению аннотацию, описание, краткое содержание или предисловие (зависит от того, что написал сам автор книги «U.S. Army Combat Pistol Training Handbook»). Если вы не нашли необходимую информацию о книге — напишите в комментариях, мы постараемся отыскать её.
(FM 3-23.35) reflects current Army standards in weapons qualification and can be a guide for the instructor to develop training programs, plans, and lessons that meet the objectives of the U.S. Army Marksmanship program for developing combat effective marksmen.
The first part focuses on the components and functions of the pistols, where readers will learn about components, ammunition, maintenance and assembly, clearing procedures, preventive maintenance, operation, loading, unloading and clearing, troubleshooting, and much more. The second part is where things get fun and where readers will find instructions on topics such as basic marksmanship, grip and aiming, breath control, trigger squeeze, techniques of firing, target engagement, combat reloading techniques, coaching, and safety, among others. Finally, the appendixes include a thorough explanation of the U.S. Army qualification courses and training schedules.
This compact guide will tell you everything you need to know about training with an M9 or M11 pistol. Loaded with illustrations and charts, this handbook shows as well as tells how to be the best pistol shooter in the Army.
U.S. Army Combat Pistol Training Handbook — читать онлайн бесплатно полную книгу (весь текст) целиком
Ниже представлен текст книги, разбитый по страницам. Система сохранения места последней прочитанной страницы, позволяет с удобством читать онлайн бесплатно книгу «U.S. Army Combat Pistol Training Handbook», без необходимости каждый раз заново искать на чём Вы остановились. Поставьте закладку, и сможете в любой момент перейти на страницу, на которой закончили чтение.
Интервал:
Закладка:
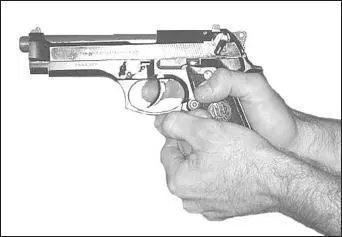
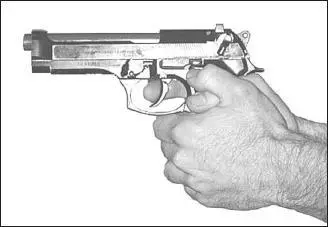
(3) Weaver Grip. Apply this grip the same as the fist grip. The only exception is that the nonfiring thumb is wrapped over the firing thumb (Figure 2-4).
c. Isometric Tension. The firer raises his arms to a firing position and applies isometric tension. This is commonly known as the push-pull method for maintaining weapon stability. Isometric tension is when the firer applies forward pressure with the firing hand and pulls rearward with the nonfiring hand with equal pressure. This creates an isometric force but never so much to cause the firer to tremble. This steadies the weapon and reduces barrel rise from recoil. The supporting arm is bent with the elbow pulled downward. The firing arm is fully extended with the elbow and wrist locked. The firer must experiment to find the right amount of isometric tension to apply.
NOTE:The firing hand should exert the same pressure as the nonfiring hand. If it does not, a missed target could result.
d. Natural Point of Aim. The firer should check his grip for use of his natural point of aim. He grips the weapon and sights properly on a distant target. While maintaining his grip and stance, he closes his eyes for three to five seconds. He then opens his eyes and checks for proper sight picture. If the point of aim is disturbed, the firer adjusts his stance to compensate. If the sight alignment is disturbed, the firer adjusts his grip to compensate by removing the weapon from his hand and reapplying the grip. The firer repeats this process until the sight alignment and sight placement remain almost the same when he opens his eyes. With sufficient practice, this enables the firer to determine and use his natural point of aim, which is the most relaxed position for holding and firing the weapon.
2-2. Aiming
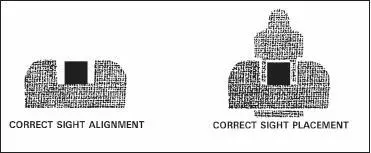
Aiming is sight alignment and sight placement (Figure 2-5).
a. Sight alignment is the centering of the front blade in the rear sight notch. The top of the front sight is level with the top of the rear sight and is in correct alignment with the eye. For correct sight alignment, the firer must center the front sight in the rear sight. He raises or lowers the top of the front sight so it is level with the top of the rear sight. Sight alignment is essential for accuracy because of the short sight radius of the pistol. For example, if a 1/10-inch error is made in aligning the front sight in the rear sight, the firer’s bullet will miss the point of aim by about 15 inches at a range of 25 meters. The 1/10-inch error in sight alignment magnifies as the range increases–at 25 meters, it is magnified 150 times.
b. Sight placement is the positioning of the weapon’s sights in relation to the target as seen by the firer when he aims the weapon (Figure 2-5). A correct sight picture consists of correct sight alignment with the front sight placed center mass of the target. The eye can focus on only one object at a time at different distances. Therefore, the last focus of the eye is always on the front sight. When the front sight is seen clearly, the rear sight and target will appear hazy. The firer can maintain correct sight alignment only through focusing on the front sight. His bullet will hit the target even if the sight picture is partly off center but still remains on the target. Therefore, sight alignment is more important than sight placement. Since it is impossible to hold the weapon completely still, the firer must apply trigger squeeze and maintain correct sight alignment while the weapon is moving in and around the center of the target. This natural movement of the weapon is referred to as wobble area. The firer must strive to control the limits of the wobble area through proper grip, breath control, trigger squeeze, and positioning.
c. Focusing on the front sight while applying proper trigger squeeze will help the firer resist the urge to jerk the trigger and anticipate the moment the weapon will fire. Mastery of trigger squeeze and sight alignment requires practice. Trainers should use concurrent training stations or have fire ranges to enhance proficiency of marksmanship skills.
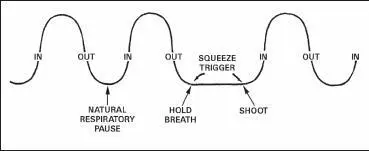
2-3. Breath Control
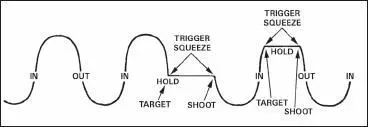
To attain accuracy, the firer must learn to hold his breath properly at any time during the breathing cycle. This must be done while aiming and squeezing the trigger. While the procedure is simple, it requires explanation, demonstration, and supervised practice. To hold his breath properly, the firer takes a breath, lets it out, then inhales normally, lets a little out until comfortable, holds, and then fires. It is difficult to maintain a steady position keeping the front sight at a precise aiming point while breathing. Therefore, the firer should be taught to inhale, then exhale normally, and hold his breath at the moment of the natural respiratory pause (Figure 2-6). (Breath control, firing at a single target.) The shot must then be fired before he feels any discomfort from not breathing. When multiple targets are presented, the firer must learn to hold his breath at any part of the breathing cycle (Figure 2-7). Breath control must be practiced during dry-fire exercises until it becomes a natural part of the firing process.
2-4. Trigger Squeeze
Improper trigger squeeze causes more misses than any other step of preparatory marksmanship. Poor shooting is caused by the aim being disturbed before the bullet leaves the barrel of the weapon. This is usually the result of the firer jerking the trigger or flinching. A slight off-center pressure of the trigger finger on the trigger can cause the weapon to move and disturb the firer’s sight alignment. Flinching is an automatic human reflex caused by anticipating the recoil of the weapon. Jerking is an effort to fire the weapon at the precise time the sights align with the target. For more on problems in target engagement, see paragraph 2-5.
a. Trigger squeeze is the independent movement of the trigger finger in applying increasing pressure on the trigger straight to the rear, without disturbing the sight alignment until the weapon fires. The trigger slack, or free play, is taken up first, and the squeeze is continued steadily until the hammer falls. If the trigger is squeezed properly, the firer will not know exactly when the hammer will fall; thus, he will not tend to flinch or heel, resulting in a bad shot. Novice firers must be trained to overcome the urge to anticipate recoil. Proper application of the fundamentals will lower this tendency.
b. To apply correct trigger squeeze, the trigger finger should contact the trigger between the tip of the finger and the second joint (without touching the weapon anywhere else). Where contact is made depends on the length of the firer’s trigger finger. If pressure from the trigger finger is applied to the right side of the trigger or weapon, the strike of the bullet will be to the left. This is due to the normal hinge action of the fingers. When the fingers on the right hand are closed, as in gripping, they hinge or pivot to the left, thereby applying pressure to the left (with left-handed firers, this action is to the right). The firer must not apply pressure left or right but should increase finger pressure straight to the rear. Only the trigger finger should perform this action. Dryfire training improves a firer’s ability to move the trigger finger straight to the rear without cramping or increasing pressure on the hand grip.
Читать дальшеИнтервал:
Закладка:
Похожие книги на «U.S. Army Combat Pistol Training Handbook»
Представляем Вашему вниманию похожие книги на «U.S. Army Combat Pistol Training Handbook» списком для выбора. Мы отобрали схожую по названию и смыслу литературу в надежде предоставить читателям больше вариантов отыскать новые, интересные, ещё непрочитанные произведения.


Обсуждение, отзывы о книге «U.S. Army Combat Pistol Training Handbook» и просто собственные мнения читателей. Оставьте ваши комментарии, напишите, что Вы думаете о произведении, его смысле или главных героях. Укажите что конкретно понравилось, а что нет, и почему Вы так считаете.