Gus Khawaja - Kali Linux Penetration Testing Bible
Здесь есть возможность читать онлайн «Gus Khawaja - Kali Linux Penetration Testing Bible» — ознакомительный отрывок электронной книги совершенно бесплатно, а после прочтения отрывка купить полную версию. В некоторых случаях можно слушать аудио, скачать через торрент в формате fb2 и присутствует краткое содержание. Жанр: unrecognised, на английском языке. Описание произведения, (предисловие) а так же отзывы посетителей доступны на портале библиотеки ЛибКат.

- Название:Kali Linux Penetration Testing Bible
- Автор:
- Жанр:
- Год:неизвестен
- ISBN:нет данных
- Рейтинг книги:4 / 5. Голосов: 1
-
Избранное:Добавить в избранное
- Отзывы:
-
Ваша оценка:
Kali Linux Penetration Testing Bible: краткое содержание, описание и аннотация
Предлагаем к чтению аннотацию, описание, краткое содержание или предисловие (зависит от того, что написал сам автор книги «Kali Linux Penetration Testing Bible»). Если вы не нашли необходимую информацию о книге — напишите в комментариях, мы постараемся отыскать её.
is a hands-on guide for getting the most from Kali Linux for pentesting. This book is for working cybersecurity professionals in offensive, hands-on roles, including red teamers, white hat hackers, and ethical hackers. Defensive specialists will also find this book valuable, as they need to be familiar with the tools used by attackers.
This is the most comprehensive pentesting book on the market, covering every aspect of the art and science of penetration testing. It covers topics like building a modern Dockerized environment, the basics of bash language in Linux, finding vulnerabilities in different ways, identifying false positives, and practical penetration testing workflows. You’ll also learn to automate penetration testing with Python and dive into advanced subjects like buffer overflow, privilege escalation, and beyond.
Gain a thorough understanding of the hundreds of penetration testing tools available in Kali Linux Master the entire range of techniques for ethical hacking, so you can be more effective in your job and gain coveted certifications Learn how penetration testing works in practice and fill the gaps in your knowledge to become a pentesting expert Discover the tools and techniques that hackers use, so you can boost your network’s defenses For established penetration testers, this book fills all the practical gaps, so you have one complete resource that will help you as your career progresses. For newcomers to the field,
is your best guide to how ethical hacking really works.
Kali Linux Penetration Testing Bible — читать онлайн ознакомительный отрывок
Ниже представлен текст книги, разбитый по страницам. Система сохранения места последней прочитанной страницы, позволяет с удобством читать онлайн бесплатно книгу «Kali Linux Penetration Testing Bible», без необходимости каждый раз заново искать на чём Вы остановились. Поставьте закладку, и сможете в любой момент перейти на страницу, на которой закончили чтение.
Интервал:
Закладка:
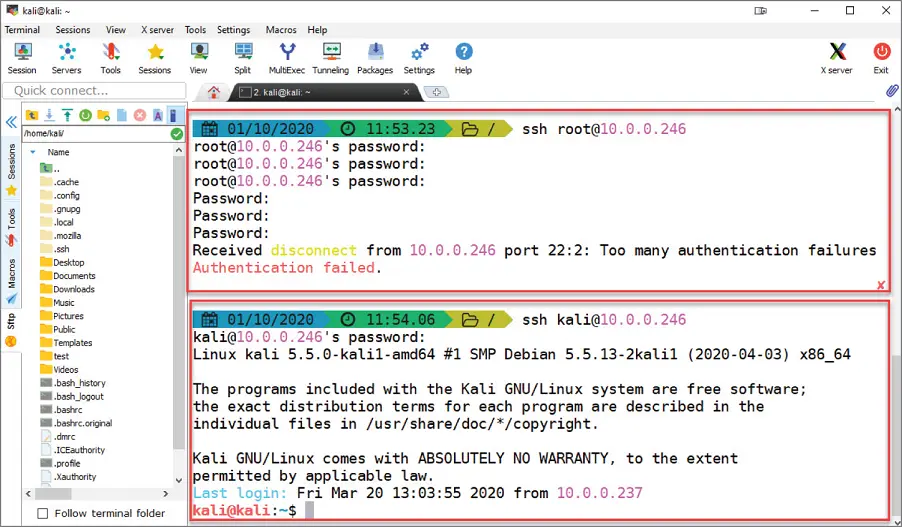
Figure 1.10SSH with MobaXterm on Windows
To allow the root user to log in remotely to SSH, you will need to edit the configuration file of SSH under this directory:
/etc/ssh/sshd_config
Make sure to add the following line to the SSH configuration file:
PermitRootLogin Yes
Now, we can try to connect to our Kali host remotely using the root account (it should work this time after the latest changes):
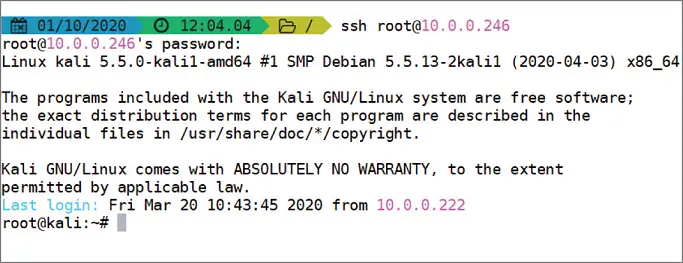
Figure 1.11 SSH Root Connection
Before you start using the SSH service on your Kali Linux, you will need to start the SSH service first. To do this, you will need to execute the following command:
$service ssh start
If you want to stop it later, use the following command:
$service ssh stop
If you want the SSH server to persist (automatically start) even after you reboot your system, then you will need to execute the following command:
$systemctl enable ssh
If you forgot the status (started or stopped) of your SSH server, then execute the following command to get the results shown in Figure 1.12:
$service ssh status 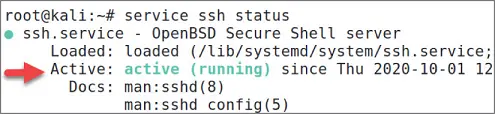
Figure 1.12SSH Service Status
By default, the port number of SSH is 22, and if the remote Linux server has changed to another port, then you will need to specify it in your connection command:
$ssh username@kaliIP -p [port number]
Passwordless SSH
Using a public key and a private key, a remote user can log in using SSH. This method is more secure than the password way because no one will be able to use the brute‐force technique to enter your server remotely.
There is a lot of misconception when it comes to the public/private keys mechanism. In the next steps, I developed an example from scratch so you can visualize how things happen in reality:
Here's the client machine information:
OS: Ubuntu Desktop Linux V20
IP:10.0.0.186
Here's the Kali Linux SSH Server host information:
OS: Kali Linux 2020.1
IP:10.0.0.246
First, we will generate a public key and a private key on our client host (Ubuntu). Why? The goal is to perform the following steps:
1 Generate a private key ( /home/[username]/.ssh/id_rsa ) on the client machine because it's the one that can decrypt the public key. If someone steals your public key, they can't hack into the remote host since they don't have the private key file.
2 Generate a public key ( /home/[username]/.ssh/id_rsa.pub ) on the client machine. We need to send a copy of the public key to the server. After that, the server will store the client's public key in a file called authorized_keys .
Let's start! On our client Ubuntu host, generate the public and private keys ( Figure 1.13):
$ssh-keygen -t rsa -b 4096
The previous command used two arguments:
‐t rsa : The t stands for the type of the key to generate. RSA is the most common one, but you have other options as well ( dsa , ecdsa , ecdsa‐sk , ed25519 , ed25519‐sk , and rsa ).
‐b 4096 : The b option specifies the number of bits in the key to create. In our case (RSA key), the minimum size is 1,024 bits, and the default is 3,072 bits.
Take note that while performing the earlier steps, we've been asked to enter a passphrase. This password will be used to add more security when you log in remotely to SSH.
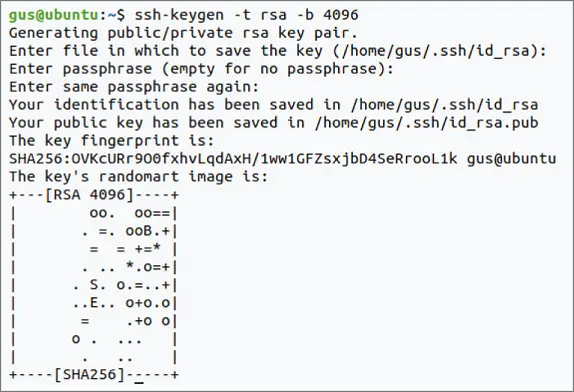
Figure 1.13SSH Key Generation
Let's check out the folder where these files were saved on the client's host machine ( /home/gus/.ssh/):
gus@ubuntu:~/.ssh$ ls -la total 16 drwx------ 2 gus gus 4096 Oct 1 10:03 . drwxr-xr-x 15 gus gus 4096 Oct 1 09:57 .. -rw------- 1 gus gus 3369 Oct 1 10:03 id_rsa -rw-r--r-- 1 gus gus 736 Oct 1 10:03 id_rsa.pub
Now we're ready to send a copy of the public key file id_rsa.pubto the Kali host machine. You can send it in multiple ways (e.g., by e‐mail, SFTP, SCP, etc.)
There is an easy, secure method using the SSH client package that comes with the SSH tool:
$ssh-copy-id username_on_kalihost@kaliIP
In the following example, we will use the root username and password (also, you will be asked for the password of this account) to copy the public key file:
gus@ubuntu:~/.ssh$ ssh-copy-id root@10.0.0.246 The authenticity of host '10.0.0.246 (10.0.0.246)' can't be established. ECDSA key fingerprint is SHA256:TA8zjlhAspZEc/3WZjyWRQBxzPfwJXE2X98JsMGnz6U. Are you sure you want to continue connecting (yes/no/[fingerprint])? yes /usr/bin/ssh-copy-id: INFO: attempting to log in with the new key(s), to filter out any that are already installed /usr/bin/ssh-copy-id: INFO: 1 key(s) remain to be installed -- if you are prompted now it is to install the new keys Password: Number of key(s) added: 1 Now try logging into the machine, with: "ssh 'root@10.0.0.246'" and check to make sure that only the key(s) you wanted were added.
Now, let's verify that the authorized key has really been added on the Kali host machine:
root@kali:~/.ssh# cat authorized_keys ssh-rsa AAAAB3NzaC1yc2EAAAADAQABAAACAQDNfvP6zEnKn55pY5hN8N34myD1XwwhS9JisvcR0qtXzM2957h9xeQMVVrUASA/xdwRObUak7wARZl+FY3pby5k+askzIgPIfqvU0lZJEpBtjobk6SdBha122pR3a72+Vh7f9hdgGQoqXeF3pyXfYOhFEJZ0s0SCFGc/MfI38pBrXCgzHXS28QxzpZnIg3/IwAcBIjbPYnszWSDqHplSFMpETPbHvPwUMU3RDGpvSgoscfyWchXzb97lViSk/zD2TbN2eSbm8k8txxIIZHq7LrAYHB8smvlFEHK6CNvIU+HU0NvvcwXmXviSCGcMAsNxzvEzEJf4U6RDhzbL85Id43VghhDYp1I7/D4euxPfs+Xt/qj6qaL4T66+KvfML3loCRg9zBo0z6sZbOGOUu6iMYguVW/lTqC+Hui/SZUV9Zt3Z2/c/hC8r8+9/SsauWXtFNC4mRTLKyeEluIdLe9USgxwtHB3uD7BgYNaC1hbgXsGdM1CoDrQS4TOLMaiq4gpIZE80dKFJTw3+EbIIj7SEPTKC6BmWZluOfYjkHDJ19qLKEGWuWqfwp6U9CW+i4f5cLoMFssafqs/uSw/u0FA6jt+ykMZ7jvbYJhHmOa4dOGrOd9PyGw8/MM2qVo2VrATvk12oIQWZwdFA8Fj1oKaGK1pFcngR+At10jL2y1mI4fJw== gus@ubuntu
Next, I will edit the SSH config file ( /etc/ssh/sshd_config) again on Kali to allow only public key authentication:
PubkeyAuthentication yes PasswordAuthentication no
TIP
To make sure that the changes are well propagated, it's better to restart the SSH server on Kali using this command:
$service ssh restart
It's time to test the SSH connection and see if it works remotely:
gus@ubuntu:~/.ssh$ ssh root@10.0.0.246 Linux kali 5.5.0-kali1-amd64 #1 SMP Debian 5.5.13-2kali1 (2020-04-03) x86_64 The programs included with the Kali GNU/Linux system are free software; the exact distribution terms for each program are described in the individual files in /usr/share/doc/*/copyright. Kali GNU/Linux comes with ABSOLUTELY NO WARRANTY, to the extent permitted by applicable law. Last login: Thu Oct 1 12:04:15 2020 from 10.0.0.222 root@kali:~#
Kali Linux System Management
Since you will be using Kali Linux as a penetration testing arsenal, then you must know how to handle its system, including how to start an Apache web server or check its status. The examples are endless. Don't worry, we will cover the most common scenarios that you'll encounter as a penetration tester later.
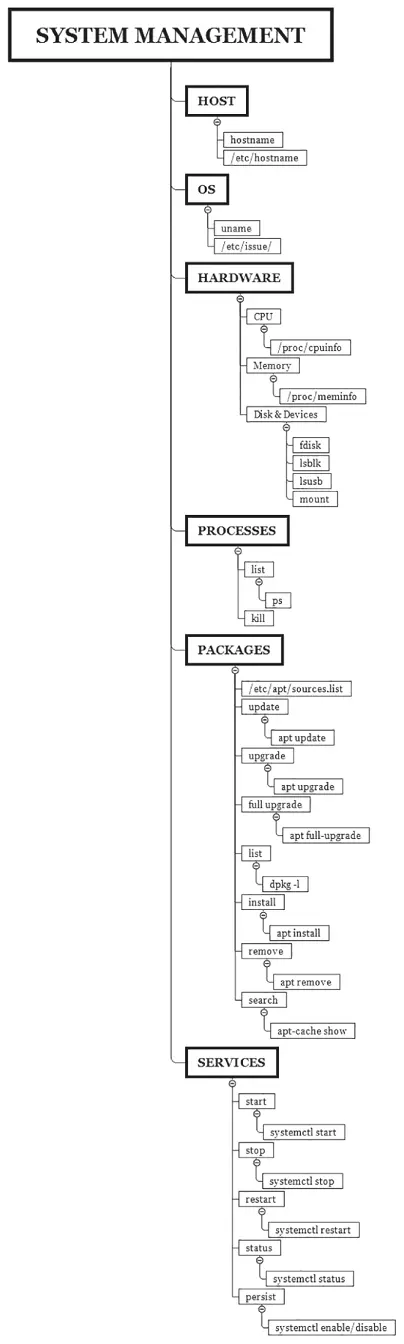
Figure 1.14 Kali System Management Commands
Читать дальшеИнтервал:
Закладка:
Похожие книги на «Kali Linux Penetration Testing Bible»
Представляем Вашему вниманию похожие книги на «Kali Linux Penetration Testing Bible» списком для выбора. Мы отобрали схожую по названию и смыслу литературу в надежде предоставить читателям больше вариантов отыскать новые, интересные, ещё непрочитанные произведения.


Обсуждение, отзывы о книге «Kali Linux Penetration Testing Bible» и просто собственные мнения читателей. Оставьте ваши комментарии, напишите, что Вы думаете о произведении, его смысле или главных героях. Укажите что конкретно понравилось, а что нет, и почему Вы так считаете.