Janice VanCleave - Janice VanCleave's Physics for Every Kid
Здесь есть возможность читать онлайн «Janice VanCleave - Janice VanCleave's Physics for Every Kid» — ознакомительный отрывок электронной книги совершенно бесплатно, а после прочтения отрывка купить полную версию. В некоторых случаях можно слушать аудио, скачать через торрент в формате fb2 и присутствует краткое содержание. Жанр: unrecognised, на английском языке. Описание произведения, (предисловие) а так же отзывы посетителей доступны на портале библиотеки ЛибКат.
- Название:Janice VanCleave's Physics for Every Kid
- Автор:
- Жанр:
- Год:неизвестен
- ISBN:нет данных
- Рейтинг книги:5 / 5. Голосов: 1
-
Избранное:Добавить в избранное
- Отзывы:
-
Ваша оценка:
Janice VanCleave's Physics for Every Kid: краткое содержание, описание и аннотация
Предлагаем к чтению аннотацию, описание, краткое содержание или предисловие (зависит от того, что написал сам автор книги «Janice VanCleave's Physics for Every Kid»). Если вы не нашли необходимую информацию о книге — напишите в комментариях, мы постараемся отыскать её.
Janice VanCleave's Physics for Every Kid: Easy Activities That Make Learning Science Fun, 2nd Edition
Physics for Every Kid
Physics for Every Kid
Janice VanCleave's Physics for Every Kid — читать онлайн ознакомительный отрывок
Ниже представлен текст книги, разбитый по страницам. Система сохранения места последней прочитанной страницы, позволяет с удобством читать онлайн бесплатно книгу «Janice VanCleave's Physics for Every Kid», без необходимости каждый раз заново искать на чём Вы остановились. Поставьте закладку, и сможете в любой момент перейти на страницу, на которой закончили чтение.
Интервал:
Закладка:
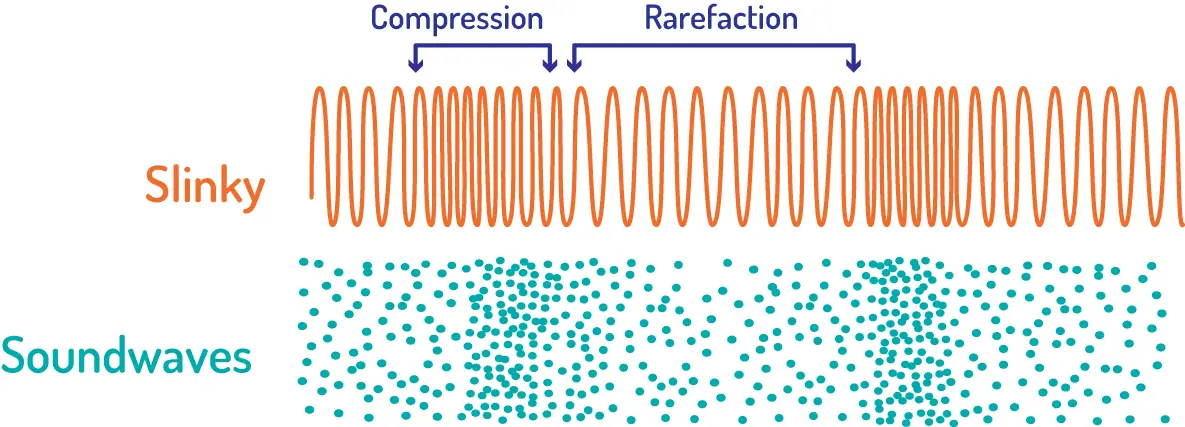
FIG 3
5 Pressure Waves
Sound wavesare also called pressure wavesbecause they increase and decrease in pressure as they move through a medium. An area where the pressure is greatest and the medium is squeezed together is called compression. An area of decreased pressure, where the medium is stretched out, is called rarefaction. Sound waves are initiated when a force (a push or pulling motion) is applied to a medium that can vibrate, meaning to move back and forth. Vibrating objects give surrounding air molecules a push, which starts a pressure wave that moves out in all directions like the ripples in a pond.
Blowing across the open mouth of an empty bottle starts a pressure wave in the bottle causing the air inside to vibrate. The air in the bottle will vibrate at a specific frequency, called its natural frequency, and the sound produced will be specific to that frequency. The height of the air column in an empty bottle is measured from the top of the bottle to its bottom. Adding water to the bottle will shorten the height of this air column. The sound waves bounce off the surface of the water in much the same way as they bounce off the bottom of the bottle. Thus, the sound heard depends on the height of the air column. As the height of the column decreases, the frequency of the sound produced increases. The highness or lowness of the sound, called the pitch, is directly related to the frequency of the sound.

FIG 1
See for Yourself
Materials
6 empty water bottles, same size and shape
water
What to Do
1 Support each empty bottle with your hand, and then blow across the top of each one.
2 Compare the sounds made by each bottle.
3 Change the height of the air column inside each bottle by adding varying amounts of water and compare the sounds that are produced.
What Happened?
The results of this experiment confirmed that as the height of a vibrating air column, which is closed at one end, decreases, the frequency of the sound produced increases. It also confirmed that the pitch of sound is directly related to the frequency of the sound. The lower the frequency, the lower the pitch, and vice versa. The empty bottle produces the lowest pitched sound because it has the air column with the greatest height; thus, the sound produced has the lowest frequency. By increasing the quantity of water added to the bottles, the height of the air column in each bottle was shortened, increasing the frequency of the sound waves, and so higher pitched sounds were produced.
6 Pitch
Pitch isa property of sound. Pitch describes the highness or lowness of a sound. The frequency of sound waves determines the pitch heard. Remember, sound is how pressure waves entering your ears are perceived by your brain. Not everyone perceives a specific sound the same. But all can agree that the lower the frequency, the lower the pitch, and the higher the frequency, the higher the pitch. Pitch has nothing to do with the loudness or softness of a sound.
A flute made from a drinking straw is a simple homemade instrument that, like all wind instruments, vibrates at a specific frequency. The source of the pressure wave that starts the air vibrating is the reed at one open end. The reedis made to vibrate by blowing on it. A straw flute is made with a double reed, consisting of two parts that vibrate, which sends a pressure wave into the straw causing an air column in the open tube to vibrate. The longer the straw, the longer the air column inside and the lower the frequency. This means a longer straw will produce a lower pitch. Conversely, decrease the length of the straw and there is an increase in both the frequency and pitch.
See for Yourself
Materials
bendy drinking straw
scissors
ruler
marking pen
helper
What to Do
1 With your fingers, flatten the short end above the accordion folds in the straw.
2 Figure 1has marks indicating where to cut the straw to form the reed part of the straw flute. Once the two cuts have been made, cut the sharp point off to blunt the end. FIG 1
3 Moisten your lips, then place the reed in your mouth past your teeth and blow. If the flute is not producing sound, try drawing in the lips around the teeth rather than puckering them. Slightly lifting or lowering the straw flute can also help. Don't be too quick to give up. It might take a few tries to reach the goal of making a sound.FIG 2
4 Once you have mastered playing the straw flute, ask your helper to cut small sections off the end of the straw as you continue testing the straw flute.
What Happened?
The length of the straw component of the flute affects the sound frequency. A shorter straw will have a higher frequency. The higher the frequency, the higher the pitch of the sound produced. Thus, as the straw was shortened, it produced a sound with a higher pitch.
7 Sound Transmission
Sound transmissionis the movement of sound energy via longitudinal waves. In most cases, sound travels slowest in gases, faster in liquids and fastest in solids. Sounds are loudest near the source. Sound waves are produced by a vibrating object. Figure 1shows how sound waves move out from a sound source through air. Notice that closest to the sound source, the compressed areas are very dark, but fade in color with distance from the speaker. The diagram shows that the spacing between the dark areas doesn't change. The equal spacing in the diagram illustrates that the frequency of sound doesn't change with distance, only the amplitudeor energy of the wave decreases. Thus, the sound would be the loudest at position A, and softest at position C. This relationship is true with all sound waves. Also, the energy of the sound would travel farther through a solid than in air.

FIG 1
See for Yourself
Materials
2 metal spoons
string, 3 yards (1.8 m)
helper
What to Do
1 Tie the string around the handle of one of the spoons so the two ends of the string are about the same length.
2 Wrap the ends of the string around your index fingers. Let the string and spoon hang in a V shape.
3 Extend your arms in front of you as shown in Figure 2so the spoon hangs freely without touching anything. FIG 2
4 Ask your helper to use the second spoon to gently tap the hanging spoon ( Figure 3). Make note of the sound produced by the spoon. FIG 3
5 Stick your index fingers in your ears and lean forward so the hanging spoon dangles freely. Check to make sure the string is not touching any object.
6 Again, ask your helper to tap the spoon as before. Compare the two sounds.
What Happened?
Everything that vibrates sends out sound waves through the air in all directions. The frequency or pitch of the sound was the same each time the spoon was tapped. But, the amplitude, or loudness, of the sound was greater with your fingers and the string pressed into your ears. This is because when traveling through air, the sound waves move slower than when they travel through a solid. Thus, more sound waves reached your ears when they traveled up the string to your ears. Also, the string provided a direct route for the sound from the vibrating spoon to your ears.
Читать дальшеИнтервал:
Закладка:
Похожие книги на «Janice VanCleave's Physics for Every Kid»
Представляем Вашему вниманию похожие книги на «Janice VanCleave's Physics for Every Kid» списком для выбора. Мы отобрали схожую по названию и смыслу литературу в надежде предоставить читателям больше вариантов отыскать новые, интересные, ещё непрочитанные произведения.


Обсуждение, отзывы о книге «Janice VanCleave's Physics for Every Kid» и просто собственные мнения читателей. Оставьте ваши комментарии, напишите, что Вы думаете о произведении, его смысле или главных героях. Укажите что конкретно понравилось, а что нет, и почему Вы так считаете.