Rob Sylvan - Adobe Photoshop Lightroom Classic For Dummies
Здесь есть возможность читать онлайн «Rob Sylvan - Adobe Photoshop Lightroom Classic For Dummies» — ознакомительный отрывок электронной книги совершенно бесплатно, а после прочтения отрывка купить полную версию. В некоторых случаях можно слушать аудио, скачать через торрент в формате fb2 и присутствует краткое содержание. Жанр: unrecognised, на английском языке. Описание произведения, (предисловие) а так же отзывы посетителей доступны на портале библиотеки ЛибКат.
- Название:Adobe Photoshop Lightroom Classic For Dummies
- Автор:
- Жанр:
- Год:неизвестен
- ISBN:нет данных
- Рейтинг книги:5 / 5. Голосов: 1
-
Избранное:Добавить в избранное
- Отзывы:
-
Ваша оценка:
Adobe Photoshop Lightroom Classic For Dummies: краткое содержание, описание и аннотация
Предлагаем к чтению аннотацию, описание, краткое содержание или предисловие (зависит от того, что написал сам автор книги «Adobe Photoshop Lightroom Classic For Dummies»). Если вы не нашли необходимую информацию о книге — напишите в комментариях, мы постараемся отыскать её.
Adobe
Photoshop Lightroom Classic For Dummies
Adobe
Photoshop Lightroom Classic For Dummies
Adobe Photoshop Lightroom Classic For Dummies — читать онлайн ознакомительный отрывок
Ниже представлен текст книги, разбитый по страницам. Система сохранения места последней прочитанной страницы, позволяет с удобством читать онлайн бесплатно книгу «Adobe Photoshop Lightroom Classic For Dummies», без необходимости каждый раз заново искать на чём Вы остановились. Поставьте закладку, и сможете в любой момент перейти на страницу, на которой закончили чтение.
Интервал:
Закладка:
Reading Metadata: It is possible to create structure or hierarchies in your keywords (that is, you might have a keyword “Animal” and then under it, you would nest all the types of animals in your photos). No single standard exists for what character must be used to separate hierarchical keywords when they are written into a file’s metadata. Lightroom Classic automatically recognizes the | (pipe) character between two words as a means to denote structure, but if you use other programs that use either a . (dot) or a / (slash) as a keyword separator, check the respective boxes in the preferences; Lightroom Classic respects your choice during import so that your keyword structure is maintained.
File Name Generation: Different operating systems and even different applications can have problems with certain characters being used within filenames. The settings in the File Name Generation section allow you to configure how Lightroom Classic responds to these characters when it encounters them in a filename. Here’s what I recommend for creating a consistent and bombproof approach to dealing with problematic filenames:Choose the largest set of characters to treat as illegal.Choose either dashes or underscores to be used as a replacement character when an illegal character is encountered.Don’t sweat spaces in filenames (leave as-is).
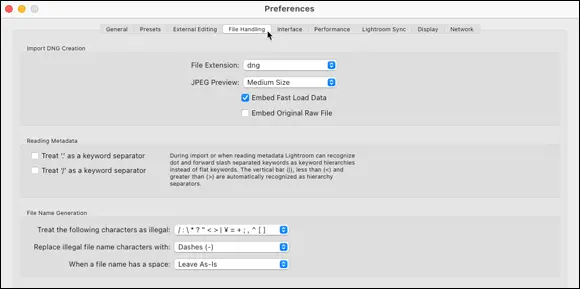
FIGURE 3-3:The File Handling preferences.
The Interface preferences
Although some of the Interface preferences, as shown in Figure 3-4, are entirely cosmetic, other settings in this panel are really useful:
Panels: I’ll leave the Panels End Marks decision up to your own sense of flair, but when this option is enabled, these little decorative icons will appear at the bottom of the panel groups in each module. For the most part you won’t notice them after a while (set to none by default). In regard to panel font size, if you’re finding the panel text a little on the small side, you can try bumping Font Size up a notch (will take effect the next time you start).
Lights Out: I go over the Lights Out function in Chapter 1, but here are its configuration settings. The Dim Level controls how much the Screen Color changes at the first level of dimming (at 80% you can just make out the interface). The defaults work well, but you can increase or decrease the first dim level amount by changing the percentage, or change the color used to hide the interface to different shades of gray.
Background: The area around the photo — but inside the panels — is called the background. The default color is medium gray because that’s a neutral color that will have the least influence on how you perceive the colors in your photo. You might try different colors, but I think you’ll come back to the default.
Keyword Entry: Choose to have keywords separated by commas or spaces. My suggestion is to use commas so that you can have multi-word keywords (such as New Hampshire ).
Filmstrip: When it comes to the Filmstrip settings, I prefer to keep all these options checked. I like being able to see ratings, picks, and badges (small icons that appear if keywords, cropping, or develop settings have been applied to a photo) on the thumbnails in the Filmstrip. The Image Info tooltips are a great way to see the filename, capture date and time, and dimensions; just hover over an image with your cursor. The most helpful option is to check Ignore Clicks on Badges so that you don’t inadvertently click a badge when trying to select a photo and end up jumping to the Crop tool or wherever the badge takes you. FIGURE 3-4:The Interface preferences.
Tweaks: The Tweaks section is the one area of the Interface panel where you’ll see a slight difference between Windows and Mac. On the Mac, you find an option to use typographic fractions, but if you wander over to a Windows machine, you find that such fractions aren’t available. Therefore, Mac users can have their exposure fractions expressed in a much cuter manner. Don’t take this as an unassailable argument for switching platforms, however; Windows users have a tweak that Mac does not — the Use System Preference for Font Smoothing option. What it means is that Lightroom Classic, in Windows, applies font smoothing (meaning it literally makes the edges of screen fonts appear smoother and rounder) independently of the operating system. If you intentionally turned off font smoothing at the operating system level (some people don’t like the smooth look) and want Lightroom Classic to follow suit, check the Use System Preference for Font Smoothing box. Not to be outdone, a new option was recently added only to Macs, which is Swipe Between Images Using Mouse/Trackpad. This makes for one more (very fast) way to scroll the Filmstrip, and hardly one more reason to switch platforms. Uncheck if you find the speed too dizzying.Both operating systems have a setting in common, though — Zoom Clicked Point to Center. When you check this option, Lightroom Classic zooms in and shifts the point you clicked to the center of the screen. I prefer to leave this option unchecked because when I click to zoom in, I want the point I clicked to remain under my cursor. When Zoom Clicked Point to Center is enabled, the point you click will instead zoom and shift to the center. Give it a test drive, but I think you’ll agree unchecked is better.
The Performance preferences
One of the most requested areas of improvement in Lightroom Classic has been performance. To that end, Adobe makes pretty regular updates in this regard. Here on the Performance preferences, as shown in Figure 3-5, you can tweak a few things to get Lightroom Classic working at its best possible performance (be sure to click the More Performance Tips link embedded at the bottom of the panel too):
Use Graphics Processor: As long as you have recent hardware and have installed up-to-date drivers for it, you can leave this option set to Auto, but to get the most boost from your computer’s GPU in Develop and even when rendering previews in Library, click the drop-down menu and choose Custom. However, if you notice weird display issues or performance slowdowns, set this to Off to see if that makes an improvement.
Camera Raw Cache Settings: The intended purpose of any cache is to store (usually temporarily) frequently accessed data to speed up the processes that require that data to function. In this case, Lightroom Classic shares a cache with Adobe Camera Raw, with the primary purpose of helping Lightroom Classic reopen files in the Develop module faster. Keeping a cache size of 5-10GB strikes a good compromise between size of the cache and benefit from its use. If you have a drive with a lot of free space, you can click Choose and select a different disk.
Video Cache Settings: This setting can be left at the default.
Enable Hover Preview of Presets in Loupe: You can see a live preview of any preset as you hover your cursor over it in the Presets panel. Some people find it distracting or even a performance hit. Uncheck if the feature bothers you because the Navigator panel still shows the preview.
Use Smart Previews Instead of Originals for Image Editing: This is a tradeoff between improving performance and image quality when editing. On a high-powered computer, I would leave this unchecked, but if your machine seems to be struggling when editing, you might enable this setting to see whether it helps.
Generate Previews in parallel: If you have a quad-core CPU (or higher), you can check this box and have Lightroom Classic create multiple previews in parallel instead of just one at a time. In theory, higher-horsepowered machines should see much faster preview rendering.
Читать дальшеИнтервал:
Закладка:
Похожие книги на «Adobe Photoshop Lightroom Classic For Dummies»
Представляем Вашему вниманию похожие книги на «Adobe Photoshop Lightroom Classic For Dummies» списком для выбора. Мы отобрали схожую по названию и смыслу литературу в надежде предоставить читателям больше вариантов отыскать новые, интересные, ещё непрочитанные произведения.


Обсуждение, отзывы о книге «Adobe Photoshop Lightroom Classic For Dummies» и просто собственные мнения читателей. Оставьте ваши комментарии, напишите, что Вы думаете о произведении, его смысле или главных героях. Укажите что конкретно понравилось, а что нет, и почему Вы так считаете.