Doug Abbott - Embedded Linux development using Eclipse
Здесь есть возможность читать онлайн «Doug Abbott - Embedded Linux development using Eclipse» весь текст электронной книги совершенно бесплатно (целиком полную версию без сокращений). В некоторых случаях можно слушать аудио, скачать через торрент в формате fb2 и присутствует краткое содержание. Год выпуска: 2009, ISBN: 2009, Издательство: Elsevier, Жанр: Программирование, ОС и Сети, Программы, на английском языке. Описание произведения, (предисловие) а так же отзывы посетителей доступны на портале библиотеки ЛибКат.
- Название:Embedded Linux development using Eclipse
- Автор:
- Издательство:Elsevier
- Жанр:
- Год:2009
- ISBN:978-0-7506-8654-9
- Рейтинг книги:4 / 5. Голосов: 1
-
Избранное:Добавить в избранное
- Отзывы:
-
Ваша оценка:
Embedded Linux development using Eclipse: краткое содержание, описание и аннотация
Предлагаем к чтению аннотацию, описание, краткое содержание или предисловие (зависит от того, что написал сам автор книги «Embedded Linux development using Eclipse»). Если вы не нашли необходимую информацию о книге — напишите в комментариях, мы постараемся отыскать её.
• Overview of the latest C/C++ Development toolkit
• Includes case studies of eclipse use including Monta Vista, LynuxWorks, and WindRiver
Embedded Linux development using Eclipse — читать онлайн бесплатно полную книгу (весь текст) целиком
Ниже представлен текст книги, разбитый по страницам. Система сохранения места последней прочитанной страницы, позволяет с удобством читать онлайн бесплатно книгу «Embedded Linux development using Eclipse», без необходимости каждый раз заново искать на чём Вы остановились. Поставьте закладку, и сможете в любой момент перейти на страницу, на которой закончили чтение.
Интервал:
Закладка:
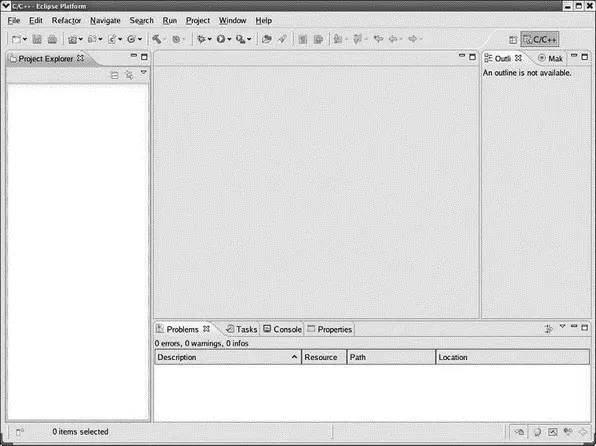
Figure 3.3: Empty workbench.
Across the top of the workbench window is a menu bar with familiar entries such as File, Edit, Search, Window, and Help, as well as some menus specific to Eclipse like Refactor, Navigate, Run, and Project. Below that is a tool bar whose icons may change depending on which perspective is visible and which view or editor has the focus. The visible perspective is changed by clicking the button  at the far right of the tool bar. Eclipse CDT offers three default perspectives: C/C++that is currently visible, Debug, and Team Synchronizing. Two other perspectives are available by selecting the Other…. button, CVS Repository Exploring, and Resource.
It is helpful to have a project open in order to discuss Eclipse basic concepts. Select File→New→C Project. In the Project name: field enter “hello”. Under Project types: click the right arrow next to Executableand select Hello World ANSI C Project(see Figure 3.4). Click Nextto bring up the Basic Settings dialog. Enter your name as the Author and change the Copyright notice and Hello world greeting, if you choose. Click Finish. The Project Explorer window on the left side of the workbench now shows some information about the hello project.
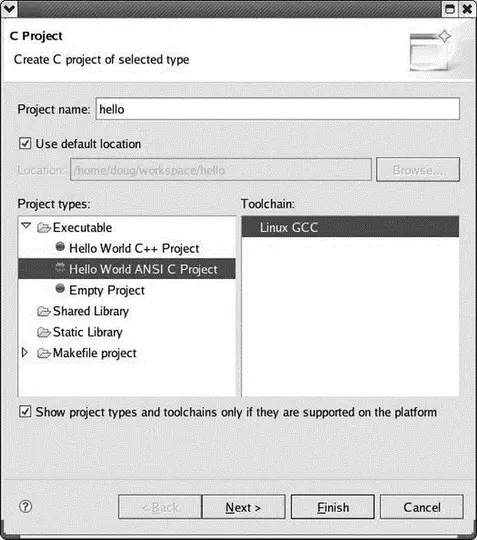
Figure 3.4: New project dialog.
3.3 Perspectives, Editors, and Views
The Workbench window contains one or more Perspectives that are, in turn, collections of Views and Editors. A Perspective defines an initial set of views, and the layout of those views, to accomplish some specific task on a particular set of resources, or files. The workbench is currently displaying the C/C++ perspective typical of Eclipse CDT.
A workbench may have several perspectives open, but only one perspective is visible in a window. To make additional perspectives visible, open additional windows using the Window→New Windowcommand.
The large space in the center of the workbench is the Editor . As you might expect, the editor allows you to open, modify, and save files. The editor window is the central feature of virtually all Eclipse perspectives. Different editors can be associated with different file types. Opening a file then starts up the corresponding editor, which may also change the contents of the menu and tool bars. The editor associated with C source files has a number of useful features that we’ll look at shortly.
Multiple files can be open in the editor and are identified by tabs across the top of the editor window. An asterisk, “*”, indicates the file has unsaved changes. Clicking the “X” icon to the right of the file name in the currently visible tab closes the file.
Views support editors and provide alternative presentations of the information in a project as well as ways to navigate that information. Views most often appear in tabbed stacks to the right and left of the editor window and sometimes beneath it. Icons on the right end of the tab bar allow the currently visible view in that stack to be minimized or maximized. Views also have their own menus represented by the down arrow icon at the far right of the view tab. Frequently used menu items may be represented by other icons in the tab.
Figure 3.5 is an example of the view menu for the Project Explorer view. The menu items are primarily concerned with how the view is displayed.

Figure 3.5: Project Explorer view menu.
A view can be moved around anywhere in the Workbench by dragging its title bar. As you move the view around, the mouse pointer changes to one of the drop cursors shown in Figure 3.6. This indicates where the view will be docked if you release the mouse. Try it with the Outline view on the right.
| Drop cursor | Where the view will be moved to |
|---|---|
| ↑ | Dock above: The view is docked above the view underneath the cursor. |
| ↓ | Dock below: The view is docked below the view underneath the cursor. |
| → | Dock to the right: The view is docked to the right of the view underneath the cursor. |
| ← | Dock to the left: The view is docked to the left of the view underneath the cursor. |
 |
Stack: The view is docked as a Tab in the same pane as the view underneath the cursor. |
 |
Detached: The view is detached from the Workbench window and is shown in its own separate window |
 |
Restricted: You cannot dock the view in this area. |
Figure 3.6: Drop cursor icons.
The default C/C++ perspective displays the Project Explorerview on the left and an Outlineview on the right. The Project Explorer provides a hierarchical view of the resources contained in a project. It allows for adding or importing new files or directories, deleting or exporting files, and opening files for editing. The Outline view displays an outline of the structural elements of the file currently visible in the editor window. Since we don’t currently have a file open in the editor, the Outline view is empty. Click the arrow to the left of the project name in the Project Explorer to expand the project. Then expand the srcentry to reveal the file hello.c. Either double-click on hello.cor right-click and select Open. The source file shows up in the editor and there’s now something in the Outline view on the right (Figure 3.7).
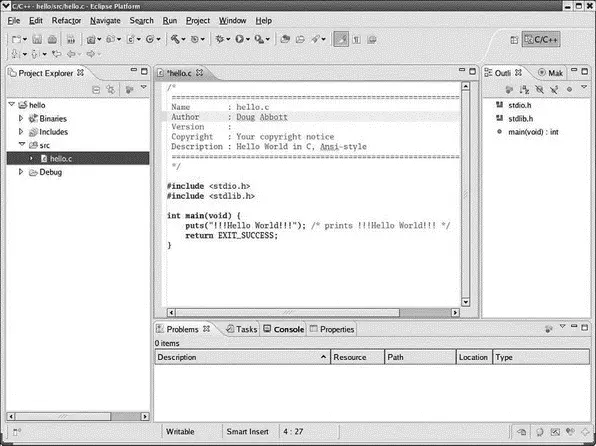
Figure 3.7: hello.c in editor window.
Note first of all that the editor, like any good programming language editor, employs syntax coloring. Click just to the right of the opening brace in main and note that the closing brace is highlighted. Try the same thing with the left parenthesis of the putsstatement.
With the cursor located anywhere in the main function, the vertical bar on the left, known as the marker bar , shows the extent of main. The same thing happens if you click on main in the Outline view.
Roll your mouse over puts. A help window pops up showing the function declaration from the header file along with any comments associated with that declaration.
It’s also worth noting that as soon as you created the hello project, Eclipse built it using the default gcc compiler. The results of the build are shown in the Consoleview below the editor. This brings us to a discussion of all four of the views that normally appear below the editor.
3.3.1 Problems View
Интервал:
Закладка:
Похожие книги на «Embedded Linux development using Eclipse»
Представляем Вашему вниманию похожие книги на «Embedded Linux development using Eclipse» списком для выбора. Мы отобрали схожую по названию и смыслу литературу в надежде предоставить читателям больше вариантов отыскать новые, интересные, ещё непрочитанные произведения.


Обсуждение, отзывы о книге «Embedded Linux development using Eclipse» и просто собственные мнения читателей. Оставьте ваши комментарии, напишите, что Вы думаете о произведении, его смысле или главных героях. Укажите что конкретно понравилось, а что нет, и почему Вы так считаете.