Doug Abbott - Embedded Linux development using Eclipse
Здесь есть возможность читать онлайн «Doug Abbott - Embedded Linux development using Eclipse» весь текст электронной книги совершенно бесплатно (целиком полную версию без сокращений). В некоторых случаях можно слушать аудио, скачать через торрент в формате fb2 и присутствует краткое содержание. Год выпуска: 2009, ISBN: 2009, Издательство: Elsevier, Жанр: Программирование, ОС и Сети, Программы, на английском языке. Описание произведения, (предисловие) а так же отзывы посетителей доступны на портале библиотеки ЛибКат.
- Название:Embedded Linux development using Eclipse
- Автор:
- Издательство:Elsevier
- Жанр:
- Год:2009
- ISBN:978-0-7506-8654-9
- Рейтинг книги:4 / 5. Голосов: 1
-
Избранное:Добавить в избранное
- Отзывы:
-
Ваша оценка:
Embedded Linux development using Eclipse: краткое содержание, описание и аннотация
Предлагаем к чтению аннотацию, описание, краткое содержание или предисловие (зависит от того, что написал сам автор книги «Embedded Linux development using Eclipse»). Если вы не нашли необходимую информацию о книге — напишите в комментариях, мы постараемся отыскать её.
• Overview of the latest C/C++ Development toolkit
• Includes case studies of eclipse use including Monta Vista, LynuxWorks, and WindRiver
Embedded Linux development using Eclipse — читать онлайн бесплатно полную книгу (весь текст) целиком
Ниже представлен текст книги, разбитый по страницам. Система сохранения места последней прочитанной страницы, позволяет с удобством читать онлайн бесплатно книгу «Embedded Linux development using Eclipse», без необходимости каждый раз заново искать на чём Вы остановились. Поставьте закладку, и сможете в любой момент перейти на страницу, на которой закончили чтение.
Интервал:
Закладка:
• Word Completion (Alt + /): Attempts to complete the word currently being entered in the active editor.
• Quick fix: Supposedly offers suggestions on correcting certain errors when the cursor is on a line that has an error. Unfortunately, the only thing I’ve seen so far is “No suggestions available.”
• Content Assist: Opens a dialog at the current cursor location to offer assistance in the form of proposals and templates. The templates can be configured through the Window menu at Window→Preferences→C/C++→C/C++ Editor→Content Assist.
• Parameter Hints: Displays the parameter portion of a function prototype.
• Format: Reformats a source file to match the currently selected coding style.
3.4.3 Refactor Menu
There’s only one item in the Refactor menu: Rename. This is a way to rename a selected object and have the change propagated through the entire project.
3.4.4 Navigate Menu
As the name implies, this menu helps you navigate through a large project in a number of different ways. We’ll look at many of these menu items in more detail in the next chapter, where we get into C programming:
• Open Type Hierarchy: Displays the Type Hierarchy view for the selected object, provided the object resolves to a defined type.
• Open Call Hierarchy: Displays the Call Hierarchy view for the selected function. The Call Hierarchy can show which functions call this function, and which functions this function calls.
• Open Declaration: Opens the declaration of the selected object: a function, variable, class, type, etc.
• Open Resource: Displays a dialog allowing you to select any resource in the workspace to open in an editor.
• Last Edit Location: Moves the cursor to the line that contains the most recent edit.
• Go to Line: Displays a dialog to specify a line number to which to move the cursor.
3.4.5 Search Menu
The Search menu offers three different ways to search for text, represented by four menu items. Figure 3.13 shows the C/C++ search dialog that allows you to search for text in specific language elements. The scope of the search can be the entire workspace or the set of resources selected in the Project Explorer view. The results of the search appear in the Search view.
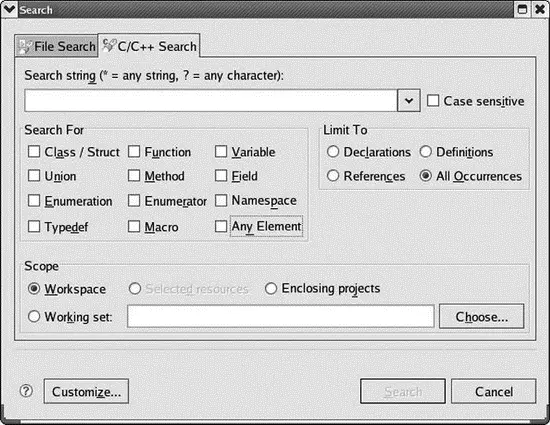
Figure 3.13: C/C++ Search dialog.
Figure 3.14 shows the File search dialog. Here you can search for a text string, a regular expression, and/or a file name pattern. Again, the search can encompass the entire workspace or only selected resources, and the results of the search appear in the Search view.
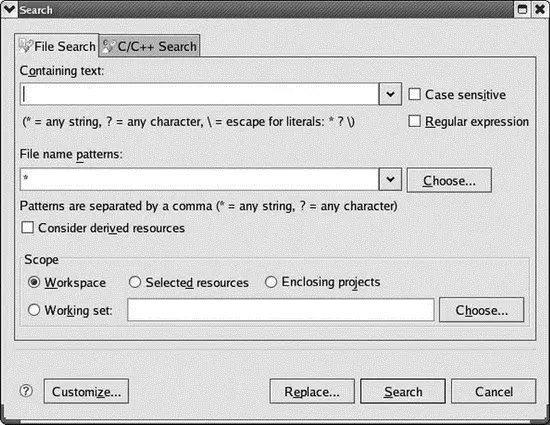
Figure 3.14: File Search dialog.
Finally, with the cursor set in any word, you can select Search→Textand immediately see the Search view with a list of the files containing the selected text.
3.4.6 Project Menu
The Project menu is concerned, perhaps not surprisingly, with managing projects, which is in fact the primary organizing principle of Eclipse. The menu includes items for opening and closing projects, building projects, and making specific targets.
Select the hello project in the Project Explorer view and click the Project menu. Menu items include:
• Close Project: Closes the selected project(s). Any project files open in editors are closed and the hierarchy in the Project Explorer view is collapsed.
• Open Project: A project that was previously closed can be opened. Note that the Project Explorer view must have the focus for Openand Closeto be active.
• Build All: Builds all projects in the workspace. Currently there’s only one, the “hello” project. Clicking Build Allnow will probably result in the message “Nothing to be done for ‘all’” since the project has already been built. This is a full build, that is, all files are built.
• Build Project: Builds the project currently selected in the Project Explorer view. This is a full build.
• Build Configurations: Allows you to set the active configuration, either Debugor Release. Build Alland Build Projectbuild the active configuration.
• Clean: Cleans either all projects or selected projects, as determined by a dialog. The selected projects are then rebuilt.
• Build Working Set: If you have created one or more working sets you can have Eclipse just build the selected working set. We’ll look at working sets in the next chapter.
• Build Automatically: If this item is checked then the project is automatically rebuilt any time a project file is saved. This is probably not a very good idea for very large projects.
• Make Target: Opens a submenu that allows you to create and then build additional make targets. We’ll look at this is in the next chapter.
• Properties: Opens a rather extensive properties dialog, an example of which is shown in Figure 3.15. This particular tab sets options for the gcc compiler and linker. These settings are for the selected configuration.
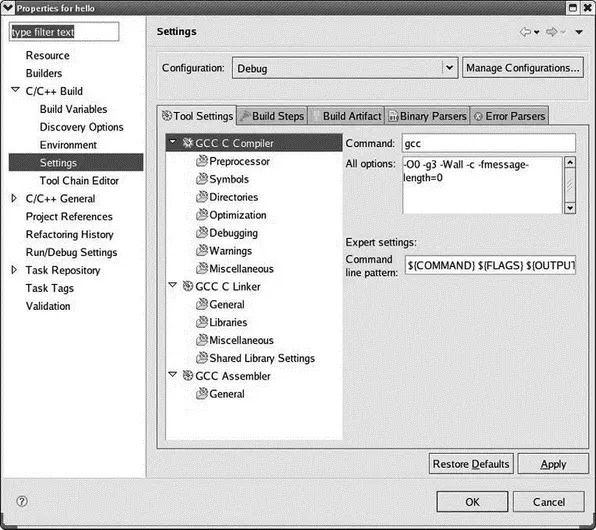
Figure 3.15: Project properties dialog.
3.4.7 Run Menu
Having built a project, the next thing we probably want to do is run or debug it. Eclipse runs projects from a launch configuration that specifies the program to run, its arguments and environment, and how the program connects to Eclipse (i.e., is it a local process or is it running remotely on a target board of some sort?). A launch configuration also specifies the debugger and how it connects to Eclipse.
Before we run or debug a project, we must first create a launch configuration. Click on Run→Run Configurations…. Click the Newbutton, the one farthest to the left in the left-hand panel, to create a new configuration under “C/C++ Local Application.” This brings up the dialog shown in Figure 3.16.
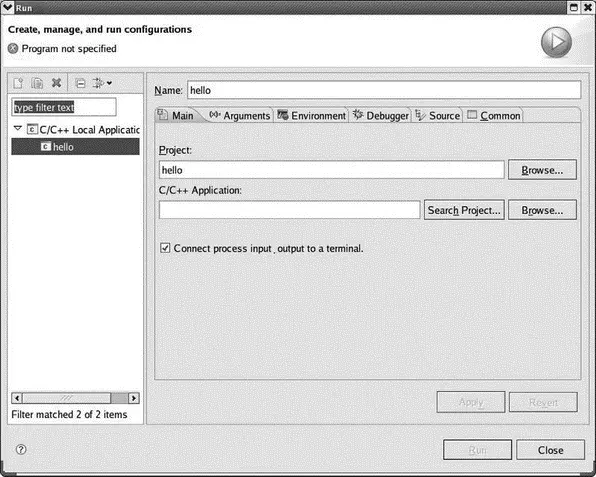
Figure 3.16: Launch configuration dialog.
The configuration name has been automatically set to match the project name.
You need to select an application to run by clicking Search Project…and then selecting /hello/Release/hello. Click the other tabs just to see what’s there. The hello program takes no arguments and has no environment variables. We’ll look at the Debuggertab in the next chapter.
Now click Applyand then click Run. The program output appears in the Console view. With at least one launch configuration established, the other Run menu actions become meaningful:
• Run: Rerun the most recent launch in Run mode.
• Run History: Presents a submenu of configurations launched in Run mode. Currently there’s only one.
Читать дальшеИнтервал:
Закладка:
Похожие книги на «Embedded Linux development using Eclipse»
Представляем Вашему вниманию похожие книги на «Embedded Linux development using Eclipse» списком для выбора. Мы отобрали схожую по названию и смыслу литературу в надежде предоставить читателям больше вариантов отыскать новые, интересные, ещё непрочитанные произведения.


Обсуждение, отзывы о книге «Embedded Linux development using Eclipse» и просто собственные мнения читателей. Оставьте ваши комментарии, напишите, что Вы думаете о произведении, его смысле или главных героях. Укажите что конкретно понравилось, а что нет, и почему Вы так считаете.